| Denim Blues Tag I'm using the awesome artwork of Keith Garvey. You must purchase a license to use his artwork. You can purchase one HERE. Supplies Tube of Choice Scrapkit Funky Denim can be found at misfits scrapz HERE. Mask Vix_Mask36 Here Then go to goodies to find her masks. Font Blue Jeans 5 Lets Begin Open a new canvas 600X600 transparent. Flood fill white. Open Paper 1 from the scrapkit. Copy and paste as a new layer. Go to Layers Load/Save Mask Mask from disk. Find your mask Vix_Mask36. Use the settings in the screenshot. 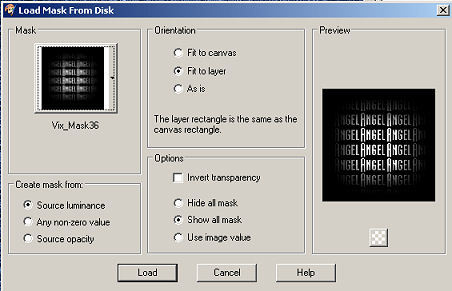
Delete your mask and click yes when prompted. Merge group. Now duplicate your mask and merge down. Open frame 1 copy and paste as a new layer. Go to your selection tool and set it on circle. Now draw out a circle that is just a little bit bigger than the middle of your frame. Go to Selections down to Edit Selection. See screenshot. 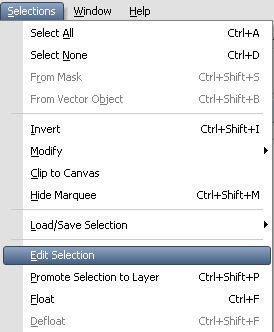
Your selection should now be a solid red circle.Use your deform tool to position your selection over the middle of the frame. Make sure your selection overlaps the frame a little bit. Go back to selections edit selections and click. You should now have marching ants again. Open paper 4 copy and paste as a new layer. Go to selections down to invert and then hit delete on your keyboard. DO NOT DESELECT. Move paper 4 under your frame. Now open the tube your going to use and paste it as a new layer. Position it in the frame when your happy with it's placement hit delete on your keyboard again. Deselect. Dropshadow your tube. See screenshot. 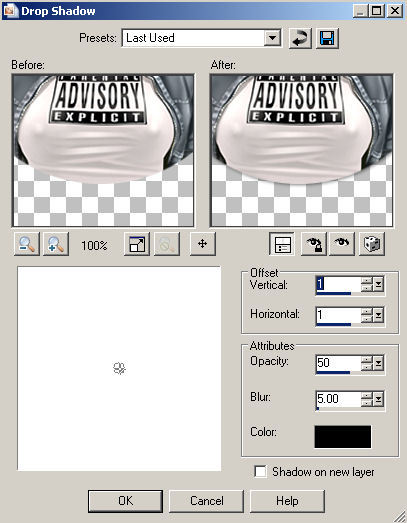
Now dropshadow your frame same settings. Open the pocket and resize it by 80%. Copy and paste as a new layer and place it on the bottom left of your tag. Go to Image Free Rotate and Rotate your pocket 20 degrees left. Dropshadow your pocket. Open the flower shape and resize 80% copy and paste as a new layer. Position the flower so it looks like its sticking out of the pocket. Now open the Heart shape resize 80% and position next to the flower. Dropshadow both. Open the beads and copy and paste as a new layer. Resize them until they fit on the pocket. Use deform tool to turn them just a little see my tag for example. Dropshadow. Now duplicate the beads and move them down just a little. Open the safety pin and resize it. Copy and paste it as a new layer place it on the right side of the frame. Dropshadow. Now use your eraser tool to erase a small part of the safety pin to make it look like it's sticking through the frame. See my tag for example. This is what you should have so far. 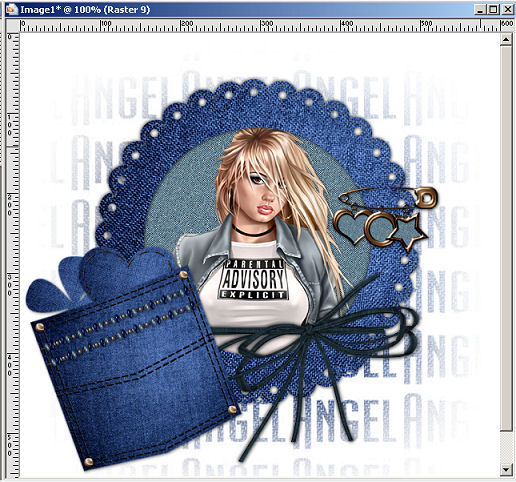
On your material pallet set your background color to pattern and find paper 1 use that as your pattern. Set your foreground color to black. Go to your text tool with these settings. Stroke width 2.0, Size 72 Font Blue Jeans 5. Type out your text and place where you like. Convert your text to raster layer. Dropshadow. Add your proper copyrights and your watermark. Resize your tag and save as a JPEG. I hope you have enjoyed this tutorial. Page Assembled by Tammy A.
Page and Tiles © Keith Garvey MPT3782
HTML By SnowKat @ Creative Elegance | 
 Important Announcement

