
|
Computer + Msn Lingo
|
Kat
|
Puter = Computer ISP = Internet Provider Server/Service Lurker = Someone who joins a Msn community and then never posts. Hacker = Someone who hacks into your community to cause problems. Lol = Laughing out loud. Rofl = Roling on floor laughing. Lmao = Laughing my a** off. Omg = Oh my God Thread = A started message on any message board.
|
  beatnikcafe beatnikcafe
|
11/30/2002
|
|
|
Eliminating Spaces Between Paragraphs
|
Kat
|
When you write an emal letter or post on the message board,
press the shift key down while pressing enter. This will stop the double space between lines.
|
beatnikcafe
|
12/1/2001
|
|
|
Helps on the Keyboard
|
|
Press both keys at the same time
1.Ctrl+D= Bookmark a page.
2.Ctrl+B= Open bookmarks-favorites Folder.
3.Ctrl+N= Open a new browser window.
4.Ctrl+W=Close a browser window.
5.Ctrl+H= Open the history folder.
6.Ctrl+R=Reload current page.
7.Ctrl+A=Copy all text on the page.
8.Tab=Move from link to link on a page.
9.Ctrl+L=Open the location field (url).
10.Ctrl+C=Copy to the clipboard (text).
11. Ctrl+V=Paste from the clipboard (text).
12.Ctrl+P=Print current page.
13.Ctrl+S=Save as.
14. Esc=Stop a page from loading.
15.Space=Scroll to the end of a web page by pressing right
side of space bar.
|
beatnikcafe
|
12/1/2001
|
|
|
BackGround Tip
|
Sweet Liberty
|
Don't use the file cabinet to upload your backgrounds. Your backgrounds will not show up to anyone but members and they will have to be signed in to see them. To everyone else they will appear as a plain white page. Upload your backgrounds to your photo album for best results.
|
InfamousStarDancer
|
1/14/2002
|
|
|
Double Background Formula
|
|
<html>
<CENTER>
<TABLE background="Your Background URL" border=2 cellPadding=20cellSpacing=0 width="100%">
<TBODY>
<TR>
<TD width="100%">
<P>
<CENTER>
<TABLE background="Your Background URL" border=2 cellPadding=40 cellSpacing=0 width="90%">
<TBODY>
<TR>
<TD width="90%">
<P>
<CENTER>
|
InfamousStarDancer
|
2/22/2002
|
|
|
Stop Viruses From E-mailing Your Friends
|
Sweet Liberty
|
Trick your address book!
Who among us doesn't know someone who has experienced the embarrassment
of unknowingly spreading a computer virus via their email address book?
It's time to STOP this from happening by TAKING CONTROL of your email
program! For those who are unaware, many computer viruses spread
themselves by sending themselves to everyone in your address book. Imagine
how you would feel if you were unknowingly infected with a computer virus,
and worse yet, your friends, family, and business contacts were being
targeted by your computer! Well, if you want to avoid this sort of thing,
here's a great tip:
This tip won't prevent YOU from getting any viruses (you have to scan
those attachments yourself before opening them to do that), but it will
stop those viruses from latching onto your address book and sending itself
out to others.
To avoid spreading computer viruses, create a contact in your email address
book with the name :
** !0000
with no email address in the details.
This contact will then show up as your first contact. If a virus attempts
to do a "send all" on your contact list, your pc will put up an error
message saying that: "The Message could not be sent. One or more recipients
do not have an e-mail address. Please check your Address Book and make sure
all the recipients have a valid e-mail address." Your messages to an
individual or individual addressees will not be affected. You click on OK
and the offending (virus) message would not have been sent to anyone. Of
course no changes have been made to your original contacts list. The
offending (virus) message may then be automatically stored in
your "Drafts" or "Outbox" folder. Go in there and delete the offending
message. Problem is solved and virus is not spread.
|
InfamousStarDancer
|
2/26/2002
|
|
|
Triple Background Formula
|
|
<html>
<CENTER>
<TABLE background="Your Background URL" border=2 cellPadding=40 cellSpacing=0 width="100%">
<TBODY>
<TR>
<TD width="100%">
<P>
<CENTER>
<TABLE background="Your Background URL" border=2 cellPadding=40 cellSpacing=0 width="90%">
<TBODY>
<TR>
<TD width="90%">
<P>
<CENTER>
<TABLE background="Your Background URL" border=2 cell Padding=40 cellSpacing=0 width="85%"><P>
<TBODY>
<TR>
<TD width="85%">Your Content Goes Here</td>
</tr>
</table>
</center>
</td>
</tr>
|
InfamousStarDancer
|
2/22/2002
|
|
|
Animation help
|
Kat
|
- click on "customize" when you optimize and set partial transparancy to convert pixels less than 40 (default is 1 %, I believe) andto blend with a light color. White or light gray seems to work best.
|
![]() Kat Kat
|
1/28/2006
|
|
|
AS Settings
|
|
You need to open a new animation frame and use your brush and make a dark line thru it. This is just so your wizard has something to work with. Any line will do but I use a dark one so I can tell if it comes out looking like the one I started with... Go to file..Optimization Wizard... On the screen that comes up I have these checked..  then click next at the bottom... I have the little lever pushed to the very top, and I have "use these settings.... " checked, ( I change these sometimes but not often.)...now while you are in this screen click on the "customize" button, Now you have this screen... (Note: instead of the "3 colors" that are shown in this graphic.. set the colors numbers to 255..) 
Click on Optimizations at the top of that screen..
I don't have anything checked in there. now click on the Partial Transparency at the top of that screen...  Click OK and keep clicking next till you are finished. You will be able to see if the end result looks like the one you started with. Sometimes you need to play around with them to make it look the same, But these are the setting I use the most. Sandie |
![]() Kat Kat
|
10/16/2006
|
|
|
Copy screen
|
Kat
|
- When you have the screen up that you want to copy, press the "alt" key and then press the "print scr" key (usually located on the top right side of the keyboard.
- Open Paint
- Right click in the work area and select "Paste"
- Click on File>save as
- Type in a title. In the drop down menu for the file format, select .jpeg, .jpg, or .gif. (Paint normally defaults to saving pictures as bitmaps and those file types are generally a lot larger than others.) If you find you do not have any other save options (other than bitmap) clean out cookies and temporary internet files and try again.
|
![]() Kat Kat
|
2/1/2006
|
|
|
Create restore point
|
|
 |  |  | | |  Don't Forget to Create Restore Points
When everything's going particularly well with your computing day, you don't usually think about System Restore. But you should. While smiling blissfully, capture that happy moment in time by creating your own restore point. Then when things aren't going particularly well, return to happier times by using that restore point. The more good restore points you've created, the easier it will be to return to good times. To maximize System Restore's potential, create your own restore points with your own labels. Here's how: - Call up System Restore by going to the Start menu's All Programs menu. From there, pop open the Accessories menu and then the System Tools menu, where you find System Restore. The Welcome to System Restore window appears.
- Choose Create a Restore Point and then click Next.
- When Windows asks you to describe your new restore point, type in something that helps you remember why you made the restore point. For instance, type in Nothing has crashed for a week -- if only my computer could always run this smoothly! You needn't add the date in your description because Windows automatically gives it a date stamp.
- Click the Create button, and you're done.
For more information like this, get a copy of Windows XP For Dummies, 2nd Edition, by Andy Rathbone. Related Articles Tips and Tricks for Better Scanning and Editing Customizing Display Settings in Windows Me Ward Off Computer Viruses with Scheduled Scans | | | |
|
![]() Kat Kat
|
9/14/2006
|
|
|
Crop something In AS
|
|
Not sure if this will help or not but here is another explaination...
In AS, when you want to crop something,, take the crop tool and make the mark around the part you want to save... In this I wanted to save just the hand so I used the crop tool and outlined just the hand. (This is the method you would use to crop just part of that screen shot that you saved and make it smaller.) 
Then go right to the word "crop" on the top and click "crop". You will have just the hand.. 
(Since it was on a transparent background it shows just the hand.)
Now here is when you use that "Option" at the top. You have a tag, (it can be several frames and it works perfect to just use the crop tool on one frame and not each one) Now you want to crop that but you want to be sure that part of your graphic isn't cut off. This also includes the name you have added).  You use the crop tool to draw around your graphic.. go to Options and click on the "Surround the opaque area". That is the only thing on that screen that you need to click. That right hand pic above shows where that crop line moves to when you click the OK at the bottom.  The graphic to the left of the Options screen shows where that line is if you have a name added to your graphic. It will always include the name if you use the "surround the opaque area". Now when you click "crop" it will crop it perfect and never cut off anything from your graphic.
Ok to select just a part of that graphic, use your crop tool and then crop. To bring that crop as close as possible without taking any of your graphic off... use that "options" first.
Hope I didn't confuse you all. If there are any questions. just holler.
|
![]() Kat Kat
|
4/5/2007
|
|
|
How to use the Onionskin feature in Animation Shop
|
|
How to use the Onionskin feature in Animation Shop This is a wonderful tool that I wished I'd known about when I first started struggling with animations! Hope your learning it now, speeds up your learning curve and prevents some of the bumps and bruises I got from bangin' my head on my computer desk from frustration!  See the little pointy finger on the example below? That's the icon you click to activate the Onionskin tool. 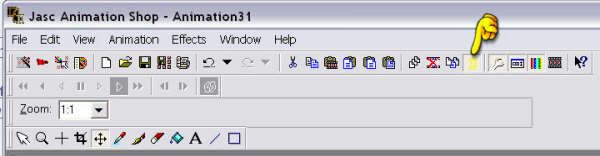
Here's how you use it: Say you have a little truck that you want to back up in several frames. You can do this so easily by: 1) Bringing your truck up in AS. Make several copies of it. (Note: It's always a good idea to make a few more than you think you might need. You can always delete the extras.) 2) Click on the Onionskin icon and you'll get a "ghost" image on the frames following the first image. See below 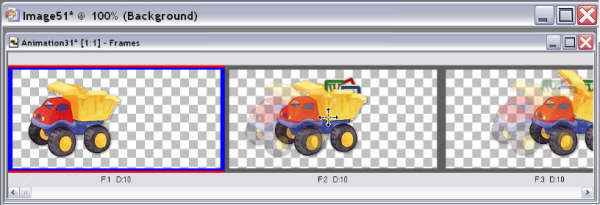
3) Get your mover tool and in your 2nd frame, move the truck backwards...or forwards...or up and down...however you want your image to move. Then go to next frame and you'll see where you just moved your truck by the "ghost" image from the previous frame and you can move your truck to where you want it to be! NO MORE GUESSING! 
|
![]() Kat Kat
|
3/13/2007
|
|
|
PSP
|
|
Find out what color you want to make it and write down the Hue and Sat numbers (in the red box below) <<If you want to colorize a certain part of the image select your freehand and outline what you want to change the color of>> Next use Shift L (Colorize) and this screen pops up Type in the Hue and Sat numbers and click ok. There is an arrow to the left of the eye (above), click on that and it will show the color change on your actual image.
|
![]() Kat Kat
|
9/11/2006
|
|
|
What to do if your message does not post
|
Kat
|
This informaton came from someone in Community Feedback. if you click on the Send Message button and your post turns white and doesn't appear to send, don't worry - its not lost and you don't have to retype your message! - just Right Click inside that blank white post window, choose Refresh, then a new little window will pop up, click on RETRY. You might have to do that more than once when the Hiccups are bad Feel free to pass this tip along!! This is great advice if you are like me and forget to copy before you hit send!
|
![]() Kat Kat
|
1/23/2006
|

 Important Announcement
