MSN Home  |  My MSN  |  Hotmail
Sign in to Windows Live ID Web Search:   
go to MSNGroups 
Free Forum Hosting
 
Important Announcement Important Announcement
The MSN Groups service will close in February 2009. You can move your group to Multiply, MSN’s partner for online groups. Learn More
!!!!!Friend's Family Fellowship[email protected] 
  
What's New
  
  Welcome to Friend's Family Fellowship  
  Statement of Faith  
  `°�?¸\�?¸.•°`°�?¸\�?¸.•°`  
  God's Awsome Promises  
  `°�?¸\�?¸.•°`°�?¸\�?¸.•°`  
  Messages  
  `°�?¸\�?¸.•°`°�?¸\�?¸.•°`  
  Pictures  
  `°�?¸\�?¸.•°`°�?¸\�?¸.•°`  
  Family and Friends  
  In Memorium  
  `°�?¸\�?¸.•°`°�?¸\�?¸.•°`  
  Lurking  
  `°�?¸\�?¸.•°`°�?¸\�?¸.•°`  
  Fun and Games  
  `°�?¸\�?¸.•°`°�?¸\�?¸.•°`  
    
    
  Links  
  Tutorials  
  Tutorials  
  Artist Permissio  
  Disclaimer  
  
  
  Tools  
 
Tutorials : Blinds
Choose another message board
 
     
Reply
 Message 1 of 1 in Discussion 
From: friend_555  (Original Message)Sent: 3/14/2008 1:26 AM
BLINDS TILE
 
Very Basic beginners tile - made in PSP v9 - no outside filters used.

This tutorial was written by
[email protected] for Kays Tags, tiles & Webstuff and Friends PSP & Backgrounds Made Easy AS 1.2.3.
and must not be copied without my permission.
 
 
 1. Open new transparent image, 150x150 pixels.

Photo Sharing and Video Hosting at Photobucket

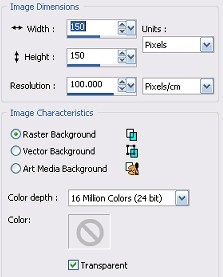
 2. Floodfill (match mode - none, Blend mode - normal, opacity 100)with colour of your choice - I am using #c00000  

Photo Sharing and Video Hosting at Photobucket

 3. Go to Effects > Texture effects > Blinds  

Photo Sharing and Video Hosting at Photobucket

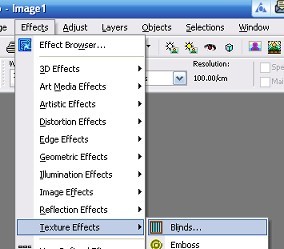
 4. Use these settings
(width 25, Opacity 40, Colour Black, Horizontal - not checked, Light from left/top - checked)

 Photo Sharing and Video Hosting at Photobucket

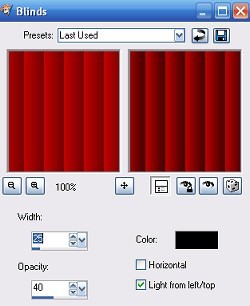
 5. That is it - your first tile!!!  Save as a JPEG

Photo Sharing and Video Hosting at Photobucket

 For more variations play with the settings in step 4 - vary the width, the opacity, make some tiles horizontal.  Use different colours in the color box.


 6. This is exactly the same colour (#C00000) - I changed the settings to width 5, opacity 100

Photo Sharing and Video Hosting at Photobucket

 7. Exactly sames settings as in step 6 but color in blinds option box was white.

Photo Sharing and Video Hosting at Photobucket

 8. Exactly same settings as in step 4 but using a gradient.

Photo Sharing and Video Hosting at Photobucket

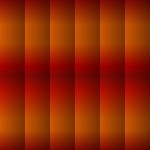
 9. Another gradient and width set at 15

Photo Sharing and Video Hosting at Photobucket

I would love to see your results, and please give me some feedback on this tutorial - too short? too long? Easy to understand?


First  Previous  No Replies  Next  Last