MSN Home  |  My MSN  |  Hotmail
Sign in to Windows Live ID Web Search:   
go to MSNGroups 
Free Forum Hosting
 
Important Announcement Important Announcement
The MSN Groups service will close in February 2009. You can move your group to Multiply, MSN’s partner for online groups. Learn More
!!!!!Friend's Family Fellowship[email protected] 
  
What's New
  
  Welcome to Friend's Family Fellowship  
  Statement of Faith  
  `°�?¸\�?¸.•°`°�?¸\�?¸.•°`  
  God's Awsome Promises  
  `°�?¸\�?¸.•°`°�?¸\�?¸.•°`  
  Messages  
  `°�?¸\�?¸.•°`°�?¸\�?¸.•°`  
  Pictures  
  `°�?¸\�?¸.•°`°�?¸\�?¸.•°`  
  Family and Friends  
  In Memorium  
  `°�?¸\�?¸.•°`°�?¸\�?¸.•°`  
  Lurking  
  `°�?¸\�?¸.•°`°�?¸\�?¸.•°`  
  Fun and Games  
  `°�?¸\�?¸.•°`°�?¸\�?¸.•°`  
    
    
  Links  
  Tutorials  
  Tutorials  
  Artist Permissio  
  Disclaimer  
  
  
  Tools  
 
Tutorials : Tiles
Choose another message board
 
     
Reply
 Message 1 of 1 in Discussion 
From: friend_555  (Original Message)Sent: 3/14/2008 1:30 AM
SEAMLESS TILE FROM TUBE/GRAPHIC
 
Very Basic beginners tile - made in PSP v9 - no outside filters used.

This tutorial was written by
[email protected] for Kays Tags, tiles & Webstuff and Friends PSP & Backgrounds Made Easy AS 1.2.3.
and must not be copied without my permission.


1. Open the tube or graphic you want to make a tile from. 
(To use this image just right click on it and save it to your computer - open in PSP)

Photo Sharing and Video Hosting at Photobucket

2. Right click on image title bar and select "copy", minimise the image, you are finished with it. Photo Sharing and Video Hosting at Photobucket
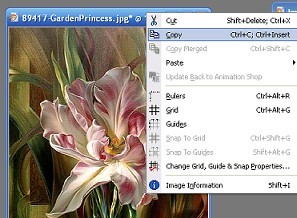
 3. Open new transparent image, 150x150 pixels.

Photo Sharing and Video Hosting at Photobucket

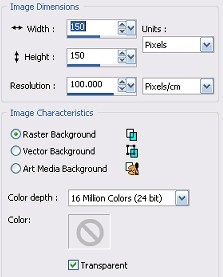
 3. With your new image highlighted go to Selections>select all (or press Ctrl-A), this will give you "marching ants" around your new image

  Photo Sharing and Video Hosting at Photobucket

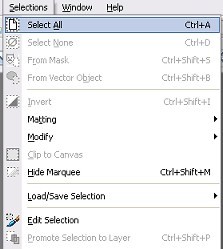
 3. Right click on title bar or your new image and choose > Paste > paste into selection

  Photo Sharing and Video Hosting at Photobucket

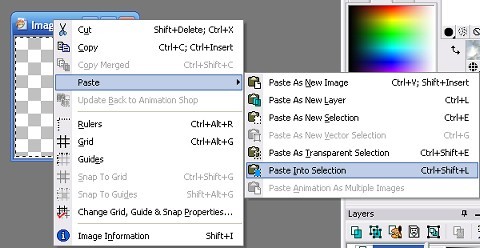
 4. Go to Selections>Select none (or press Ctrl+D)

 Photo Sharing and Video Hosting at Photobucket

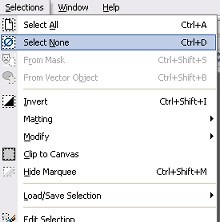
 5. Your image should look like this

Photo Sharing and Video Hosting at Photobucket

 6. Go to Effects>Image Effects>Seamless Tiling

Photo Sharing and Video Hosting at Photobucket

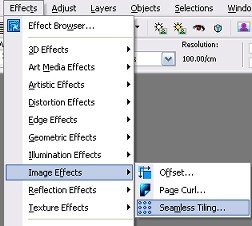
 6. Apply default settings

Photo Sharing and Video Hosting at Photobucket

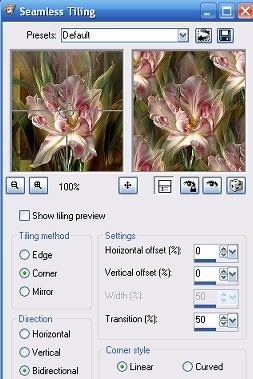
 7. Thats it!!  Easy Peasy - you have your seamless tile.  Save it as a JPEG

Photo Sharing and Video Hosting at Photobucket

 8. For a more "muted" tile play around with the opacity slider on your layer pallette.

Photo Sharing and Video Hosting at Photobucket

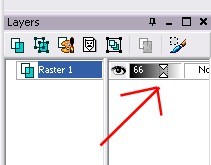
 9. When happy save as a JPEG

Photo Sharing and Video Hosting at PhotobucketPhoto Sharing and Video Hosting at Photobucket

I would love to see your results, and please give me some feedback on this tutorial - too short? too long? Easy to understand?


First  Previous  No Replies  Next  Last