MSN Home  |  My MSN  |  Hotmail
Sign in to Windows Live ID Web Search:   
go to MSNGroups 
Free Forum Hosting
 
Important Announcement Important Announcement
The MSN Groups service will close in February 2009. You can move your group to Multiply, MSN’s partner for online groups. Learn More
Highland High School Survivors[email protected] 
  
What's New
  
  Home Page  
  Merry Christmas!  
  Happy Thanksgiving!  
  Happy Halloween  
  ******Messages*******  
  General  
  **Tributes  
  **How to...  
  **Chicken Soup  
  **Great Recipes  
  Groups 10 Commandments  
  School collage  
  Memorial For Cindee (Schwenn)  
  Memorial For Dallas (Roy Shultz)  
  In Memory of Carl Lon Humphrey  
  In Memory Of Lori Ann Mankowski  
  **In Honor of Our Fallen Troops**  
  Pictures  
  Links  
  MSN Code of Conduct  
  The Rez.  
  Zodiac  
  In Memory  
  Richard Knierim, II Memorial  
  
  
  Tools  
 
**How to... : THIS IS ONE OF THE WAYS YOU CAN POST GIFS TO MESSAGE BOARDS
Choose another message board
 
     
Reply
 Message 1 of 10 in Discussion 
From: ﻚﻕ1979ﻚﻕ  (Original Message)Sent: 6/10/2004 8:28 AM

THIS IS ONE OF THE WAYS YOU CAN POST GIFS TO MESSAGE BOARDS

 I will try to make this as simple as possible.

 If you already have your own gifs stored somewhere on your PC you will need to put them in a PHOTO ALBUM somewhere. If you do not have any stored, feel free to store them at one of the members storage sites or take some off of this sites picture albums so you can at least see some success. The tutorial MAKE AN ALBUM covers the process of making a photo album.

For those of you who don't know how to store your photos yet......please read, MAKE A FOLDER.

When inserting a gif into a message board post, first type your message (duh) then place your cursor where you want to insert the gif. Then you will need to clik on the little square thingy at the top of the page that looks like it has mountains in it. The mouse over should say......INSERT PICTURE...


Now....clik on that and a new window will pop up. On the left side of that window you will see a list of sites you belong to, this site being one of them.


Clik on the site that has the picture album where your gifs are stored. If it is here, clik on HoppysHelpForPostingPics

Another window will pop up.....this is the window that displays the photo albums.


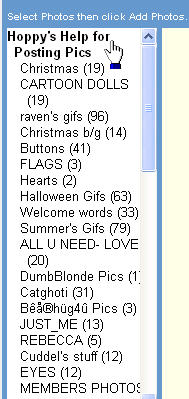
Now......clik on the photo album that has the gif that you want to insert.....  A window will open displaying the gifs or pictures available for you to post. You will be able to see them and their names.


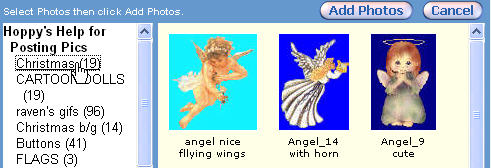
Clik ONCE on the gif you want to insert......a border will appear around the picture showing that you have selected it......then clik on ADD PHOTOS at the top of the page. Your page will refresh..and you will see your gif working. TAH....DAHHHHHHH

See ........that wasn't so hard huh.......after you do it a couple of times it is real easy. Only takes a few seconds really once you get it down. Don't get discouraged if it doesn't work the first time........we have a lot of room on the message boards to practice on.

If you need help.....feel free to email me or post something on the " ?'s About Gifs" board and I will be HOPPY to help you. If I don't know the answer, hopefully someone in here will.  Don't be bashful........we all had to start somewhere, and we all are still learning.


First  Previous  2-10 of 10  Next  Last 
Reply
 Message 2 of 10 in Discussion 
From: FoxyladySent: 8/25/2004 12:01 AM
And you can post several gifs in one message by clicking on several gifs in one album (and don't forget to add them), then go to another album and choose some more. I must have 20 albums, so I get stuff from different ones.

Reply
 Message 3 of 10 in Discussion 
From: FoxyladySent: 8/25/2004 12:07 AM


Not getting anywhere am I, (LOL)


Reply
 Message 4 of 10 in Discussion 
From: ﻚﻕ1979ﻚﻕSent: 8/26/2004 7:03 AM
The trick is to choose only one row, and one column, then if you start putting things in it, it will stretch;
 

 See like this, if I leek typing of add a picture like this,

 It gets even bigger, just keep practicing you'll get it!!!    

Here are some bars I have collected along the way, feel free to take any you like  The Background is another story, we will try that later!


Reply
 Message 5 of 10 in Discussion 
From: ﻚﻕ1979ﻚﻕSent: 8/26/2004 3:02 PM
Adding a Background from the Photo Album:

To add a background to a custom page or message, first put your background into the photo album.  Then open to full size.  Right click on it, choose properties, highlight the url - (you must scroll to get it all or triple-click on it), and copy (Control+c). 

You then should paste to note pad so you will have it if you need it again later.

On your page or message board where you want the background, put your cursor where you want the table to be and click the table icon from the edit menu.  Change the columns and rows to 1, and create the table as usual.

When you click on 'Background' this window opens and you paste (use control V) into the box (you may also choose a color to go behind the graphic if you like).  Click Insert Table and you are done.  Note that there will be a tiny little box with the background in it.  Put your cursor in the box and build your page inside of it.

NOTE:  If you are changing an existing background or adding one after the table has been created, you must click on the EDIT TABLE tab (which is the grayed out tab heading in the illustration above).  The old URL will show in the URL location if you had a background previously.  Delete that and control+v copy in your new one.  The button at the bottom will say "Update Table" instead of insert table.

Adding a Background to a List page item:  

You still have to use tables to get a background color on a list item, and there will be "white space" between list items.  The background color only shows on the Details View, not on the List View version of the page. 

You can pretty much copy an entire MSN Custom Web Page into a list item in the Description box, if you wanted!  Like a custom page or mail message, you can only get a background if you insert a table.  Of course all the formatting rules apply, so if the list entry is short, the table will be small.  If it's large, it can cause a hugely wide page and side scrolling!  But if you are sure you want a common background on every item in your list page, here's how:  

  • Open the new page
  • Click on More...
  • Click on Change the Settings
  • Click on Customize Details View
  • Position your cursor in the editing box and insert a 1x1 table and follow the instructions above to insert the background.
  • Drag the link and Description into the table and arrange them as you prefer - You can also remove the dash between the Link and Details forms that is the default setup for a list page, or add a paragraph break (enter key) or line break (shift+enter) between them
  • Click the "show details view as default" radio button and enter the number of entries to display on a page
  • Check the box under Default Sort Order (this saves the order the list items are in)
  • Click on Save Settings

Adding a Background from the File Cabinet or other web location: Upload your graphic to the file cab or other web site that you have access to.  Everything works the same way, except you copy the URL from the browser address bar of the open graphic.  Paste that URL into the 'Background Image URL' location in the Table Background tool.

Note that since MSN locked the file cabs, non-members and members who are not signed into MSN Groups will NOT be able to see the backgrounds.

Using Double Backgrounds & editing the table html code

Easiest way:  Create the outer table as per the first item below, but set the Cell Padding to the pixel width you want - try 30 for wider outer table margins, and 2-4 for narrow ones.  This ensures the identical amount of space around all 4 sides of your tables.

The outer Table:  After you insert the table and center it, you will see this code when you look in the html view - it will be between the < open and > close of the <TABLE<>specifications (can't put the actual code here without it turning into a table!):

You want to add this to it:  width="100%" although it's not necessary because the table will stretch to the full MSN page width - or more if you put too much in it.  You can also use a specific number of pixels - e.g. 622 width="622" when centered gives you the smallest equal sized sliver of white space on either side of your main background table (if you haven't stretched your nav bar wider than the normal width).  Add the width statements in after the Cell Padding command, and before the close of the table specification >. The inner tables(s):  Ensure there are no excess spaces or paragraph breaks in the outer table.  Now insert a second 1-celled table into the outer one.  It will be automatically centered if you used the Cell Padding specification noted above.  Repeat for additional tables, editing the the number of pixels for Cell Padding to the amount you require.

Reply
 Message 6 of 10 in Discussion 
From: faith58Sent: 9/5/2004 12:07 AM
Thanks alice and drena for all your help..
Jan

Reply
 Message 7 of 10 in Discussion 
From: MSN Nicknamecat-rn1Sent: 9/18/2004 5:10 AM
 

Reply
 Message 8 of 10 in Discussion 
From: MSN Nicknamecat-rn1Sent: 9/18/2004 5:13 AM
 

Reply
 Message 9 of 10 in Discussion 
From: ﻚﻕ1979ﻚﻕSent: 9/18/2004 5:13 AM

Reply
 Message 10 of 10 in Discussion 
From: MSN Nicknamecat-rn1Sent: 9/18/2004 5:14 AM
and to the siamese twins...lol

First  Previous  2-10 of 10  Next  Last 
Return to **How to...