|
|
 |
 |
Reply
 | |
Emergency Shelter building out doors 4 PARTS The most important concept in survival (besides mental attitude) is shelter construction. A human can die from exposure to the elements in minutes in the Earth's coldest regions and can develop chronic hypothermia from exposure to wind and rain at temperatures as high as 60 degrees! The two most important concepts in shelter construction are: LOCATION
INSULATION-Type and amount of building material "A good shelter in a bad location is a bad shelter." Tom Brown jr. Selecting a site for your survival shelter is critical to your survival, convenience and comfort. There are several key concepts in choosing a site. Keep in mind that in a survival situation you may not be able to follow all the principles in this list, but the more you are able to adopt the greater your chances for survival.
A quality survival shelter is:
Safe
Dry
Properly located
and Warm
SAFE - do not build your shelter under dead trees or branches, near or on a wasp or insect site, near or on an animal bed or lay (due to ticks and fleas), near or on an animal trail, and be certain to keep all source of flame at least fifteen feet downwind from a survival shelter unless that shelter is built to house a fire (e.g. domed shelter with fire pit)
DRY - Do not build a shelter closer than 75 yards from a stream, lake, pond, or other large body of water or your shelter will sponge up ambient air moisture. Do not build your shelter in a low drainage area or along flooding or overflow water runways. Avoid building your shelter in the middle of a forest due to the high moisture content trapped by tall trees. Relatively flat, elevated land is generally the most desirable type of terrain but rain and drainage patterns must influence your decision about where to build!
PROPERLY LOCATED - this means your shelter should be located in a TRANSITION AREA. That is, an area of low brush between a forest and a field. The greatest amount of building material will be found in these areas (this is discussed in greater detail below). Furthermore the small trees and low brush will protect your shelter from wind, rain, and direct sunlight. Also, the greatest number of animals live in transition areas. As a result of having your shelter in a transition area you will increase the likelihood of locating and trapping or hunting wild game.
WARM - this is a RELATIVE term! Your shelter should be protected from wind, water, and draft. A survival shelter must be able to keep your body temperature at their normal levels despite environmental conditions. Don't expect even the best debris hut or other survival shelter to be Club Med. Focus on making your shelter FUNCTIONAL first, comfortable second.
|
|
 First First
 Previous
2-8 of 8
Next Previous
2-8 of 8
Next Last
Last
|
 |
Reply
 | |
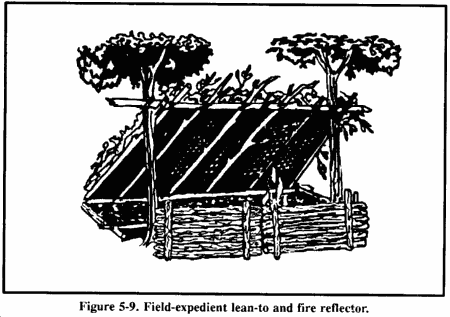
Field-Expedient Lean-To Part 2 If you are in a wooded area and have enough natural materials, you can make a field-expedient lean-to without the aid of tools or with only a knife. It takes longer to make this type of shelter than it does to make other types, but it will protect you from the elements. 
You will need two trees (or upright poles) about 2 meters apart; one pole about 2 meters long and 2.5 centimeters in diameter; five to eight poles about 3 meters long and 2.5 centimeters in diameter for beams; cord or vines for securing the horizontal support to the trees; and other poles, saplings, or vines to crisscross the beams. To make this lean-to-- - Tie the 2-meter pole to the two trees at waist to chest height. This is the horizontal support. If a standing tree is not available, construct a biped using Y-shaped sticks or two tripods.
- Place one end of the beams (3-meter poles) on one side of the horizontal support. As with all lean-to type shelters, be sure to place the lean-to's backside into the wind.
- Crisscross saplings or vines on the beams.
- Cover the framework with brush, leaves, pine needles, or grass, starting at the bottom and working your way up like shingling.
- Place straw, leaves, pine needles, or grass inside the shelter for bedding.
In cold weather, add to your lean-to's comfort by building a fire reflector wall. Drive four 1.5-meter-long stakes into the ground to support the wall. Stack green logs on top of one another between the support stakes. Form two rows of stacked logs to create an inner space within the wall that you can fill with dirt. This action not only strengthens the wall but makes it more heat reflective. Bind the top of the support stakes so that the green logs and dirt will stay in place. With just a little more effort you can have a drying rack. Cut a few 2-centimeter-diameter poles (length depends on the distance between the lean-to's horizontal support and the top of the fire reflector wall). Lay one end of the poles on the lean-to support and the other end on top of the reflector wall. Place and tie into place smaller sticks across these poles. You now have a place to dry clothes, meat, or fish. |
|
Reply
 | |
Natural Shelters Part 3 Do not overlook natural formations that provide shelter. Examples are caves, rocky crevices, clumps of bushes, small depressions, large rocks on leeward sides of hills, large trees with low-hanging limbs, and fallen trees with thick branches. However, when selecting a natural formation-- - Stay away from low ground such as ravines, narrow valleys, or creek beds. Low areas collect the heavy cold air at night and are therefore colder than the surrounding high ground. Thick, brushy, low ground also harbors more insects.
- Check for poisonous snakes, ticks, mites, scorpions, and stinging ants.
- Look for loose rocks, dead limbs, coconuts, or other natural growth than could fall on your shelter.
|
|
Reply
 | |
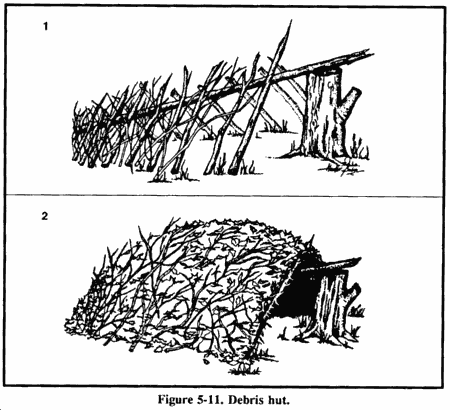
Debris Hut Part 4 For warmth and ease of construction, this shelter is one of the best. When shelter is essential to survival, build this shelter. To make a debris hut - Build it by making a tripod with two short stakes and a long ridgepole or by placing one end of a long ridgepole on top of a sturdy base.
- Secure the ridgepole (pole running the length of the shelter) using the tripod method or by anchoring it to a tree at about waist height.
- Prop large sticks along both sides of the ridgepole to create a wedge-shaped ribbing effect. Ensure the ribbing is wide enough to accommodate your body and steep enough to shed moisture.
- Place finer sticks and brush crosswise on the ribbing. These form a latticework that will keep the insulating material (grass, pine needles, leaves) from falling through the ribbing into the sleeping area.
- Add light, dry, if possible, soft debris over the ribbing until the insulating material is at least 1 meter thick--the thicker the better.
- Place a 30-centimeter layer of insulating material inside the shelter.
- At the entrance, pile insulating material that you can drag to you once inside the shelter to close the entrance or build a door.
- As a final step in constructing this shelter, add shingling material or branches on top of the debris layer to prevent the insulating material from blowing away in a storm.

|
|
Reply
 | |
The individual accessing this site assumes the risk of safe practices. Failure to do so could result in severe personal injury (or death) and/or property damage.
The users assume all risk, responsibility and liability whatsoever for any and all injuries (including death), losses or damages to persons or property (including connsequential damages), arising from the use of any of this data.
|
|
Reply
 | |
The lean to that is illustrated is not steep enough to not leak in even a light rain. These old military manuals are pretty good but you need to get out and build one and spend the night in it. I carry a small piece of ripstop nylon in a day pack when I go out. it is only ten by ten but it will build a great sun or rain cover. The debri shelter that is shown is practically worthless in use. You will do better to put leaning pole around a sapling and start piling stuff on it. Make it as steep as you can and it will turn water pretty good. If you are making a debri shelter you need to remember that steep and deep means dry and warm. Keep piling shit on untill you don't have any more time to do so. You cannot get enough between you and the outside. People forget that it is as important to keep off the ground as it is to keep out of the open air and rain. I like to carry a bag made out of rip top nylon that I can fill with stuff to make a bag to sleep on. Neither the bag or the "tarp" take up much room in a day pack. In fact I keep them in zip lock bags. Avoid mistakes in the woods and carry a little day pack. It will save you gobs of suffering. |
|
Reply
 | |
Natural shelter is pretty easy to find but hard to make livable.
Most consist of depressions that will draw dampness.
A combination is great and keep your idea of natural shelter open.
I spent two days in a hollow tree with a tarp.
I knew a man who lived an entire missouri winter and spring inside a hollow tree that he expanded with the use of debri.
Of course the trees are hollow because they are dead in the middle so be careful about rotted limbs. |
|
Reply
 | |
most of what is posted here is for the newbe ( no skills ) ask and I will give out more info, if I have it...  |
|
 First First
 Previous
2-8 of 8
Next Previous
2-8 of 8
Next Last
Last
|
|
|
 Free Forum Hosting