 Suggested materials: Suggested materials: - Assortment of cardboard boxes, large and small
- Wrapping paper tubes or paper towel and toilet paper tubes
- Paper plates
- Empty kleenex boxes (and other lightweight paper/cardboard items)
- Small plastic containers
- Popsicle sticks
- Lots of glue - white glue and gluesticks
- Old wrapping paper or wall paper
- Heavy scissors and a sharp knife
- Brown wrapping tape
- String or yarn
- Toothpicks
- Spray paint
- Cut out pictures from birthday cards or calendars
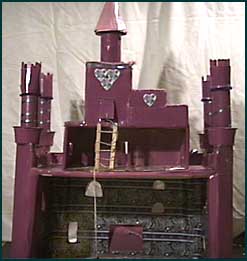
TO START: For the bottom/base we used one side of a large box (I think a computer came in it), cut into a rectangle. Make it several inches larger than the box you'll be using for your castle. Spray paint the top - we used black - you can painted water for a moat later. For a sturdier base, you could buy a large piece of tagboard or even particle board if you have the budget for it. For the main building, cut the flaps off a medium size box and lay it on its side so your main room has one open side. Glue the main building onto the base. Using a sharp knife, cut out windows and doors anywhere you want. Some of them we left the top side attached and propped the flap open with toothpicks or popsicle sticks. Some of them we cut out small rectangles and decorated the outside with small pieces of ribbon for window ledges. 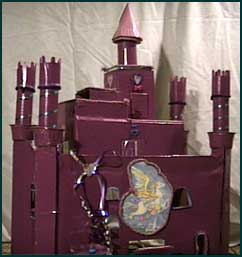 TURRETS: TURRETS:
Cut the tall tubes so they are about 6-8" taller than the main room and glue them to the four corners - these are your turrets. Wrap pieces of the brown tape around each to attach it to the box more securely and give the turrets a seamless look. (The brown packing tape turned out to be an ESSENTIAL part of this project!) For the tops of the turrets, you can use four small plastic cups. Cut a hole in the bottom of each cup, just wide enough so the cup will slide over the cardboard tubes. We broke popsicle sticks in half and glued them around each cup, then wrapped some brown tape around the bottom to cover the broken ends. Slide the cups over the tops of the cardboard tubes and secure with glue and brown packing tape.
TOP FLOOR: Using small boxes, design smaller rooms on the top floor. (This castle actually has three levels.) Using a sharp knife, cut doors and windows before you glue them to the top of the main building. We also used some small boxes glued to the sides of our building. A paper plate, wrapped to make a cone, decorates the very top of the castle. There was a flag coming out of the top of it, made with a toothpick and scrap of material, but somewhere in playtime it got lost. PAINT & DECORATE: Spray paint the entire building with a light coat first and allow to dry. It may take 3-4 coats to entirely cover the cardboard brown. Our castles were for fairy dolls, so we painted ours pink and purple. NOTE: Our cardboard pieces were all different colors, so we had a problem when painting - the solution was to cover almost all of the cardboard with the brown tape, so it was all more or less the same color before we started painting. If you want it to look like stone on the outside, cut a sponge into a small rectangle. Dip the sponge in gray paint (or just a darker color than your walls) and dab it onto the outside of the building. Leave space between the "bricks" - kinda like this: -_-_- Glue wrapping paper or wall paper to the inside walls and floor. We used mostly gluesticks for this part, as the white glue is too wet. We also glued some pretty buttons onto the doors for door handles and things like that. DRAWBRIDGE:  On the opposite side of the open wall, make a 3-sided cut shaped like an upside down U. Bend it outward and down - this will be your drawbridge. Glue a popsicle stick to the outside top edge of the door. This will keep it from falling INto the building. On the opposite side of the open wall, make a 3-sided cut shaped like an upside down U. Bend it outward and down - this will be your drawbridge. Glue a popsicle stick to the outside top edge of the door. This will keep it from falling INto the building.
Make your drawbridge open and close by attaching a piece of string or yarn. To make it work from the inside, poke holes in the top two corners of the drawbridge, just under the popsicle sticks and in the walls of the main building near the top of the doorway. Tie a knot in the string and run it through one of the wall holes, working from the inside. Pull it all the way through till the knot hits the wall, then string it through one hole in the drawbridge, across the back of the bridge, into the other hole, and then into the other wall hole. Be sure to do this with the drawbridge open! We made the final hole loose enough that the string could slide through easily. On the inside wall we poked a thumbtack. When the drawbridge is closed, the string wraps around the thumbtack. To open the drawbridge, unwrap the string and let the door drop open. LITTLE THINGS: 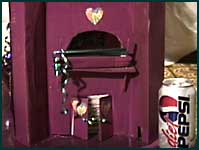 We added a small balcony on one side of our castle. First, we cut a three sided "window", leaving the bottom side attached. Then we glued and taped several popsicle sticks together to make the railing. To secure the railing and keep the balcony sturdy, we cut a slit in each side of the wall below the balcony and slid two popsicle sticks into the slits at an angle. These were glued to the railing and cardboard. We added a small balcony on one side of our castle. First, we cut a three sided "window", leaving the bottom side attached. Then we glued and taped several popsicle sticks together to make the railing. To secure the railing and keep the balcony sturdy, we cut a slit in each side of the wall below the balcony and slid two popsicle sticks into the slits at an angle. These were glued to the railing and cardboard.
We used cut out pictures to decorate the entire castle. Most of these were from old birthday cards the kids had. For the front picture we used a picture of a unicorn from an old coloring book. Almost all the windows were decorated with ribbon or material. And all the doors had door knobs made out of buttons or little plastic things we had. We wrapped ribbon around the turrets FURNISHINGS: Make a staircase using several different size boxes glued together. Cover with wrapping paper or wall paper. We didn't glue our staircase to the floor because we wanted the kids to be able to move it around. If you want, cut a small three-sided opening in the ceiling and bend the door upward to create a trap door in the top of the box. The staircase will sit under the trap door. Make a table by cutting up a kleenex box. Turn it upside down and cut out the sides, leaving about 1/2" before the corners. Paint or cover with paper. We also made some small wood furniture by glueing popsicle sticks and pieces of cardboard together. There are many different things you can make this way, just use your imagination. | 
 Important Announcement

 First
First 