Trick-or-Treat Bag
Age: Preschool and up
Time: An hour or more
Type of activity: Arts and Crafts
Your kids will love trick or treating with their own homemade treat bag!
Materials needed:
· Canvas tote bag (sold at local craft stores)
· Tempera paints (Halloween colors)
· Paintbrush
· Paper plates
· Scissors
· Wiggle eyes (sold at local craft stores)
· Felt, glitter, buttons, or other decorative materials (optional)
· Fabric glue
· Newspaper
What to do:
Step One: Lay newspaper over your work area in case of spills.
Step Two: Pour a bit of paint on a paper plate. Use a new plate for each color.
Step Three: Lay the canvas bag on the newspaper with the handles pointing towards you.
Step Four: Use the paintbrush to lightly coat the palm of your child's hand with paint.
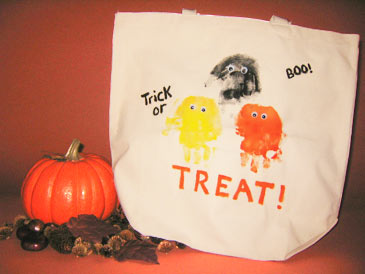
Step Five: Your child will make "ghosts" with her handprint. To do this, have her press her hand on the canvas bag where she wants her first "ghost" to be. Make sure her fingers are pointing away from the bag's handles, toward the bottom of the bag (so when the bag is upright, you'll see an upside-down handprint).
Step Six: Repeating Step Five, use different colors to make as many ghosts as she'd like.
Step Seven: Paint any other designs you'd like on the bag.
Step Eight: Let the paint dry. Then, glue a pair of wiggle eyes to each ghost, securing them with fabric glue.
Step Nine: Now, add any additional decorative items to the bag. For example, you could cut out a felt moon and glue it to the bag or add sparkle to your ghosts with glitter.
Step Ten: Let the bag dry completely - then fill it with treats on Halloween!

 Important Announcement

 First
First 