|
|
 |
|
Reply
| |
Halloween Arts and Crafts Activity:
Wicked Welcome 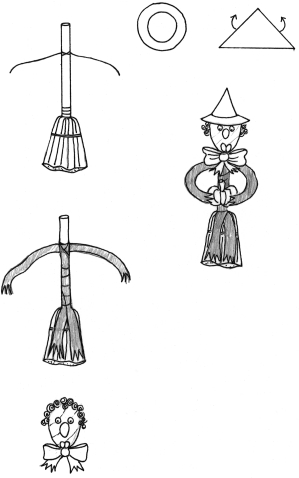 A welcoming witch for your door. Scare away the goblins on trick-or-treat night by hanging this bewitching Halloween decoration on your front door. Level: Moderately difficult Time involved: Two to three hours Materials: - Wire coat hanger
- Wire cutters
- Decorative straw broom
- Black and tan paper ribbon (3-inch width)
- Scissors
- White glue
- One 4-inch round Styrofoam ball
- Three 2-inch oval Styrofoam balls (egg size)
- Low-heat glue gun
- Plastic eyes
- Spanish moss
- 1 yard of decorative Halloween ribbon
- Black foam sheet
- Miniature plastic or real pumpkin or gourd
Holiday Hints If you can't find black and tan paper ribbon to make your witch, you could substitute black and tan tissue paper, crepe paper, or streamers for the ribbon. If using tissue or crepe paper, cut it into 3-inch-wide strips. You also might want to experiment with using different colors for the face, such as green or gray. -
Open up the coat hanger and cut off the hooked end. Wrap the middle of the wire around the upper one third of the broom handle to form the arms. -
Cut two pieces of black paper ribbon to 36-inch lengths. Make the ends of these lengths of ribbon jagged to form fingers. Wrap the middle of the ribbon around the middle of the wire and extend the ribbon down the wire arms, covering the front and back of each piece of wire. Run a line of glue down each side of the paper ribbon to keep the two pieces of ribbon together with the wire arms in between the ribbon. -
Cut two more pieces of black paper ribbon 36 inches long. Wrap the middle of these ribbons around the intersection of the arms and broomstick. Bring two of the ends of ribbon down the front to form a skirt on top of the straw of the broom. Wrap the other two ends around the middle of the broomstick to form the bodice, and glue them in place (see illustration). -
Using the white glue, cover the round Styrofoam ball and the three oval balls with tan paper ribbon, smoothing the ribbon with your fingers as you go along. Some wrinkles will form on the surfaces, which are a desired effect. Using a glue gun, glue one oval onto the center of the ball to form a nose, and two ovals onto the bottom center of the ball to form a chin. Glue the plastic eyes onto the ball. -
Glue Spanish moss onto the top of the head to form hair. Make a bow out of the ribbon, and glue it onto the witch's neck. -
Make a witch's hat out of the black foam sheet by cutting a circle out of the foam that is 6 inches in diameter. Then cut a second circle out of the middle of this circle that is 4 inches in diameter. This will form the rim of the hat. Make a 12 x 9 x 9 inch triangle out of black foam sheet and form it into a cone, making the point of the hat along the longer length of the triangle. Using a low-heat glue gun or foam glue, glue the cone together and trim the ends to form the top of the hat. Glue the cone onto the foam rim to form a witch's hat. Glue the hat onto the head of the witch. -
Insert the ends of the wire hands into the sides of a small pumpkin, or glue a small plastic pumpkin onto each end of the wire to bring the arms together holding a pumpkin |
|
 First
Previous
No Replies
Next First
Previous
No Replies
Next Last
Last
|
|
|

 Important Announcement
