|
|
 |
|
Reply
| |
| The Cutout function (Image, Effects, Cutout) is a great tool for making a fairly rapid 3D effect on text or other objects. The trick is to apply a light to the top left and a shadow to the bottom right. This means that you have to use the Cutout in reverse (if you see what I mean). It's easier to do than explain! Step 1:
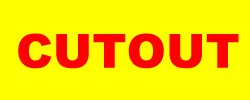 - Create a new image, 200 x 100, 64M colours
- Select a colour and enter some text
- DO NOT clear the selection marquee (the "marching ants") from the text
Whenever text is entered it is automatically selected. This is vital for nearly all text effects. So be ready to apply any text effects as soon as you have entered the text. Step 2:
 - Select Image, Effects, Cutout
- Set Fill Interior with colour OFF
- Set Shadow Colour to White
- Set Opacity to 80, blur to 2
- Set offsets to vertical=2, horizontal=2
- OK x
You can also try reducing the opacity a little to stop the edges going totally white. This gives you the highlight on the top left of the object. Step 3:
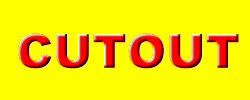 - Repeat the cutout, but this time:
- Set Shadow Colour to Black
- Set offsets to vertical = -2, horizontal = -2
This basic tool lets you apply an quick 3D appearance to almost any object. Just make sure the object is selected before you start. Note that obviously increasing the blur and offsets, increases the solidity of the object. | language=javascript>var bMB=true;</SCRIPT> |
|
 First
Previous
No Replies
Next First
Previous
No Replies
Next Last
Last
|
|
|

 Important Announcement
