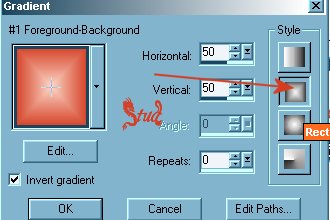
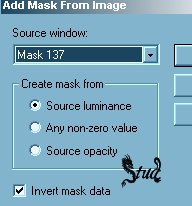
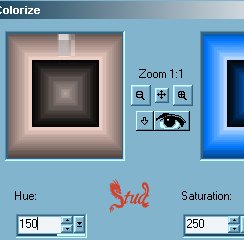
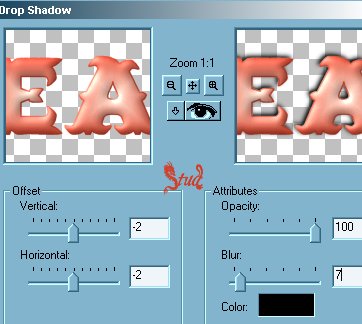
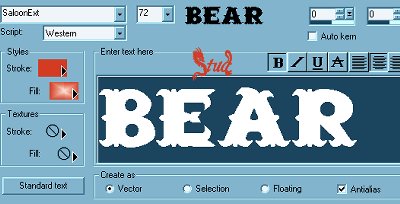
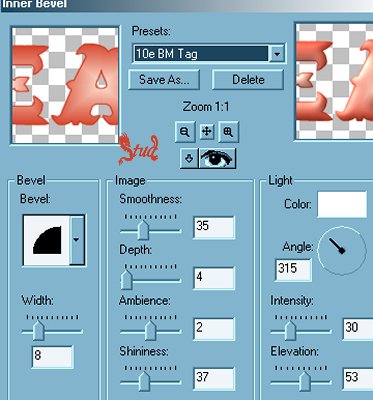
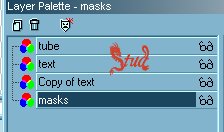
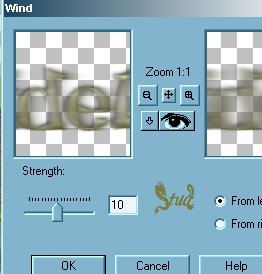
Cowgirl in the City Tutorial 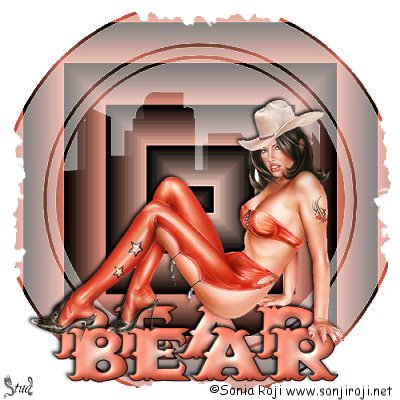 This tutorial is my own creation, any similarity is purely coincidental! This tutorial was written July 27th 2005. Please feel free to LINK to this tutorial and/or print it out for your personal use, but please do not copy it in anyway to put online, pass out or re-write without my permission ©§tud Supplies PSP A tube of your choice font of your choice 2 masks - 1 must be an edge effect Toadies plugin my supplies inclucing tube, font, the inner bevel preset and both masks here My tube is the artwork of Sonia Roji who gave me permission to use her fantastic artwork... visit her site here http://www.soniaroji.net if you use this tube please ensure you add the copyright information supplied with it This tutorial is my own creation, any similarity is purely coincidental! This tutorial was written July 27th 2005. Please feel free to LINK to this tutorial and/or print it out for your personal use, but please do not copy it in anyway to put online, pass out or re-write without my permission ©§tud Supplies PSP A tube of your choice font of your choice 2 masks - 1 must be an edge effect Toadies plugin my supplies inclucing tube, font, the inner bevel preset and both masks here My tube is the artwork of Sonia Roji who gave me permission to use her fantastic artwork... visit her site here http://www.soniaroji.net if you use this tube please ensure you add the copyright information supplied with it 1. Open a new, blank image 500 x 500 pixels transparent image (16 million color depth). File > New > set size & set color depth 2. Open your tube and pick a dark color for your foreground and pale color for your background. Make your own gradient with these 2 colors and select the 2nd option down and invert this gradient. Select your paint pot and fill your image. 3. Effects > Plugin Filters > Toadies > MetalicOnion with the seetings 232, 153 (play with these settings to make it unique if desired) 4. Open the edge effect mask (mask 137), make your image active and click on masks > new > from image... select the mask 137 (or your own edge effect). Masks > invert > masks > delete > yes. Close that mask and open the cityscape then masks > new > from image...Nik_Cityview... masks > delete > yes... don't invert this mask. 5. At this point you can colorize the mask layer to either brighten that color or make a contrasting color to your tube. You'll need to play with these settings to get it how you like it. Colors > colorize... 6. Copy and paste your tube as a new layer and resize and position as desired... mine was resized by 85%. Effects > 3D effects > drop shadow with the settings: V & H ~ -2, Opacity ~ 100, Blur ~ 7, color ~ black. 7. Open your font and minimize it to your toolbar. I used the Saloon Ext font but use what font suits your tube. The size depends on what text you're adding but create as vector and antialias both checked. Resize and reposition as desired, right click on the layer palette and convert to raster. 8. Effects > 3D effects > inner bevel > 10eBM preset with default settings: width ~ 8, smoothness ~ 35, Depth ~ 4, Ambience ~ 2, Shininess ~ 37, color ~ white, angle ~ 315, Intensity ~ 30, Elevation ~ 53 9. Duplicate this layer and drag both layers below the tube, with the copy below the original text. Reposition the the copy off to one side slightly. 9a. If you're using a different tube, the placement may be different... for my alternative i kept both on top and added a wind to the copy... Effects > geometric effects > wind > settings strength ~ 10 and from the left checked. 10. Add a new raster layer for your watermark/ brush. Layers > merge > merge visible. Image > resize no longer than 400 pixels on it's longest edge. Add a new raster layer and put any © information on it so it's visible. Save as jpeg! Hope you enjoy this tut and I look forward to seeing any results! | 
 Important Announcement