Criss Cross  This tutorial is my own creation, any similarity is purely coincidental! This tutorial was written May 13th 2007. Please feel free to LINK to this tutorial and/or print it out for your personal use, but please do not copy it in anyway to put online, pass out or re-write without my permission. Supplies PSP Tube of choice This tutorial is my own creation, any similarity is purely coincidental! This tutorial was written May 13th 2007. Please feel free to LINK to this tutorial and/or print it out for your personal use, but please do not copy it in anyway to put online, pass out or re-write without my permission. Supplies PSP Tube of choice
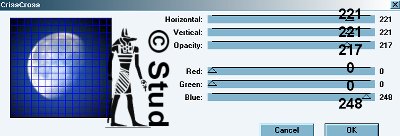
Font of choice Accent(s) of choice background picture of choice MuRa's Cloud & Copies filters HERE Tormentia Plugin HERE Filter Factory L HERE Included in my supplies: font, tube, background picture, inner bevel preset, accents HERE 1. Open your background tube and resize to 500 on it's largest edge, if larger than that. Promote to layer. 2. Effects > plugins > Tormentia > Criss Cross with settings: Horizontal ~ 221, Vertical ~ 221, Opacity ~ 217, Red ~ 0, Green ~ 0, Blue ~ 248 (these last 3 change depending on the color of your background!) 3. Effects > Plugins > Filter Factory L > Perspecula with settings: Upper Left X ~ 96, Upper Left Y ~ 210, Upper Right ~ 104, Upper Right Y ~ 111, Lower Left X ~ 200, Lower Left Y ~ 95, Lower Right X ~ 130, Lower Right Y ~ 76 (again, depending on the size and shape of your canvas these will change - you may find it also flips your piccy so just... image > flip or mirror or rotate - the choice is yours!) It just needs to have the whole picture inside your canvas! 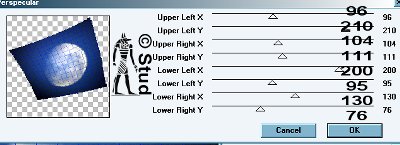 4. Duplicate the layer and hide the copy. Highlight the original layer.
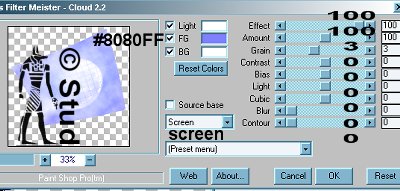
5. Effects > Plugins > MuRa's Meister > Cloud with settings: Light checked on white, FG checked (click on the colored box and enter #8080FF *or another color!!*), BG checked on white, Effect ~ 100, Amount ~ 100, Grain ~ 3, contrast - Bias - Light - Cubic - Blur & Contour all set to 0, source bias UNchecked, screen selected from the list.
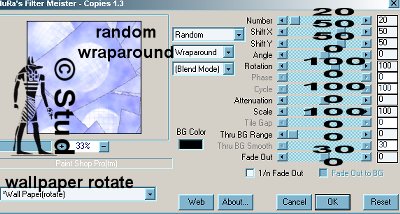
6. Effects > Plugins > MuRa's Meister > Copies with settings: Wallpaper (rotate), random, wraparound, blend mode, number ~ 20, Shift X ~ 50, Shift Y ~ 50, Angle ~ 0, Rotation ~ 100, Phase ~ 0, Cycle ~ 100, Alternation ~ 0, Scale ~ 100, Tile Gap ~ 0, Thru BG Range ~ 0, Thru BG Smooth ~ 30, Fade out ~ 0
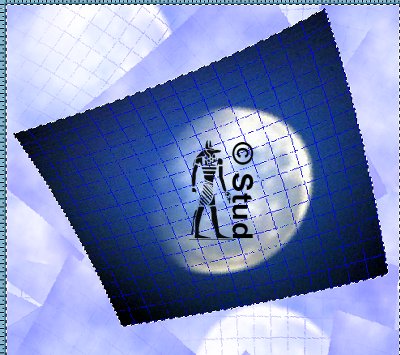
7. Unhide the copy and highlight it, selections > select all > selections > float > selections > invert.
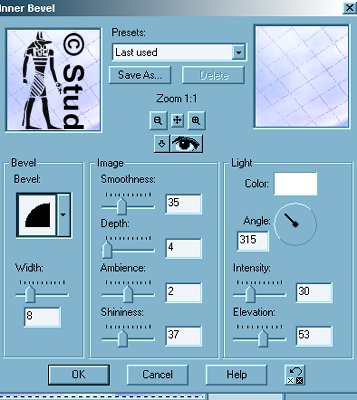
8. Highlight the original layer, effects > 3D effects > inner bevel of your choice, I used a preset 10eBM with it's default settings. Deselect
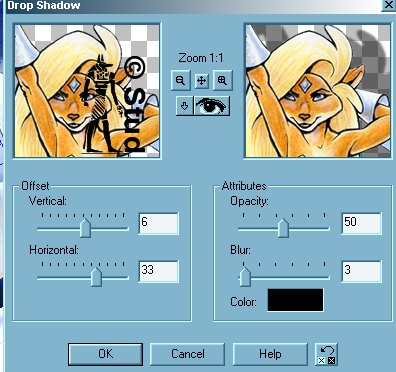
9. Open your tube, copy and paste as new layer, resize and position as desired 10. Effects > 3D effects > drop shadow with settings: vertical ~ 6, Horizontal ~ 33, opacity ~ 50, blur ~ 3, color black (you may want to change these settings if your tube is on the opposite side of the tag!)
11. Open your font and with create as vector and antialias both checked, color scheme is your choice. Resize and position as desired then convert to raster layer when you're happy. 12. Add an inner bevel of choice and the same drop shadow as before. 13. Add any accents you wish 14. Resize as desired and save as jpeg 
| ©§tuds§hedcreations
|
|
|

 Important Announcement