This tutorial was written January 13th 2007. Please feel free to LINK to this tutorial and/or print it out for your personal use, but please do not copy it in anyway to put online, pass out or re-write without my permission Supplies Font (s) and tube (s) of choice Mura Meisters Perspective filing and copies HERE Supplies inc. stamp tube and valentine font HERE Gradient/pattern of choice 1. Open a new, blank image 600 x 600 pixels transparent image (16 million color depth). File > New > set size & set color depth.
2. Open the stamp tube, copy and paste as new layer into your blank canvas. Use the deformation tool to reduce the width by half and lessen the height a little. Click "apply" when happy. Move it to the center of the canvas.
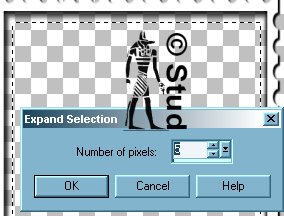
3. Use the wand and click inside the stamp. Selections > modify > expand by 5 pixels. Keep selected.
4. Make the bottom layer active by clicking on it and add a new raster layer, flood fill this selection with your chosen pattern/ gradient or solid color. Keep selected.
5. Select a font you like and with a dark color of choice add a short phrase like "love me", "kiss me" or "I love you". Make sure the antialias and create as vector are both checked, you don't want the font too big, I used size 36 as a maximum. Place the phrase near the center, bottom of the stamp and convert to raster. Keep selected.
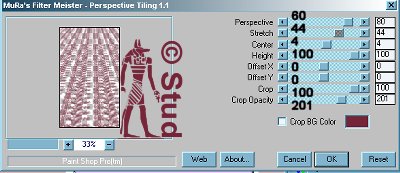
6. Effects > Plugins > Muras Meister > Perspective tiling with the settings: Perspective > 60, Stretch > 44, Center > 4, Height > 100, Offset X & Y > both 0, Crop > 100, Crop Opacity > 201. Crop BG color UNchecked. Keep selected.
7. Add new raster layer. Open the tube you want to add to your stamp, copy and paste into selection. Deselect.
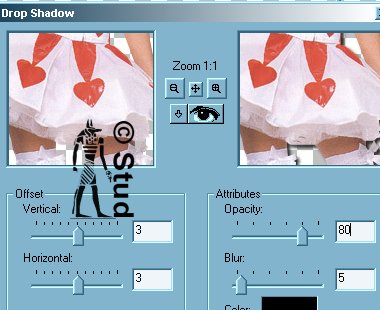
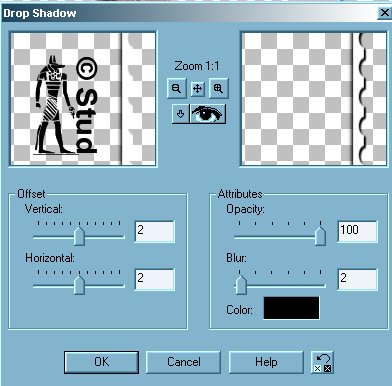
8. Add a drop shadow to your tube with settings Vertical and horizontal > both 3, opacity > 80, blur > 5, color > black. Merge > merge visible.
9. Add a drop shadow to your merged stamp of vertical and horizontal > both 2, opacity > 100, blur > 2, color > black.
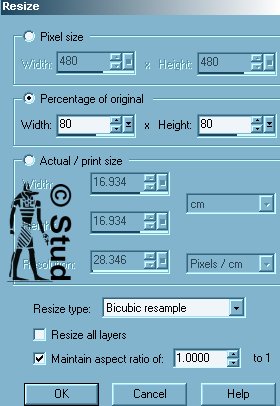
10. Resize the stamp by 80% with bicubic resample selected and resize all layers UNchecked and maintain aspect ratio checked.
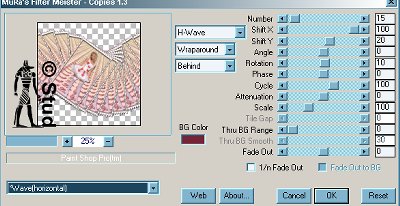
11. Effects > Muras Meister > Copies: select wave horizontal from the drop down list and use the default settings.
12. Add the tube you like and position and resize as desired. Add the same drop shadow settings as step 8.
13. Add the tag text with a font of your choice, create as vector and antialias both checked. Position and resize as desired. Convert to raster. Add an inner bevel of choice, here I also used Lokas Aqua filter to add a bit more shine but this is optional (if you have it use your favorite settings!). Add a drop shadow from step 8.
14. Add any copyright information required and also your own watermark. Resize to 400 pixels making sure all layer is checked.
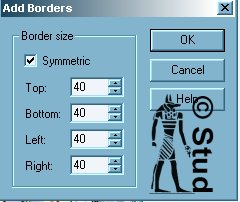
15. Select a bright color not in your tag ( i used bright pink) as your background color, click on "image" > add borders and with symmetrical selected add a 40 pixel border.
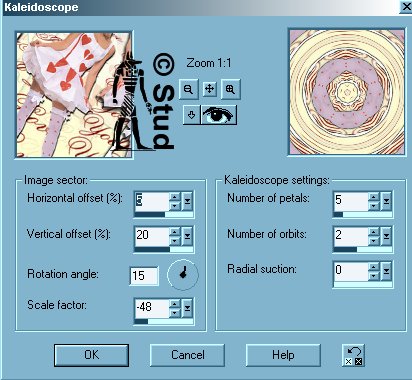
16. Use your wand and click onto the bright border, effects > Reflection effects > Kaleidoscope with the settings: Horizontal offset > 5, Vertical offset > 20, rotation angle > 15, scale factor > -48, number of petals > 5, number of orbits > 2, Radial suction > 0. Keep selected.
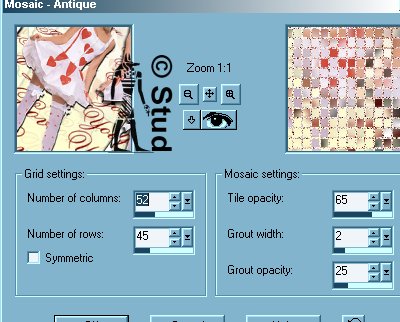
17. Effects > texture effects > mosaic - antique sith settings: symmetrical UNchecked, number of columns > 52, number of rows > 45, Tile opacity > 65, Grout width > 2, grout opacity > 25. Keep selected.
18. Add an inner bevel of choice, then add the same drop shadow settings as step 8. Keep selected and repeat the drop shadow but change the vertical and horizontal settings to -3. Deselect.
19. Resize if required and save as jpg.

 Important Announcement