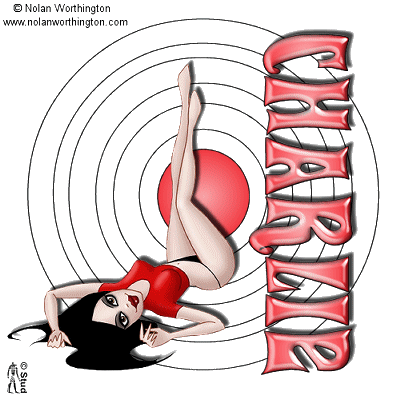
Ring - a - Ding  This tutorial is my own creation, any similarity is purely coincidental! This tutorial was written March 11th 2007. Please feel free to LINK to this tutorial and/or print it out for your personal use, but please do not copy it in anyway to put online, pass out or re-write without my permission Supplies PSP Animation Shop Ding font SP Three Ring Circus fat font of choice (used Dear teacher Normal-Ex) tube of choice supplies include the ding font, dear teacher font and Lady Littlefox tube HERE this tutorial doesn't use any filters unless you wish to use one!! This tutorial is my own creation, any similarity is purely coincidental! This tutorial was written March 11th 2007. Please feel free to LINK to this tutorial and/or print it out for your personal use, but please do not copy it in anyway to put online, pass out or re-write without my permission Supplies PSP Animation Shop Ding font SP Three Ring Circus fat font of choice (used Dear teacher Normal-Ex) tube of choice supplies include the ding font, dear teacher font and Lady Littlefox tube HERE this tutorial doesn't use any filters unless you wish to use one!! 1. Open a new, blank image 500 x 500 pixels transparent image (16 million color depth). File > New > set size & set color depth. 2. Open Ding font SP Three Ring Circus. With foreground color set to black and background set to null, make sure antialias and create as vector are both checked. Type in the letter b in lower case, highlight the letter and change the size to 250. Click ok. 3. Resize so that the rings nearly fill the canvas and ensure that the center ring is in the middle of your canvas. When you're happy with the size and position, convert to raster layer. Rename layer "rings". Duplicate this layer and hide the original (ONLY IF YOUR ARE DOING MORE THAN ONE COLOR!) rename the original layer "original rings" 4. Choose either a solid color to match your tube, or pattern or gradient. If using a gradient change it to the sunburst option. 5. Click onto the magic wand and then into the the center circle. Selections > modify > expand by 1. Click on the "original rings" layer and add new raster layer, flood fill this layer with the color. Hide all but the new layer and the rings layer, merge > merge visible and duplicate the merged layer. Rename the merged layer "rings1" so you don't get mixed up. Deselect. Hide the "rings" layer. 6. Make sure the duplicated layer is highlighted and then click back on the magic wand and then into the next ring, selection > modify > expand by 1. Click on the "rings1" layer and add new raster layer. Flood fill this layer with your chosen color. Hide all but the top 2 layers (rings1 and new layer)... merge > merge visible, rename "rings2" and deselect. 7. Repeat step 6 for the next 2 rings, renaming the layers rings 3 and rings 4. At the end you should have the following layers. Layer 1 (blank), layer 2 named "original rings", layer 3 renamed rings 1, layer 4 renamed rings 2, layer 5 renamed rings 3, layer 6 renamed rings 4. TO ADD ANOTHER COLOR UNHIDE YOUR ORIGINAL RINGS LAYER, DRAG IT TO THE TOP AND REPEAT THE ABOVE STEPS WITH A NEW COLOR/GRADIENT ETC. RENAMING THEM RINGS 5, 6, 7 & 8. 8. Unhide rings1 layer, open your tube, copy and paste as new layer, resize and position as desired. Effects > 3D effects > drop shadow with settings vertical ~ -5, horizontal ~ 5, opacity ~ 75, blur ~ 5, color ~ black. 9. Add a new layer with any copyright information and your watermark. 10. Open your font and add your tag name with antialias and create as vector both checked. Resize and position as desired then convert to raster. Add an inner bevel of choice. Add the same drop shadow (optional choice - Lokas Aqua/Gel or other filter!) Hide rings1 layer, merge > merge visible. 11. Duplicate the merged tube layer and drag the copied layer above rings 2, duplicate the copy and again drag up above rings 3, duplicate that copy and drag above rings 4. Hide all the copies and make sure rings 1 and the orignal merged layer is unhidden. Merge > merge visible and hide. Unhide rings 2 and the next merged layer, merge > merge visible, then hide that layer. Repeat for the next 2 rings until you have 4 merged layers, an original rings layer and a blanker layer 1. Make sure all 4 or 8 merged layers are unhidden before saving! Save as a PSP Image file. TO ANIMATE i. Open Animation Shop, find your saved tag and open it, you should have either 4 or 8 layers depending on if you are using 2 colors. ii. Edit > select all iii. Animation > Resize animation > pixel size 400 with bicubic resample selected and maintain ratio checked. iv. File > save as > name ur tag > "better image slider at the very top" > next > next > finish. Basic Single color tag More complicated 2 tone with a gradient more complicated with 2 tone font also | 
 Important Announcement