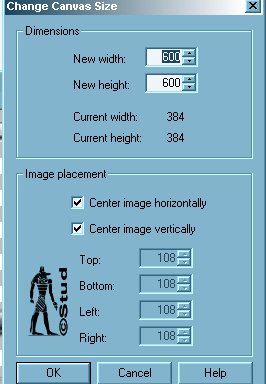
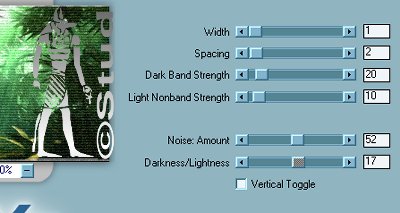
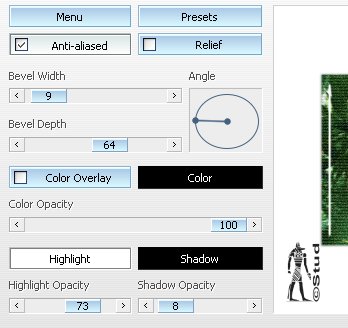
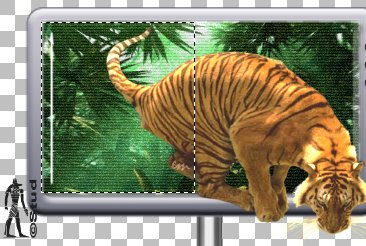
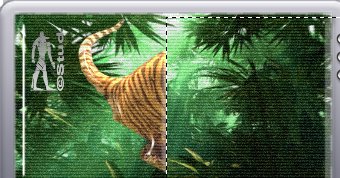
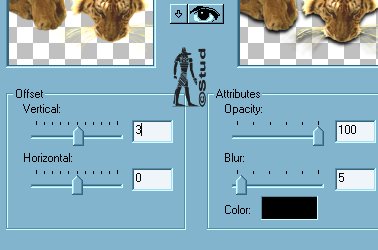
Get Me Out of Here  This tutorial is my own creation, any similarity is purely coincidental! This tutorial was written September 3rd 2005. Please feel free to LINK to this tutorial and/or print it out for your personal use, but please do not copy it in anyway to put online, pass out or re-write without my permission ©§tud Supplies PSP Background picture, tube and font of your choice TV tube supplied Photoeffex Scanlines Filter HERE unzip to your plugins folder (I made a new one called photoeffex!) Lokas Software Gel Filter HERE this link is all of the Lokas artistic effects including the Gel I've included the tiger and my background picture in the supplies SUPPLIES This tutorial is aimed at the intermediate to advanced users but I've hopefully explained it so that beginners should understand it too. Download the filters with PSP closed. This tutorial is my own creation, any similarity is purely coincidental! This tutorial was written September 3rd 2005. Please feel free to LINK to this tutorial and/or print it out for your personal use, but please do not copy it in anyway to put online, pass out or re-write without my permission ©§tud Supplies PSP Background picture, tube and font of your choice TV tube supplied Photoeffex Scanlines Filter HERE unzip to your plugins folder (I made a new one called photoeffex!) Lokas Software Gel Filter HERE this link is all of the Lokas artistic effects including the Gel I've included the tiger and my background picture in the supplies SUPPLIES This tutorial is aimed at the intermediate to advanced users but I've hopefully explained it so that beginners should understand it too. Download the filters with PSP closed. 1. Open your television tube, Ctrl+D to make a new copy and close the original. Image > Canvas size and make it 600 x 600 2. Click on the magic wand and click inside the tv screen so the marching ants go around the edge, Selections > modify > expand by 4 pixels so the ants move out further to the edge. Keep the selection active and open your background picture, edit > copy and edit > paste it into selection. Keep the selection active still and go to Effects > Plugin Filters > Photoeffex > Scanlines, with the settings width ~ 1, spacing ~ 2, dark band strength ~ 20, light nonband ~ 10, noise amount ~ 52, darkness/lightness ~ 17 and vertical toggle UNchecked. Keep the selection active. 3. Go back to Effects > plugin filters > Lokas Software > Gel with the settings: Antialias Checked, relief UNchecked, bevel width ~ 9 angle set at the 9 o'clock position (OR the 3 o'clock depending on what ya fancy! The alternative at the bottom was done with 3 o'clock instead!), color opacity ~ 100, color overlay UNchecked, highlight ~ white & 73 beneath, shadow ~ black and 8 beneath. Selections > selections > select none. 4. Open the tube that's going to escape from the tv, copy and paste as new layer and resize and repostion as desired, as long as some of it is over the edge and/or below the bottom of the tv. Duplicate this layer and hide the copy. OK... this is where it gets fiddly so please read carefully, just remember, there are no BAD tags just unique ones! That said...let's continue! 5. With the original tube layer highlighted, use the selection tool set with the rectangle, feather set to 0 and antialias checked and draw a rectangle to cover the part of the tube that is still within the tv screen and it should cover all of the tv screen to that edge (depending on which way your tube is escaping!). Go back to the effects and use the photoeffex scanlines filter with the same settings as before, they won't have changed so no need to remember them! Then repeat the same Lokas Gel settings so that end looks like it's within the tv. Then deselect. 6. Use the selection tool with the same settings now to go from the edge of the "glass" and surround the remaing part of that tube and press delete on your keyboard so you're left with... in my case 1 tiger's bum! LOL. Deselect. 7. Unhide your copy and drag it below you original and with this layer highlighted, use the seletion tool to repeat on this tube what you have just done to the original, use the edge of the "glass" as a template. You're removing the tiger's bum from this layer! Select along the same line and hit delete on your keyboard again make sure your 2 tubes don't show a gap by hiding and unhiding the layers. Deselect when you're happy they fit properly! You're removing the back end so when you add a drop shadow the part IN the TV doesn't have one! (remember, use the undo button if you're not happy it's a blessing! lol) Now it gets easier again I promise! You've made part IN the TV and you've removed part FROM the TV that's the complicated part done! 8. With the copy highlighted, effects > 3D effects > drop shadow with the settings: Vertical ~ 3, horizontal ~ 0, Opacity ~ 100, blur ~ 5, color ~ black 9. Hide all the layers apart from the TV and add any text you like within the screen. use the scanlines, gel and drop shadow again using the same settings. Add a new raster layer for any watermark you want to add. Add any ©information and make sure its legible as we are resizing the tag too. 10. Add an tag text you like, font, size and color is taggers choice as usual! Position as desired and Layers > Merge > merge visible. Crop around the edge and resize so the longest edge is no longer the 400 pixels. Save as a JPEG and you're done! Now you can relax, take a headache pill with a pint of coffee! LOL This is an alternative to show a different tube! | 
 Important Announcement