1. Open a new, blank image 400 x 200 pixels transparent image (16 million color depth). File > New > set size & set color depth.
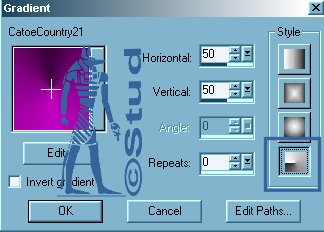
2. Select your gradient and change it to the cone shape option
3. Flood fill your blank canvas with your gradient. Add a new raster layer.
4. Click on the selection tool and draw a rectangle a little way up from the bottom.
5. Go back to your gradient and change it back to the normal horizontal version at the top of the options and flood fill the selection. Use the deformation tool to drag the sides to the very edge. Merge > Merge Visible.
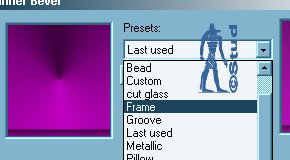
6. Effects > 3D Effects > Inner bevel > Frame default settings
7. Open your tube and copy and paste as new layer. Resize and position as desired.
8. Use a solid color from your tube or gradient as your background color and set your foreground to null. Write a phrase you like or use the font KR Bad Girlz which I've added to the documents page. Select a phrase (each letter is one phrase), I used a size 100 and had it checked on both create as vector and antialias. Resize as desired and convert to raster when happy.
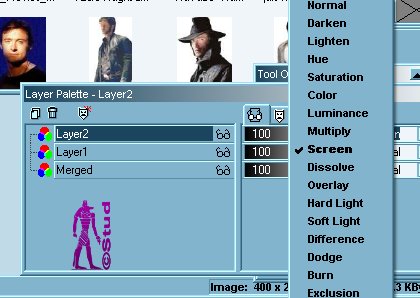
9. Select an option from the list according to where you placed your phrase. I used various options depending on how it showed up.
10. Write in your tag name, create as vector and antialias checked, resize and position as desired. Add an inner bevel of your choice (effects > 3D effects > inner bevel). Here you can use a filter, I used Lokas > Aqua filter, but this is optional.
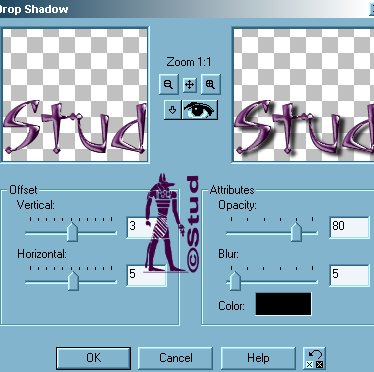
11. Effects > 3D effects > drop shadow with settings: Vertical > 3, Horizontal > 5, Opacity > 80, Blur > 5, color > black
12. Add a new raster layer and add your copyright information, add another for your watermark or brushmark.
Save as a jpeg and you're done!
Below are a couple more optionsl

 Important Announcement