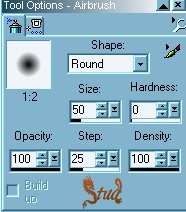
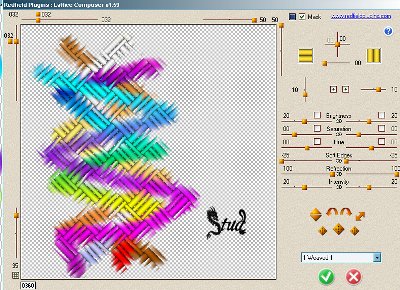
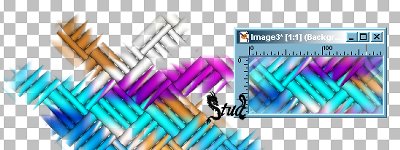
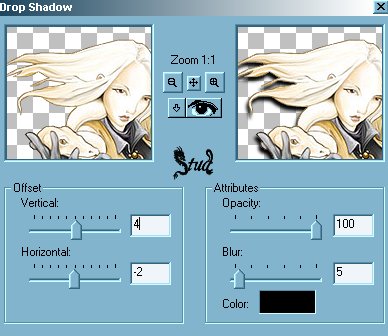
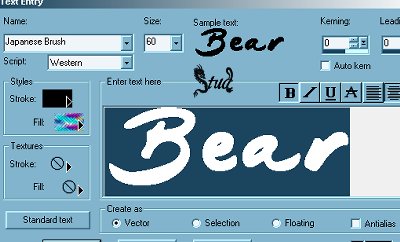
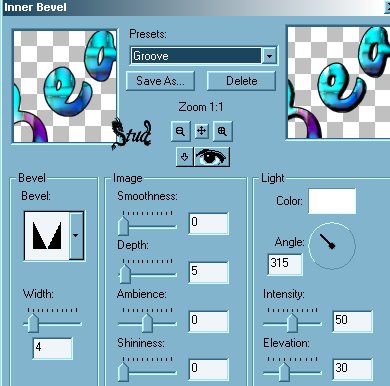
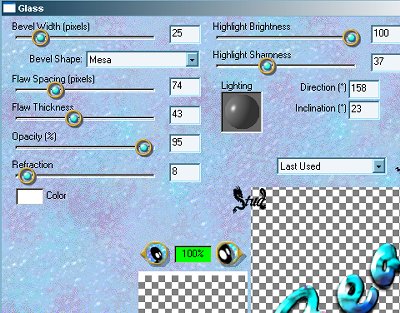
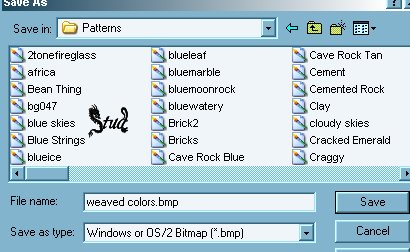
Gradient Weave Tag Tutorial 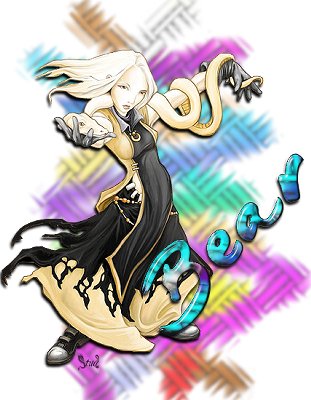 This tutorial is my own creation, any similarity is purely coincidental! This tutorial was written May 22nd 2005 especially for Bear! HA darlin! Please feel free to LINK to this tutorial and/or print it out for your personal use, but please do not copy it in anyway to put online, pass out or re-write without my permission ©§tud This tutorial is my own creation, any similarity is purely coincidental! This tutorial was written May 22nd 2005 especially for Bear! HA darlin! Please feel free to LINK to this tutorial and/or print it out for your personal use, but please do not copy it in anyway to put online, pass out or re-write without my permission ©§tud Supplies PSP a tube and font of your choice a variety of gradients Redfield Lattice Composer Plugin HERE Eye Candy (either version - optional) download your plugin with PSP closed 1. Open a new, blank image 600 x 600 pixels transparent image (16 million color depth). File > New > set size & set color depth 2. Select a gradient as your foreground, then click on the airbrush button on your toolbar and with the following selections: size ~ 50, shape ~ round, hardness ~ 0, Opacity ~ 100, step ~ 25, density ~ 100. 3. Spray a zig zag down your canvas (experiment... try a diagonal or horizontal spray... whichever suits your tube!). Change your gradient and repeat... do this 3 or 4 times... more if you prefer! Until you have several zig zags 4. Go to Effects > plugin filters > Redfield > Lattice Composer and use the 1weaved1 preset settings 5. Click on your selection tool , select rectangle with feather set to 5 and antialias checked, select a section from the weaved background that you particularly like and go to selections > convert to seamless pattern. 6. Make your main picture active, selections > select none and then click effects > blur > gaussian blur set to 2 and then lower the opacity to 70 on the layer palette. Depending on your gradient colors this may vary... if you're using similar gradients as a color scheme you may need to keep the opacity higher. My alternative tag is opacity 85. SO you need to play until you're happy! 7. Open your tube, copy and paste as new layer on your background, resize and reposition if desired. Click effects > sharpen > sharpen, then effects > 3D effects > drop shadow with the settings Vert ~ 4, Hori ~ -2, opacity ~ 100, blur ~ 5, color ~ black 8. Now to add your text, I used the font Japanese Brush, but any fat font will work. Open your font and minimize it onto your toolbar, click onto your image and with the setting: stroke ~ black, fill ~ the pattern you created from the weave selection, font size is dependent on your font and length of your text, create as vector and antialias both checked. Resize and reposition as desired. 9. With your font layer highlighted, click Effects > 3D effects > inner bevel and use the preset settings for the groove bevel as this seems to brighten the colors a little. Use a different bevel if prefered. Go back to effects > 3D effects > drop shadow and add one with the same settings as in step 7. 10. If you don't have, or don't wish to use Eye Candy, go to step 12. If you do have EC4000 glass, use the following settings: bevel width ~ 7.78, smoothness ~ 47, inside marquee checked, edge darkening ~ 19, gradient shading ~ 24, refraction ~ 87, opacity ~ 12, tinting ~ 29, glass color ~ white. Lighting direction ~ 145, inclination ~ 36, highlight brightness ~ 100, size ~ 40, color ~ white, ripple thickness # 43, width ~ 72.00 Bevel Profile ~ simple button 10a. EC 3.1 glass settings are: width ~ 24, bevel shape ~ mesa, spacing ~ 74, thickness ~ 43, Opacity ~ 95, refraction ~ 8, brightness ~ 100, sharpness 37, lighting directions ~ 158, inclination ~ 23 11. Add a new raster layer for your watermark or brush, then click layers > merge > merge visible. Crop around your image to cut out most of the blank canvas around your tag and then resize it so that the longest edge is no longer than 400 pixels. Add your copyright information if you need to now that your tag is the right size so that it is legible. 12. Save your completed picture as a jpeg and you're done! I hope you enjoyed the tutorial... below is an alternative version with the opacity at 85. N.B... If you want to keep your weaved fill for another time, go to file, save as, give it a name and select Windows bitmap from the file type and then save it to your patterns folder in your JASC file. my alternative... | 
 Important Announcement