Halloween Babe 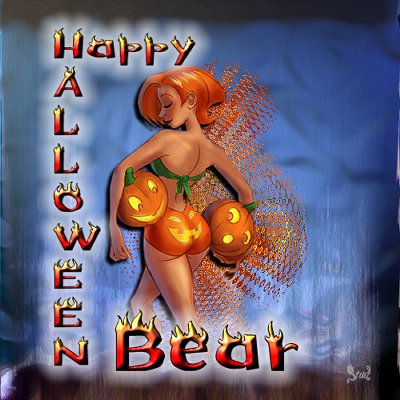 This tutorial is my own creation, any similarity is purely coincidental! This tutorial was written September 26th, 2004. Please feel free to LINK to this tutorial and/or print it out for your personal use, but please do not copy it in anyway to put online, pass out or re-write without my permission ©§tud This tutorial was written in PSP7 and will be tested in PSP8 Supplies PSP tube, font in zip This tutorial is my own creation, any similarity is purely coincidental! This tutorial was written September 26th, 2004. Please feel free to LINK to this tutorial and/or print it out for your personal use, but please do not copy it in anyway to put online, pass out or re-write without my permission ©§tud This tutorial was written in PSP7 and will be tested in PSP8 Supplies PSP tube, font in zip
VM Distortion get it here download the complete set whilst psp is closed Eye Candy (either version! I used 4000)
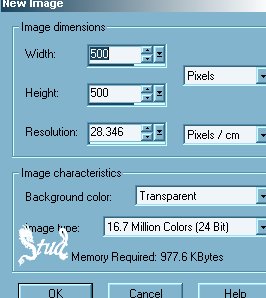
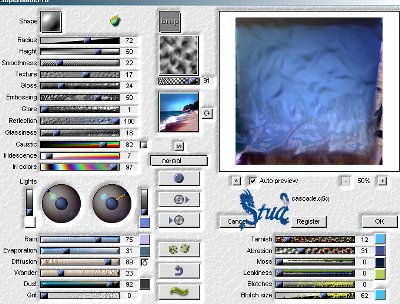
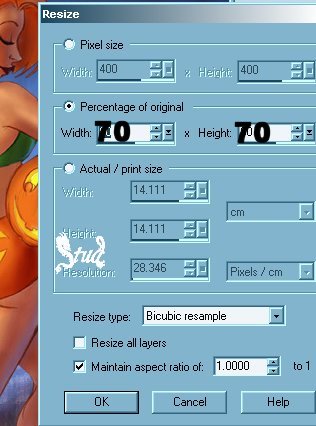
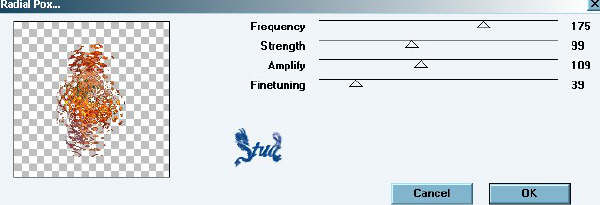
Superblade Pro is optional I've put both environments in the zip.. unzip them into your environments folder in flaming pear plugin Supplies ZIP You can use your own sexy tubes and fonts and let us see the results by posting them either on the message board or in the result picture album! 1. Open a new, blank image 500 x 500 pixels transparent image (16 million color depth). File > New > set size & set color depth, then open and copy each of the tubes, closing the originals and minimize the copies for later. 2. For the background, i made my own gradient... click on the paint pot, then make your foreground #0000C0 and your background #202020 at the top of your color palette. (make your own gradient by choosing your own fore and background colors!) Then in the styles part select the gradient and select gradient #1 which will be a mix of your 2 colors. Fill your canvas with this color, the black should be at the top. You can keep it like that or if you have Superblade Pro... see below... If you're using Superblade Pro, after using that background click on effects > plugins > then with your crumple image at the top and the samui image below use the Cascade with its default settings 3. Open your tube, click on edit > copy, close your tube and then click on edit > paste as new layer on the blank image, resize the tube by 70%... image > resize > bicubic resample selected, resize all layers UNchecked and maintain aspect ratio checked. Then click again on Image and select mirror to turn her to face the other way 4. Duplicate your tube, right click on layer 2 on your layer palette and select duplicate. Hide the copy by clicking on the sunglasses (eye - in PSP8) 5. Make sure layer 2 is highlighted then effects > plugins > VM Distortion > Radial Pox with the following settings:
Frequency ~ 175
strength ~ 99
amplify ~ 109
finetuning ~ 39 6. Move this layer slightly to the right then unhide your copy, most of the filter should now show on the right and only a little on the left. 7. With the copy highlighted, add a drop shadow with the following settings:
vertical ~ 5
horizontal ~ -5
opacity ~ 100
blur ~ 5
color set to black ~ #000000 | 
 Important Announcement