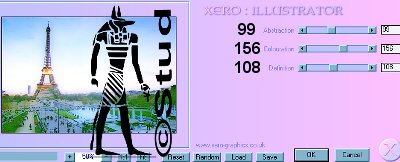
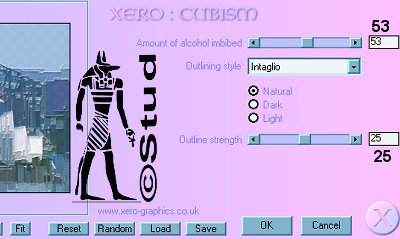
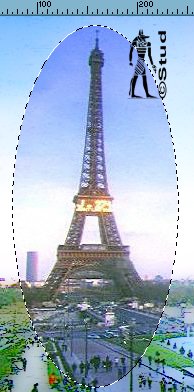
Illustrated Panorama 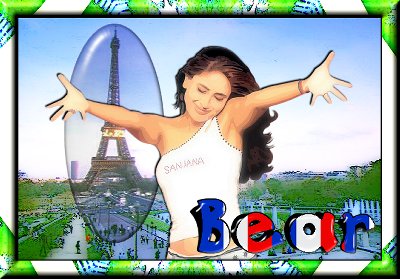 This tutorial is my own creation, any similarity is purely coincidental! This tutorial was written November 6th 2005. Please feel free to LINK to this tutorial and/or print it out for your personal use, but please do not copy it in anyway to put online, pass out or re-write without my permission ©§tud Supplies PSP Font of choice Background Picture of choice (it must be quite big approx 500 - 700 pixels) Tube of choice Xero Illustrator Filter (set 2) Eye Candy 4000 (Glass) I haven't added any supplies as this is totally your creation, pick your own photo or picture to illustrate! *Optional* Use Xero filter Cubism instead... I will show a result using this and also the settings! Also in set 2 on Xero's page. This tutorial is my own creation, any similarity is purely coincidental! This tutorial was written November 6th 2005. Please feel free to LINK to this tutorial and/or print it out for your personal use, but please do not copy it in anyway to put online, pass out or re-write without my permission ©§tud Supplies PSP Font of choice Background Picture of choice (it must be quite big approx 500 - 700 pixels) Tube of choice Xero Illustrator Filter (set 2) Eye Candy 4000 (Glass) I haven't added any supplies as this is totally your creation, pick your own photo or picture to illustrate! *Optional* Use Xero filter Cubism instead... I will show a result using this and also the settings! Also in set 2 on Xero's page. 1. Open your background picture, duplicate it and close the original. Promote the background to layer and duplicate it, so you should now have 2 layers of the same picture. On the copy layer, Effects > Plugin Filters > Xero > Illustrator - settings - Abstraction ~ 99, Coloration ~ 156, Definition ~ 108 *Alternative* Instead of Illustrator, try Cubism with the following settings - amount of alcohol imbibed ~ 53, Intaglio selected from drop down list, Outline strength ~ 25. 2. Click on the selection tool and select the elipse with feather set to 0 and antialias checked. On the copy layer draw an elipse around a piece of the picture you want to highlight (i.e. a landmark) and hit delete on your keyboard. Keep selected. 
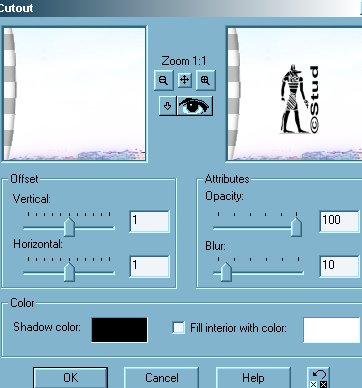
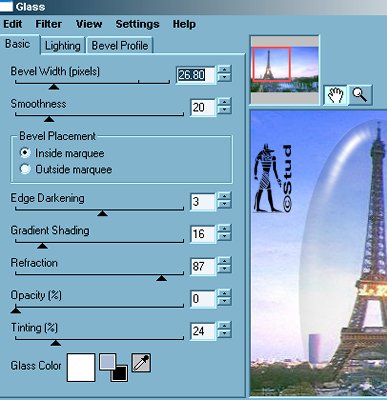
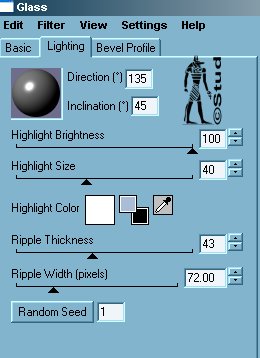
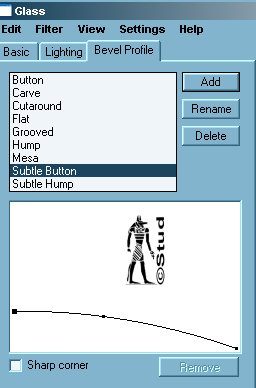
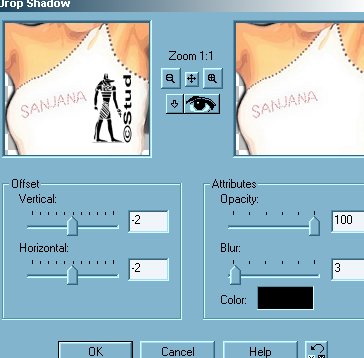
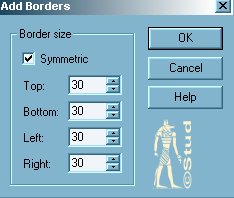
3. Effects > 3D effects > cutout: both vertical and horizontal ~ 1, Opacity ~ 100, Blur ~ 10, shadow color ~ black, fill interior UNchecked. Repeat but change vertical and horizontal to -1. Keep selected. 4. Click on the original layer. Effects > Plugin Filters> Eye Candy 4000 > Glass with the following settings: Basic - Bevel Width ~ 26.80, smoothness ~ 20, Bevel placement ~ inside marquee checked, edge darkening ~ 3, gradient shading ~ 16, refraction ~ 87, Opacity ~ 0, tinting ~ 24, glass color ~ white. Lighting - Direction ~ 135, Inclination ~ 45, highlight brightness ~ 100, highlight size ~ 40, highlight color ~ white, ripple thickness ~ 43, ripple width ~ 72.00 Bevel Profile - Subtle button, sharp corners UNchecked 5. Open your tube, copy and paste as new layer (drag it to the top of your lauer palette if necessary), resize if necessary and position as desired. Effects > 3D effects > drop shadow: Vertical & horizontal ~ -2, Opacity ~ 100, Blur ~ 3, color ~ black. 6. Set your background color to a pale color not in your tag, Image > add borders ~ 30 pixels ~ symmectrical checked. Click on the magic wand and click onto the border. Effects > reflection effects > kaleidoscope: horizontal & vertical ~ -1, rotation angle and scale ~ 4, number of petals ~ 10, orbits and radial suction ~ 0. Repeat the Illustrator or cubism settings while the border is still selected. Keep selected and repeat the drop shadow settings. 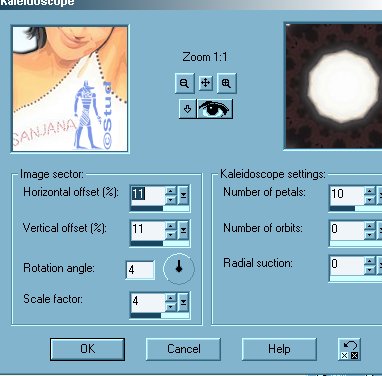
7. Effects > 3D effects > inner bevel ~ I used the Round default settings but it's up to you which you like! When you're happy, deselect. 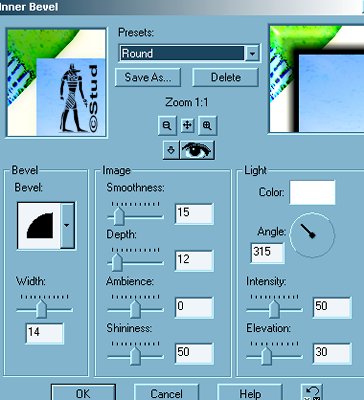
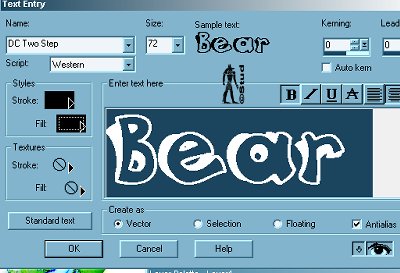
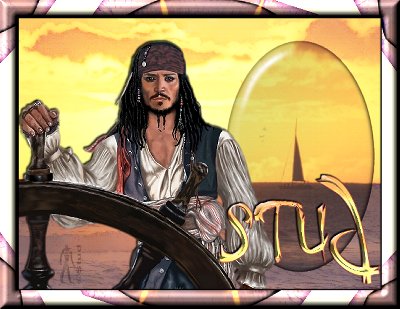
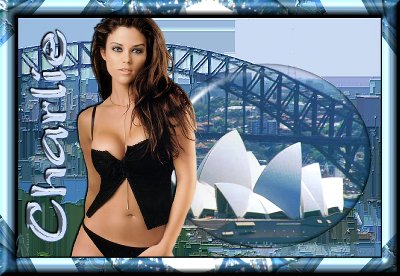
8. Add your text with any pattern/gradient or color you wish. Create as vector and antialias both checked. Resize and position as desired then convert to layer. Add a drop shadow and bevel of choice. Add any © information and watermarks you need on separate layers. 9. Resize so the longest edge is no more than 400 pixels in length and save as a jpeg. That's it... you're done! I hope you enjoy this tutorial... below is another Illustrated version and a Cubism version I made for Charlie. On this one I used Xero's Filter Caravagio (this is not part of the sets, but comes separate on the freeware downloads) on the main picture and the Xero Sparkles on the font! | 
 Important Announcement