§ines & Time§ 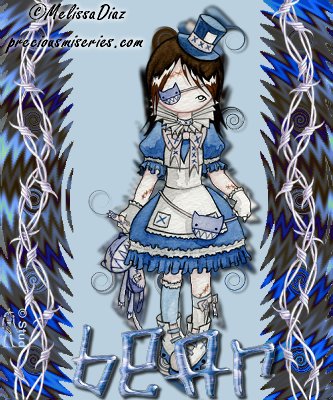 This tutorial is my own creation, any similarity is purely coincidental! This tutorial was written April 13th 2007. Please feel free to LINK to this tutorial and/or print it out for your personal use, but please do not copy it in anyway to put online, pass out or re-write without my permission the artist is Melissa Diaz, check out her website www.preciousmiseries.com Supplies PSP Tube of choice This tutorial is my own creation, any similarity is purely coincidental! This tutorial was written April 13th 2007. Please feel free to LINK to this tutorial and/or print it out for your personal use, but please do not copy it in anyway to put online, pass out or re-write without my permission the artist is Melissa Diaz, check out her website www.preciousmiseries.com Supplies PSP Tube of choice
Font of choice
Greg Factory Output Vol I zip HERE website HERE scroll down to bottom
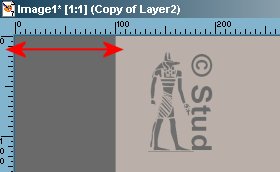
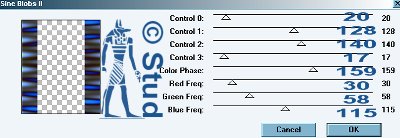
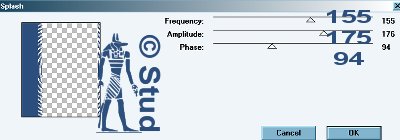
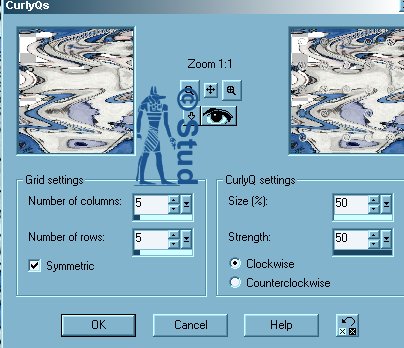
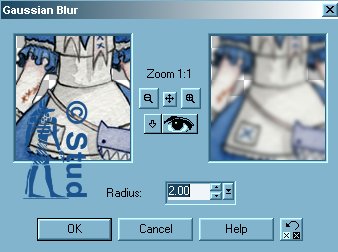
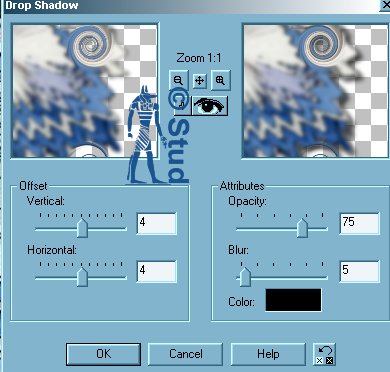
supplies include: tube, barbwire accent, font I used HERE 1. Open a new, blank image 500 x 600 pixels transparent image (16 million color depth). File > New > set size & set color depth. (or vice versa depending on the layout of your tube) 2. Open your tube select 2 colors, one dark and one mid to pale and flood fill the blank canvas with the paler one. 3. Click on the preset shapes and select the rectangle shape. Make sure that the darker color is set on your background and the foreground is set to null. Draw a rectangle the length of the canvas and approximately 100 pixels wide. Check along the ruler as you draw and you'll see! 4. Effects > plugins> Gregs Factory Output > sineblobs II with the settings: control 0 ~ 20, control 1 ~ 128, control 2 ~ 140, control 3 ~ 17, color phase ~ 159, red freq ~ 30, green flag ~ 58, blue flag ~ 115. Play with these settings as your color settings will need to be changed depending on your tube! 5. Effects > plugins > gregs factory output > splash with the settings: frequency ~ 155, amplitude ~ 175, phase ~ 94. Play with these settings to your heart's content! 6. Effects > geometric effects > CurlyQ's with the settings: columns and rows ~ 5, symmetric box checked, size and strength ~ 50, clockwise checked. You can colorize your bars to match more to your color scheme. Colors > colorize: play with the settings until you're happy! 7. Copy and paste your tube and resize and postion as desired. Duplicate the tube and hide the copy, highlight the original layer - effects > gaussian blur setting 2 8. Effects > geometric effects > curlyQ's with the same settings as before. Effects > 3D effects > drop shadow with settings as desired, I used vertical and horizontal ~ 4, opacity ~ 75, blur ~ 5, color ~ black. 9. Unhide the copy and resize by 95%. Depending on your tube, if it is fairly dark, you may need to reduce the opacity a little on the curlyQ's tube layer so the copy stands out more. 10. Add any accents, word art, scrapbooking as desired. 11. Open your font and add your text with create as vector and antialias both checked. Resize and position as desired. Convert to raster layer. Add an inner bevel and drop shadow of your choice. I used the same settings with drop shadow and THIS bevel named 10eBM. 12. Add a new raster layer for any copyright information and another for your own watermark. Merge > merge visible. Resize as desired and save as jpeg. | 
 Important Announcement