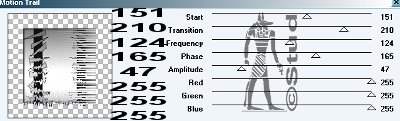
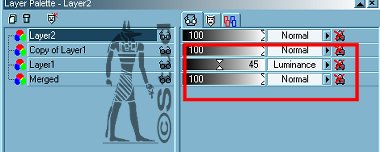
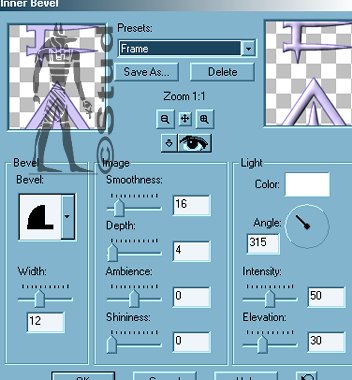
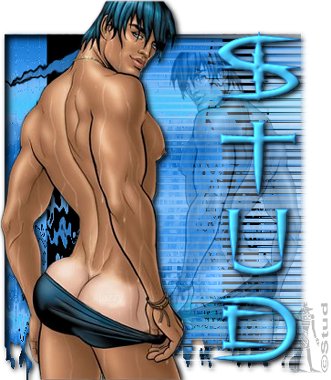
Large & In Charge  This tutorial is my own creation, any similarity is purely coincidental! This tutorial was written September 3rd 2005. Please feel free to LINK to this tutorial and/or print it out for your personal use, but please do not copy it in anyway to put online, pass out or re-write without my permission ©§tud Supplies PSP 1 or 2 tubes of your choice (one supplied) Font of your choice (one supplied) gradient of choice Visman Toolbox Filter (HERE) EyeCandy4000 Filter Mask (provided in supplies) SUPPLIES This tutorial is my own creation, any similarity is purely coincidental! This tutorial was written September 3rd 2005. Please feel free to LINK to this tutorial and/or print it out for your personal use, but please do not copy it in anyway to put online, pass out or re-write without my permission ©§tud Supplies PSP 1 or 2 tubes of your choice (one supplied) Font of your choice (one supplied) gradient of choice Visman Toolbox Filter (HERE) EyeCandy4000 Filter Mask (provided in supplies) SUPPLIES 1. Open a new, blank image 500 x 500 pixels transparent image (16 million color depth). File > New > set size & set color depth 2. Flood fill the canvas with the gradient, click on effects > Texture effects >antique mosaic with settings: columns and rows both 25, tile opacity ~ 9, grout width ~ 2, grout opacity ~ 35, symmentry checked. 3. Add new raster layer and flood fill with black, open the mask and minimize it, click on masks > New > from image - select the mask with source luminence and invert mask data both checked. Masks > delete > yes. 4. Layers > merge > merge visible. Resize to 65% with bicubic resample selected and resize all layers UNchecked. 5. Effects > Plugin Filters > Eye Candy 4000 > Melt with the settings: Ripple width ~ 5.00, Stretch Length ~ 92.98, Pooling ~ 13 6. Selections > select all > selections > float. Effects > 3D effects > Cutout with settings: vertical and horizontal both ~ 5, opacity ~ 90, blur ~ 10, shadow color ~ black and fill interior UNchecked. Selections > select none. 7. Effects > 3D effects > Drop shadow with settings: vertical & horizontal ~ 2, opacity ~ 100, blur ~ 8, color ~ black. at this point select your eraser with the size 15, round shape, hardness 100, opacity 100, step 25, density 100 and build up checked. Erase any stray blobs at the bottom that you don't like. 8. Effects > plugin filters > VM Toolbox > Motion Trail with the settings: start ~ 151, Transition ~ 210, Frequency ~ 124, Phase ~ 165, Amplitude ~ 47, red, green, blue all 255. 9. Open your tube and resize so it's slightly bigger than the background. Duplicate your tube and hide the layer with the tube on the left handside, highlight the right handside layer and image > mirror, click on the deselector tool and resize this one so it just fits inside the background behind the motion trail lines, then click apply. Keep this layer highlighted. (You can use a different tube for this background filler if you prefer, see the bottom of the page to see a version I did that way!) 9. Go to your layer palette and next to the red x at the far right, click on the word normal and select luminence, it will fade to the same color as your background. Reduce the opacity to 45 or less depending on your tube. 10. Unhide the left handside layer and add a drop shadow with the same settings as used before. Select a mid/dark color for your foreground and a pale color for your background from either your tube or background this is entirely your choice! 11. Open your font and minimize it to your toolbar, Size is dependent on your text, create as vector and antialias both checked. Resize and position as desired then convert to raster. Add an inner bevel - your choice which one you like best, I used the frame preset default settings and then added the same drop shadow as before. 12. Add a new raster layer for any © information and another for your brush or watermark. Layers > Merge > merge visible. Crop your tag to take away the spare white and then resize so the longest side is no more than 400 pixels. Save as a JPG and your done! I hope you enjoy this tut, below is a couple of different versions | 
 Important Announcement