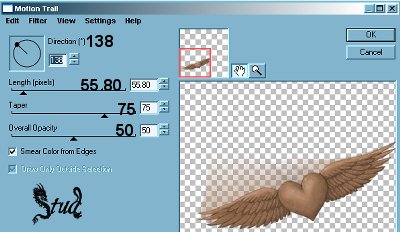
| Love's Flight Continued... 8. Now for the trail of the heart... click on Effects > plugins > Eye Candy 4000 (if using 3.1 go to step9) and select motion trail with the following settings:
direction ~ 138
length (pixels) ~ 55.80
taper ~ 75
overall opacity ~ 50
smear color from edges ~ checked
9. With Eye Candy 3.1 > effects > plugins > eye candy 3.1 > motion trail with settings:
length (pixels) ~ 50
opacity ~ 75
direction ~ 138
just smear edges ~ checked
10. Duplicate this layer and reduce the opacity to 46, then repeat your motion trail with the same settings
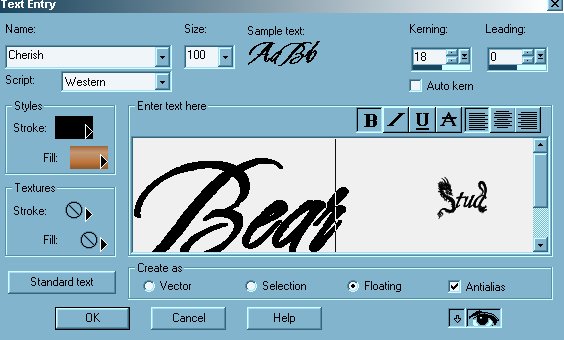
11. Now to add your text... open your font and minimize it then add a new raster layer... there should be room above and below your tag to add what you like and where so here are the settings I used the db Terracotta gradient to keep the color scheme in order, the Cherish font size 100, kerning at 18 (as Bear's name is short), floating and antialias both checked
12. Once you've positioned your text where you like click on effects > 3D effects > inner bevel > > bead preset with the following settings:
width ~ 8
smoothness ~ 4
Depth ~ 4
Ambience ~ 0
Shininess ~ 0
color set to white ~ #FFFFFF
angle ~ 315
Intensity ~ 50
Elevation ~ 30
13. Add a drop shadow, effects > 3D effects > drop shadow > settings:
vertical ~ 5
horizontal ~ -5
opacity ~ 50
blur ~ 5
color set to black ~ #000000
14. Selections > select none
15. Add another layer for your watermark if you're using one, then layers > layers merge > merge visible
16. Now to resize to a maximum of 400 x 400 pixels, less if you want, with bicubic resample selected with all layers and maintain ratio both checked and then save as a jpeg
| 
 Important Announcement