1. Open a new, blank image 500 x 500 pixels transparent image (16 million color depth). File > New > set size & set color depth.
2. Open your tube and select a mid/dark color for your foreground and a pale color for your background. Flood fill your blank canvas with the darker color.
3. Effects > Plugins > Plugins AB 08 > Wiremeshings with the settings: factor 1>28, factor 2 > 8, factor 3 > 4, factor 4 > 4, Mix 1 > 53, Mix 2 > 32 ... OK
4. This step is optional depending on how you like your background! Image > mirror... I did it as I liked the colors better!
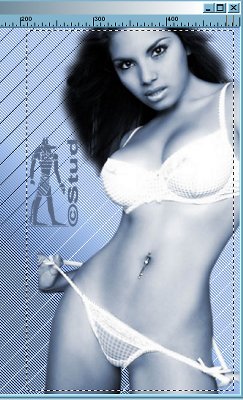
5. Copy and paste your tube as a new layer, resize as desired, with my tube I used the deformation tool to drag the edges to the top and bottom.
6. Add new raster layer and flood fill with the pale color. Hide this layer and highlight the tube layer. Use the selection tool set on rectangle, feather on 0 and antialias checked and draw a selection around the edge of your tube.
7. Unhide the pale layer and highlight it, keeping your selection, hit delete on your keyboard.
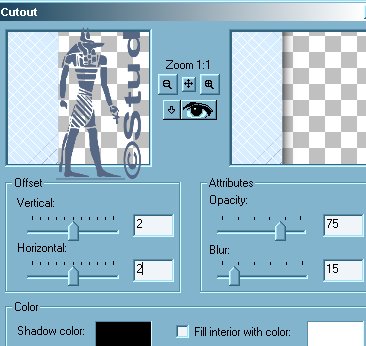
8. Selections > Invert. Effects > 3D effects settings: both vertical and horizontal > 2, opacity > 75, blur > 15, shadow color > black and interior fill UNchecked. Keep selected
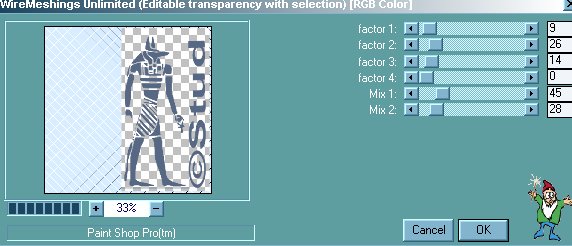
9. Effects > Plugins > Plugins AB 08 > wiremeshings with settings: factor 1 > 9, factor 2 > 26, factor 3 > 14, factor 4 > 0, Mix 1 > 45, mix 2 > 28 ... OK
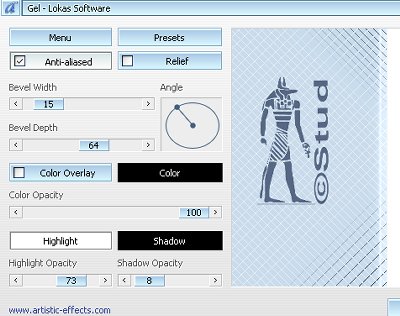
10. Effects > Plugins > Lokas > Gel with antialias checked, bevel > 15, Bevel depth > 64, color overlay UNchecked, color opacity > 100, highlight > white, shadow > black, highlight opacity > 73, shadow > black. (You can use Eye candy 4000 glass if you prefer, or just a bevel of choice)
11. Add new raster layer for any © information and another for your watermark or brush.
12. Add your text, using any font you like with antialias and create as vector both checked. Rotate 90 degrees if necessary. Resize as desired and convert to raster when happy. Selections > select all > selections > float. Effects > Plugins > Plugins AB 08 > use same settings as before. Effects > Plugins > Lokas > Gel with same settings as before (or use a bevel or EC 4000 as before)
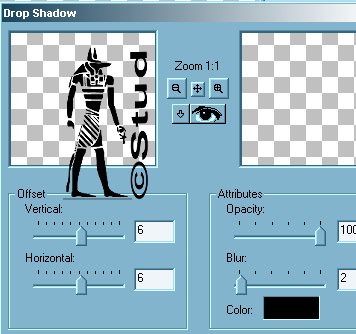
13. Effects > 3D effects > drop shadow with settings: vertical and horizontal > 6, opacity > 100, blur > 2, color > black
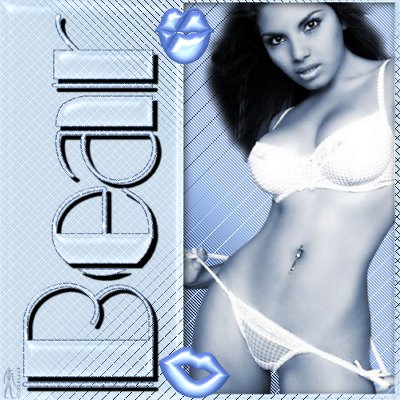
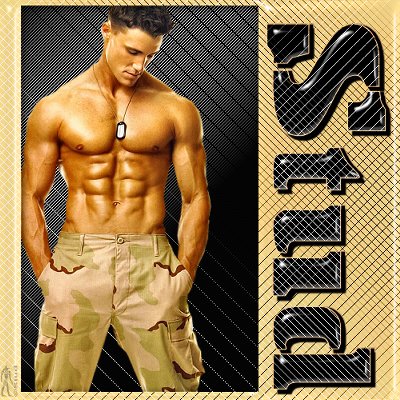
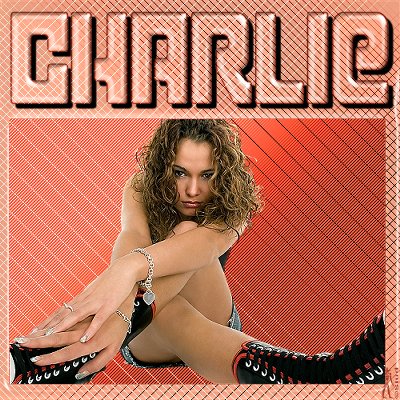
14. Add any accents you like, if at all and resize so that it's no longer than 400 pixels and save as a jpg.
With mine I didn't mirror the background as I used the tube on the opposite side and I also swithced the colors around for the text and on Charlies I didn't mirror anything as the horizontal tube didn't need changing!

 Important Announcement