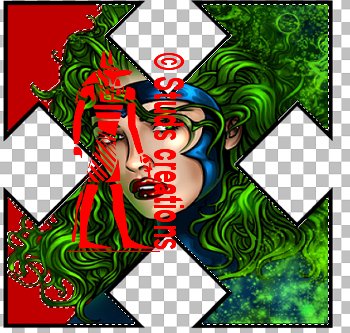
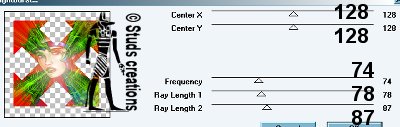
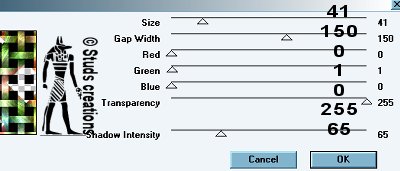
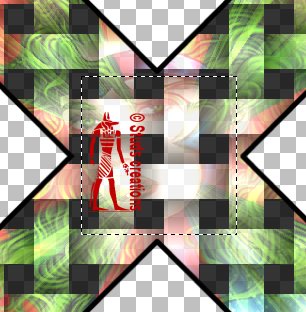
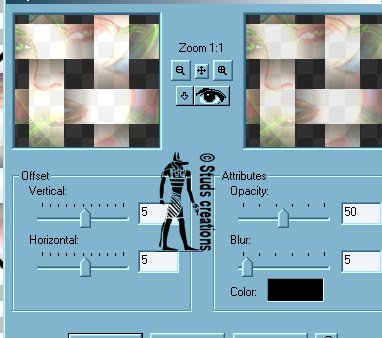
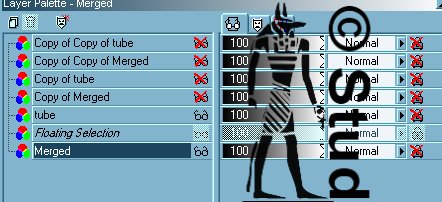
Natural Light 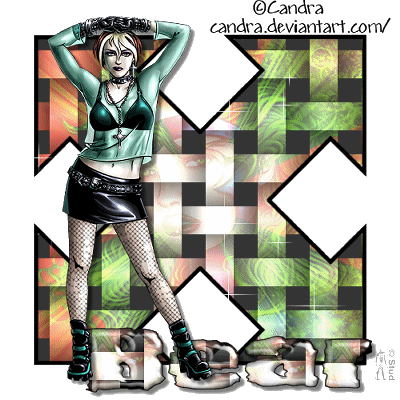 This tutorial is my own creation, any similarity is purely coincidental! This tutorial was written March 18th 2007. Please feel free to LINK to this tutorial and/or print it out for your personal use, but please do not copy it in anyway to put online, pass out or re-write without my permission Supplies PSP Animation Shop 2 tubes of your choice font of choice (font used 2Peas Bad Attitude) VM Filter Natural HERE to download all VM filters Supplies include the 4way arrow and 2Peas font HERE This tutorial is my own creation, any similarity is purely coincidental! This tutorial was written March 18th 2007. Please feel free to LINK to this tutorial and/or print it out for your personal use, but please do not copy it in anyway to put online, pass out or re-write without my permission Supplies PSP Animation Shop 2 tubes of your choice font of choice (font used 2Peas Bad Attitude) VM Filter Natural HERE to download all VM filters Supplies include the 4way arrow and 2Peas font HERE 1. Open a new, blank image 500 x 500 pixels transparent image (16 million color depth). File > New > set size & set color depth. 2. Open, copy & paste 4 way arrow as new layer, click on the wand and select inside arrow, selections expand by 2, highlight the bottom layer and add a new raster layer. Flood fill with a solid color of choice. Keep selected. 3. Open your first tube (I used a tube that had been cropped as a corner shape), copy, highlight the colored layer, add a new raster layer and paste into selected. Deselect. 4. Effects > plugins > VM Natural > Lightburst with settings: Center X ~ 128, Center Y ~ 128, Frequency ~ 74, Ray Length 1 ~ 78, Ray Length 2 ~ 87. 5. Reduce the opacity to approximately 80 depending on your tube. For my Hugh Jackman version I omitted this step! 6. Make sure the tube layer is highlighted, selections > select all > selections > float. Effects > plugins > VM Natural > Weave no distortion with default settings: size ~ 41, gap width ~ 150, Red ~ 0, green ~ 1, blue ~ 0, transparency ~ 255, shadow intensity ~ 65. Deselect. 7. Merge > merge visible. Click on the selection tool set on rectangle with feather on 0 and antialias checked, select a section from the center of the 4way arrow. Selections > convert to seamless pattern. Reactivate your tag and deselect. 8. Open your 2nd tube, copy and paste as new layer, resize and position as desired. Effects > 3D effects > drop shadow with settings: vertical and horizontal both ~ 5, opacity ~ 50, blur ~ 5, color ~ black 9. Add a new raster layer for your watermark and another for any copyright information. 10. Change your background color to the pattern you created earlier and the foreground to black. Open your font and with create as vector and antialias both checked add your text. Resize and position as desired, convert to raster layer. Use any inner bevel and drop shadow you desire, I also used Lokas Aqua filter on it, but that is optional! 11. Hide the merged arrow layer and highlight any of the other layers > merge > merge visible, rename this layer "tube" and duplicate it twice so you have 3 tube layers. Also duplicate the merged layer and drag each copy so that is is beneath the corresponding tube copy. Hide all but the bottom 2 layers. Selections > select all > selections > float. 12. Effects > plugins > VM Natural > sparkle with any settings you like. Merge > merge visible. Keep selected and hide the merged layer. Unhide the next 2 layers, highlight the "copy of merged" layer and repeat the sparkle effect with different settings. Merge those visible and hide it. Repeat again with new settings on the last 2 layers. Merge those visible and unhide all 3 layers. 13. Save the tag as a PSP image file. Open Animation Shop and open the tag. You should have 3 frames that play as they are. Edit > select all > animation > resize animation (as desired, i use no more than 400 pixels). Save as a gif with the highest quality selected > next > next > finish. | 
 Important Announcement