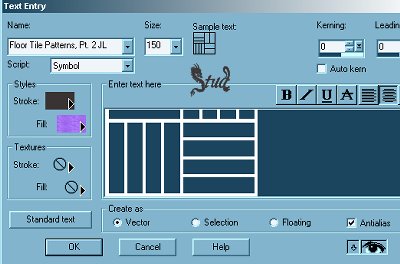
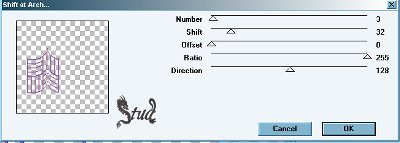
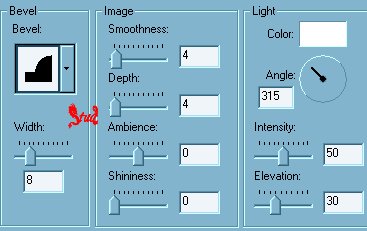
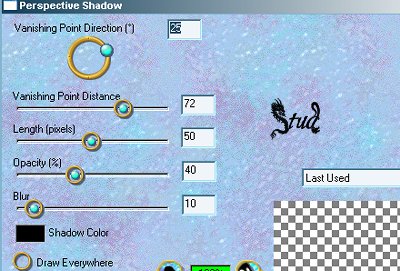
On The Fence  This tutorial is my own creation, any similarity is purely coincidental! This tutorial was written June 11th 2005. Please feel free to LINK to this tutorial and/or print it out for your personal use, but please do not copy it in anyway to put online, pass out or re-write without my permission ©§tud Supplies PSP A tube of your choice that is in a sitting position Eye Candy 3.1 Mura's Seamless Filters (download all of them here!) the 2 fonts are here a pattern of your choice I have enclosed the heart shaped accents that I used with the gothic version in the zip. Always download plugins with PSP closed! This tutorial is my own creation, any similarity is purely coincidental! This tutorial was written June 11th 2005. Please feel free to LINK to this tutorial and/or print it out for your personal use, but please do not copy it in anyway to put online, pass out or re-write without my permission ©§tud Supplies PSP A tube of your choice that is in a sitting position Eye Candy 3.1 Mura's Seamless Filters (download all of them here!) the 2 fonts are here a pattern of your choice I have enclosed the heart shaped accents that I used with the gothic version in the zip. Always download plugins with PSP closed! 1. Open a new, blank image 600 x 600 pixels transparent image (16 million color depth). File > New > set size & set color depth 2. Set your foreground  to black and select to black and select your pattern for the fill 3.Open the two fonts and minimize them to your toolbar. Click into the middle of your blank image and type in the lower case letter e. Highlight it and find the floortiles pattern font and make the size 150. With create as vector and antialias both checked and also the letter is underlined and bold. Convert to raster by right clicking on the layer palette. 4. Click on Effects > Plugin Filters > Mura Seamless > Shift at Arch and use the following settings: Number ~ 3, Shift ~ 32, Ratio ~ 255, Driection ~ 128 5. Go back to your text dialogue box and change the font to the flowery text then type in your tag name with the same settings as the floor tiles other than the size which is about 72 depending on the length of your name. Turn the tag on it's end so it lays on the edge of the fence side and then when happy with it's position (it's to be the fence post!) drag that layer underneath layer 2. 6. Click on Layers > Merge > Merge Visible, then right click on the merged layer and duplicate it. Go to Image > Mirror and then move them together in the lower center of the canvas so they fit together, then go back and merge visible when you're happy with their position. 7. Click on Effects > 3D effects > Inner Bevel > use the Bead preset default settings of: width~8, smoothness & Depth ~ 4, Ambience & Shininess ~ 0, color ~ white, angle ~ 315, Intensity ~ 50, Elevation ~ 30. Do this step twice! 8. Open your tube, copy and paste as a new layer, resize as desired and position in the center cup of the fence. When you're happy, merge visible again. 9. Click on Effects > Plugin Filters > Eye Candy 3.1 > Perspective Shadow and use the settings: Vanishing point direction ~ 25, vanishing point distance ~ 72, length ~ 50, Opacity ~ 40, Blur ~ 10, shadow color ~ black 10. Add any accents or details you would like on your tag, add a new raster layer for your watermark then merge visible. Crop you image to remove most of the white areas and then click on Image > resize and make sure the longest edge is no longer than 400 pixels. Add another raster layer for your © information. I do this after I've resized to make sure it's legible... it's only fair to the gifted artists that people can read their accreditation! Save as a Jpeg and your done! I hope you enjoyed making your tag and I'd love to see your results! Here are a couple of different one's I've made Many thanks to Gothika for playing and letting me show you all her results... | 
 Important Announcement