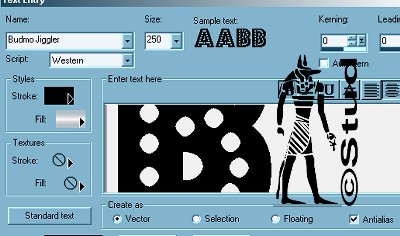
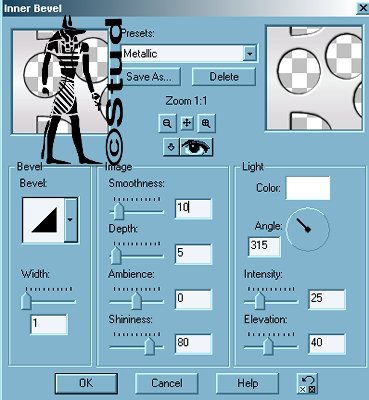
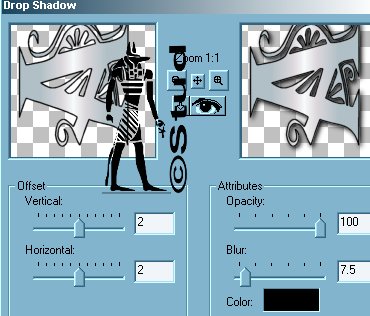
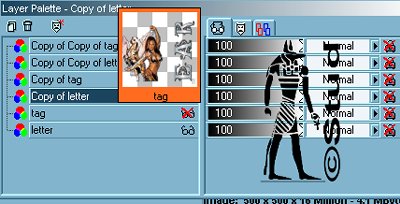
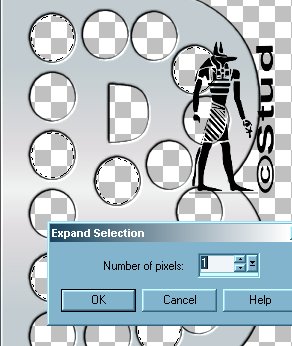
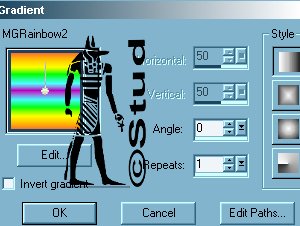
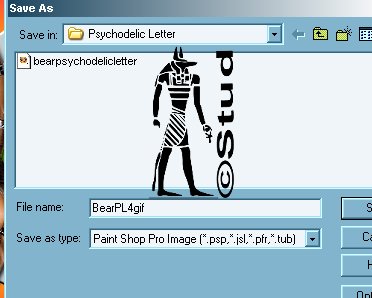
Psychodelic Letter  This tutorial is my own creation, any similarity is purely coincidental! This tutorial was written November 13th 2005. Please feel free to LINK to this tutorial and/or print it out for your personal use, but please do not copy it in anyway to put online, pass out or re-write without my permission This tutorial is aimed at the intermediate PSP user, but I will attempt to write it so that beginners understand too. This was written in PSP7. No outside filters are used, just some basic animation! ©§tud Supplies PSP Animation Shop 2 fonts (1 fancy & 1 with holes that can be colored!) I used Budmo Jiggler and DecoCaps Tube of choice 2 gradients of choice This tutorial is my own creation, any similarity is purely coincidental! This tutorial was written November 13th 2005. Please feel free to LINK to this tutorial and/or print it out for your personal use, but please do not copy it in anyway to put online, pass out or re-write without my permission This tutorial is aimed at the intermediate PSP user, but I will attempt to write it so that beginners understand too. This was written in PSP7. No outside filters are used, just some basic animation! ©§tud Supplies PSP Animation Shop 2 fonts (1 fancy & 1 with holes that can be colored!) I used Budmo Jiggler and DecoCaps Tube of choice 2 gradients of choice  1. Open a new, blank image 500 x 500 pixels transparent image (16 million color depth). File > New > set size & set color depth 2. Open the font you're using as the main letter of your tag, stroke color ~ black, fill ~ one of your gradients, size 250, create as vector and antialias both checked. Resize and position as desired and then convert to raster. Rename layer "Letter" 3. Effects > 3D effects > Inner bevel > bevel of choice... I used Metallic default. 4. Open your decorative font and use the same settings apart from changing the size to 72. Image > rotate > left > 90 degrees all layers UNchecked. Resize to be the same length as your large letter and position as desired. Convert to raster, rename layer "name". 5. Effects > 3D effects > Inner bevel as above. Effects > 3D effects > drop shadow > vertical/horizontal both ~ 2, Opacity ~ 100, Blur ~ 7.5. 6. Open your tube, copy and paste as new layer, resize and position as desired. Add the same drop shadow as above. Add a new raster layer for your watermark/brush and another for any © information needed. 7. Hide the "letter" layer and Merge visible all other layers and rename the merged layer "tag". Duplicate this layer twice so you have 3 of the same layers. Hide all 3 of these layers and inhide the "letter" layer, duplicate this layer twice and drag each copy up to below the corresponding copy of the "tag" layer. So you should have 6 layers. Hide all layers apart from the original "letter" layer. 8. Change your gradient to your 2nd choice, make sure it's a bright one! Click on the magic wand, then click into the first hole in the letter. Hold down the shift key and click into every fourth hole, selections > modify > expand > expand by 1 pixel. Click into the paint pot and flood fill these with your gradient. 9. Unhide the 1st copy of the "letter" layer and repeat step 8 but clicking into the next set of empty holes. Once you've selected all the holes you need for this layer, change the repeats on your gradient to 1 and flood fill with this version. 10. Unhide the 3rd "letter" layer and repeat the selections, change the repeats to 0, but click invert gradient instead. Now all the holes should be filled. Deselect. Hide all layers but the 2 original "tag" and "letter" layers. Layers > merge > merge visible, then hide this merged layer and unhide the next 2 layers and repeat. Repeat again for the 3rd set so you have 3 merged layers and unhide all of them. 11. Save as a PSP Image *NOT JPEG!!!* 12. Open Animation Shop, open your PSP image - you should have 3 frames. If you don't, close without saving changes and go back to PSP and check that you have all 3 layers unhidden. If you do, check if you've saved it as a jpeg, if ya have YIKE! You'll have to start again and resave as a PSP Image.  13. In A.S. Edit > select all. Animation > frame properties > display time... the higher the number the slower the animation, I used 15. Animation > resize animation > pixel size checked *no more than 400 pixels* - mine is 380. 14. Play the frames, if you're happy with it save as a gif with the highest quality set and click next until finish. To check your optimisation settings please check out Jane's tutorial on them which she kindly gave me permission to copy across from her group. I used them to get my settings right for this tutorial. Tutorial HERE I hope you enjoyed this tut! Below is a version I made for myself... I used the font DreamScar, Lokas Crude Metal, and Eye Candy 4000 shadowlab to show how different it can look! 
| 
 Important Announcement