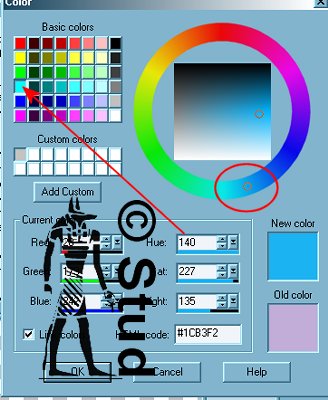
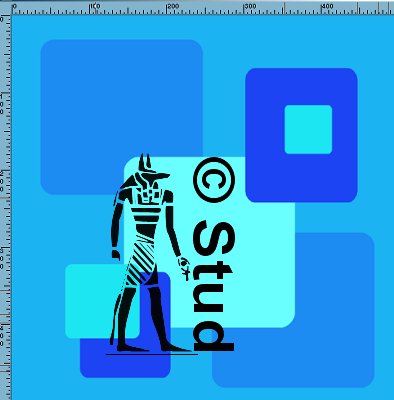
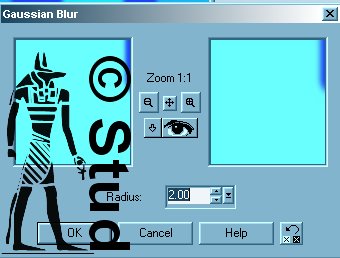
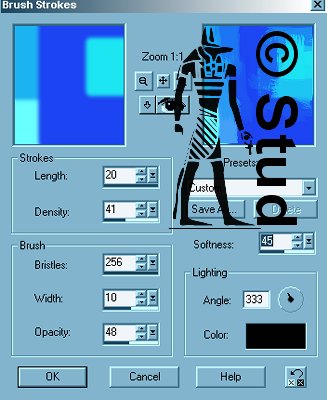
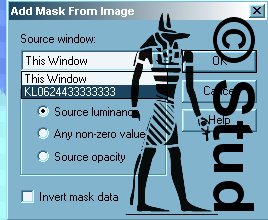
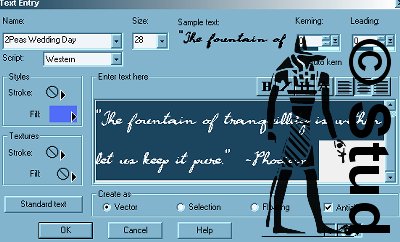
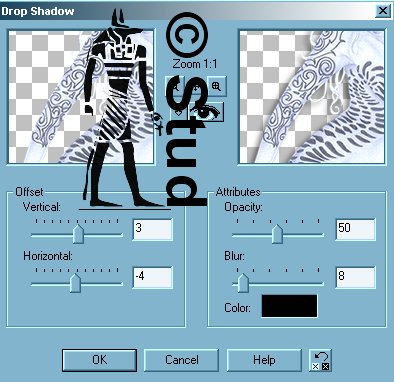
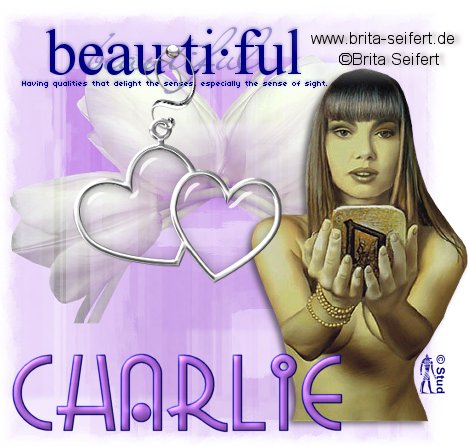
TranQuility 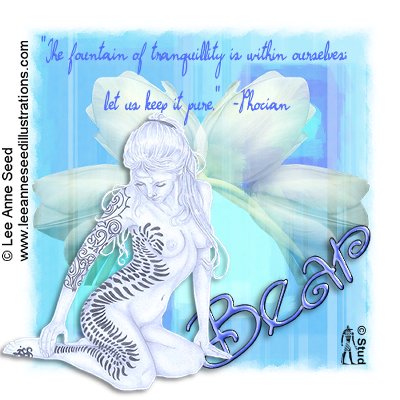 This tutorial is my own creation, any similarity is purely coincidental! This tut doesn't use any filters! YAY! This tutorial was written April 28th 2007. Please feel free to LINK to this tutorial and/or print it out for your personal use, but please do not copy it in anyway to put online, pass out or re-write without my permission artist Lee Ann Seed found at www.leeanneseedillustrations.com Supplies PSP Tube of choice flower tube of choiceScript Font of choice Other font of choice Accent(s) (optional) Word Art or Quote of choice (quote site HERE) edge mask of choice pattern mask of choice my supplies include: Lee Anne Seed tube (AC content so only download if topless lady doesn't offend!) 2 flower tubes for choice! edge mask (dbmuted) & pattern mask (KL0624433333333) also an extra one just coz I'm such a great guy! (used in an alternative tag) script font (2Peas Wedding Day) & other font (AmoreATT) Heart accent used in alternative version All found HERE This tutorial is my own creation, any similarity is purely coincidental! This tut doesn't use any filters! YAY! This tutorial was written April 28th 2007. Please feel free to LINK to this tutorial and/or print it out for your personal use, but please do not copy it in anyway to put online, pass out or re-write without my permission artist Lee Ann Seed found at www.leeanneseedillustrations.com Supplies PSP Tube of choice flower tube of choiceScript Font of choice Other font of choice Accent(s) (optional) Word Art or Quote of choice (quote site HERE) edge mask of choice pattern mask of choice my supplies include: Lee Anne Seed tube (AC content so only download if topless lady doesn't offend!) 2 flower tubes for choice! edge mask (dbmuted) & pattern mask (KL0624433333333) also an extra one just coz I'm such a great guy! (used in an alternative tag) script font (2Peas Wedding Day) & other font (AmoreATT) Heart accent used in alternative version All found HERE 1. Open a new, blank image 500 x 500 pixels transparent image (16 million color depth). File > New > set size & set color depth. 2. Open your tube and select a pale to mid/pale color from it as your foreground and flood fill the canvas with it. 3. Reopen the color palette and use the selector (the small circle on the ring of color - ringed in red) to select another tone of your color as your background with foreground set to null. Also... when changing the tone to others of that color, you can use the center circle, click and hold down then drag it around the palette until you see a tone you like!! 4. Open your preset shapes and select a shape of your choice, I used the rounded rectangle and with create as vector checked, draw a small square somewhere on your canvas. Change the tone again and repeat on various parts of your canvas so it looks like a piece of modern art! 5. When you're happy with your boxes, merge > merge visible all your layers. Effects > blur > gaussian blur set to 2 6. Effects > artistic effects > brush strokes > watercolor with settings: length~ 20, Density ~ 41, bristles ~ 256, width ~ 10, opacity ~ 48, softness ~ 45, angle ~ 333, color ~ black 7. Add a new raster layer and flood fill it with white. Change the blend mode to soft light. Merge > merge visible. 8. Open your pattern mask, masks > new > from image, with source luminance checked and invert mask data UNchecked. OK. Masks > delete > yes. 9. Open your edge mask and repeat the previous step, don't forget to delete! 10. Open your flower tube, copy and paste as new layer. Resize and position as desired. On the layer palette change the blend mode to screen. Duplicate this layer and mirror. Move again if nessesary so that the flowers aren't over the edges. Merge > merge visible. Image > resize to 450 pixel and make sure resize all layers is UNchecked! 11. Add your word art on a new layer OR... find a quote (I used "The fountain of tranquillity is within ourselves; let us keep it pure" - Phocian) and keep your foreground null and a dark color from your tube as the background. Open your script font and with create as vector and antialias both checked add your quote. Resize and position as desired then convert to raster layer when happy. 12. Open your tube, copy and paste as new layer, resize and position as desired. Effects > 3D effects > drop shadow with settings: vertical ~ 3, horizontal ~ -4, opacity ~ 50, blur ~ 8, color ~ black 13. Open your other font and with colors of your choice add your tag name, again with antialias and create as vector both checked. Resize and position as desired. Convert to raster layer when happy. 14. Effects > 3D effects > inner bevel of choice - I also used Lokas Aqua filter but this is purely optional! Effects > 3D effects > drop shadow - use same settings as before. 15. Add a new layer for any copyright information and another for your own watermark. 16. Merge > merge visible. Resize as desired and save as a JPEG Alternatives: Accent added and included in supplies I added a dark layer BELOW the main layer and used the alternative mask on the paler one and didn't put a white layer on top. I also used thealternative flower tube. | 
 Important Announcement