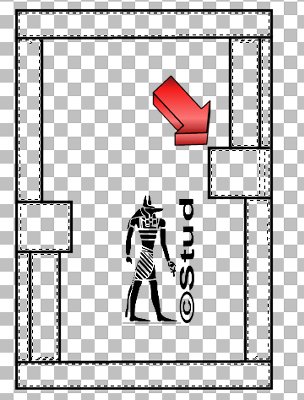
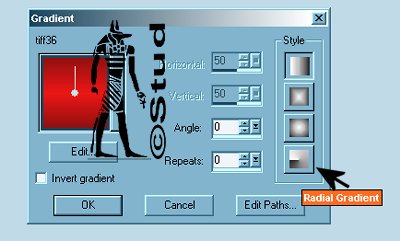
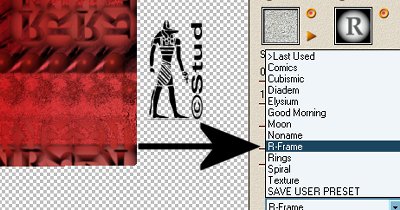
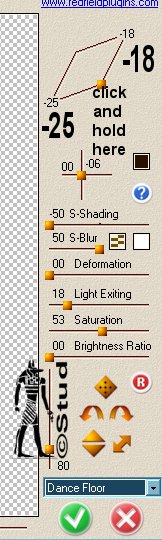
Trixsy Frame  Many thanks to Pat Carlucci who's artwork I use with a licence you can see here This tutorial was written January 6th 2007. Please feel free to LINK to this tutorial and/or print it out for your personal use, but please do not copy it in anyway to put online, pass out or re-write without my permission Supplies Frame and accents HERE Tube, gradient, pattern and font or fonts of choice Redfield *Umatrix filter (this is not a free filter) *alternative* Redfield **Jama 3D filter (freeware) both HERE Download the filter with your PSP closed Many thanks to Pat Carlucci who's artwork I use with a licence you can see here This tutorial was written January 6th 2007. Please feel free to LINK to this tutorial and/or print it out for your personal use, but please do not copy it in anyway to put online, pass out or re-write without my permission Supplies Frame and accents HERE Tube, gradient, pattern and font or fonts of choice Redfield *Umatrix filter (this is not a free filter) *alternative* Redfield **Jama 3D filter (freeware) both HERE Download the filter with your PSP closed 1. Open a new, blank image 500 x 500 pixels transparent image (16 million color depth). File > New > set size & set color depth. 2. Open the frame and copy and paste as new layer into the blank canvas. Rename the layer frame. 3. Click on your magic wand and holding down the ctrl key on your keyboard click into all the smaller outside boxes. Be careful with the larger box at the side! 4. Selection > Modify > expand by 4. Add a new layer and drag it below the frame layer. Select your gradient of choice and making sure the new layer is highlighted, flood fill the boxes. Rename the layer, boxes 5. Go back to the frame layer and with the magic wand click inside the large middle area. Add a new raster layer and drag it below the boxes layer. Change your gradient to the radial option (the bottom option) and then flood fill this layer. Keep selected. 6. Effects > Plugins > Redfield *Umatrix or **Jama 3D * Redfield Umatrix, select R-Frame with default settings ** Jama 3D, select dance floor. Click and hold on the yellow button at the top right hand corner and drag to the left and upwards until the numbers read: left -25 and right -18. Deselect. 7. Click back on the frame layer and with the magic wand click onto the black line of the frame. Flood fill with the pattern of your choice. Keep selected. 8. Add an inner bevel of your choice, while still selected add a drop shadow with the settings: v > 2, h > 2, opacity > 100, blur > 2, color > black. Deselect. Make top layer active. 9. Open, copy and paste your tube, resize and position as desired. Add an accent as desired. Add a drop shadow to both with same settings as step 8. 10. Change your gradient back to the normal linear option and the open your font. With antialias and create as vector both checked add a word such as "sexy" or "beautiful" to add to the top of the frame. Resize and position as desired then convert to raster layer. Add an inner bevel of choice and drop shadow with same settings as before. 11. With the same settings as step 10 add the name for your tag, again resize and position as desired, convert to raster layer when happy. Add the same inner bevel and drop shadow as above. 12. Add any copyright/licence required as a new layer and a layer for your own watermark. Crop and/or resize as desired and save as a jpeg. Below are a couple of alternatives, the gold one is done with Jama 3D. I hope you enjoyed the tut and look forward to seeing any results!   | 
 Important Announcement