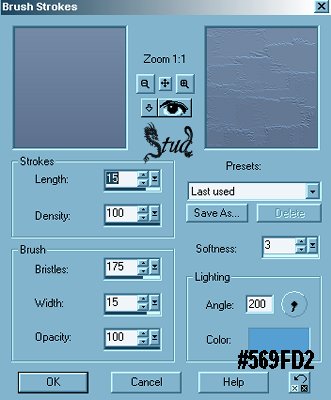
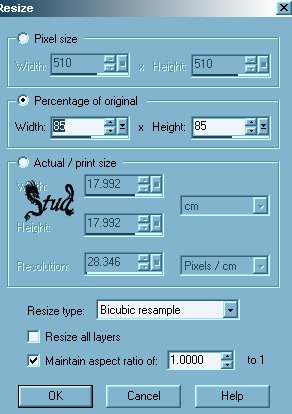
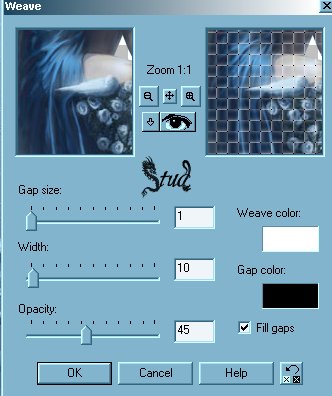
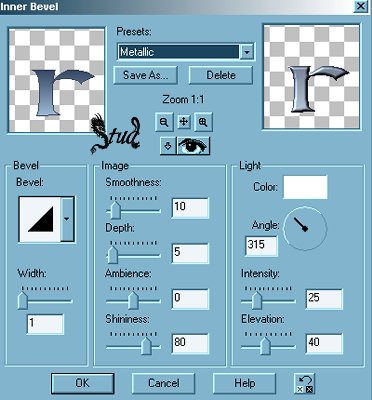
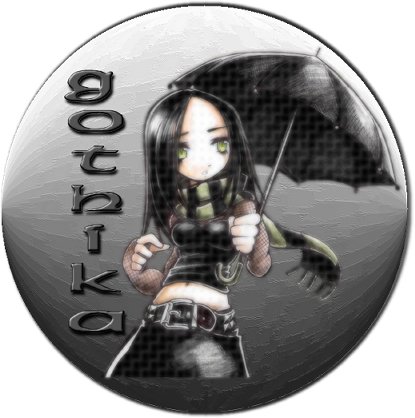
Weaved Angel Tutorial  This tutorial is my own creation, any similarity is purely coincidental! This tutorial was written May 15th 2005. Please feel free to LINK to this tutorial and/or print it out for your personal use, but please do not copy it in anyway to put online, pass out or re-write without my permission ©§tud Supplies Needed PSP Tube and Font of your Choice my tube & font here I used no outside filters for this tutorial but if you choose to I'd love to see your results! This tutorial is my own creation, any similarity is purely coincidental! This tutorial was written May 15th 2005. Please feel free to LINK to this tutorial and/or print it out for your personal use, but please do not copy it in anyway to put online, pass out or re-write without my permission ©§tud Supplies Needed PSP Tube and Font of your Choice my tube & font here I used no outside filters for this tutorial but if you choose to I'd love to see your results! 1. Open a new, blank image 600 x 600 pixels transparent image (16 million color depth). File > New > set size & set color depth 2.Open your tube and using the color selector, left click on a dark color and right click on a pale color to select your background and foreground colors. Select the gradient you've just made on the colors palette, it will be at the beginning of your gradient list 3. Click on Effects > artistic effects > brush strokes > large dry brush with the following settings: Length > 15 Density > 100 Bristles > 175 Width > 15 Opacity > 100 Softness > 3 Angle > 200 color ~ #569FD2 (or choose a mid range color from your tube) 4. Effects > Geometric effects > circle. Reduce the opacity to 86 on the layer palette and then click on Image > resize and resize by 85% making sure that resize all layers is UNchecked and bicubic resample is selected 5. Add a drop shadow with the following settings: Vert ~ -4, Horiz ~ 2, Opacity ~ 100, blur ~ 5, color ~ black (#000000). Repeat the drop shadow and change the vertical to 4 6. Copy your tube and paste as new layer, move it to your desired position and resize if necessary. Duplicate your tube and hide the copy, make sure the original is highlighted and click on effects > texture effects > weave with the settings: gap size ~ 1, width ~ 10, opacity ~ 45, weave color ~ white #FFFFFF, gap color ~ black #000000 7. Click on effects > blur > gaussian blur with radius of 2, repeat the weave with the same settings as before. 8. Unhide your copy and reduce the opacity until you start to see the weave show through, mine was 67. 9. Open your font and minimize it to your toolbar. Add your text with create as vector and antialias checked. If you're using the same gradient as your background, you may want to invert it so it shows up more! Resize and position it as desired then convert to raster. 10. With your text layer highlighted, click on effects, 3D effects, inner bevel and select the metallic preset with the settings: width ~ 1, smoothness ~ 10, Depth ~ 5, Ambience ~ 0, Shininess ~ 80, color ~ white, angle ~ 315, Intensity ~ 25, Elevation ~ 40 11. Add a drop shadow of your own choosing, I used the same settings as I had used last time for ease. Add a layer for your watermark then go to Layers > merge > merge visible and resize as desired (it shouldn't be larger than 400 pixels on it's longest length! AFTER resizing add your copyright details so that it can be seen properly, merge visible again. 12. Save as a JPEG and you're done! I hope you enjoyed trying this tutorial and I look forward to seeing your results! Many thanks to the great members of Tags4Snags of which I'm also a member who used this tut as a challenge and gave me permission to add their great work as examples of how different one tut can look! I think they all look GREAT don't you? By ChainedRose By Charlie - management here and in T4S! Both by Jackie- management of T4S By Gothika ( who also has her own site here) By Cindy By Ginger By Kia By Ishy By Stephy By Tammie By Suz. She thinks the artwork is Ayumi but isn't sure and didn't want to put the wrong © on. If you know who did that artwork plz let me know so we can give the right credit! Fantastic tag too tho!! | 
 Important Announcement