MSN Home  |  My MSN  |  Hotmail
Sign in to Windows Live ID Web Search:   
go to MSNGroups 
Free Forum Hosting
 
Important Announcement Important Announcement
The MSN Groups service will close in February 2009. You can move your group to Multiply, MSN’s partner for online groups. Learn More
The Quiet Corral2[email protected] 
  
What's New
  
  QC Members (41/21)  
  Spammer List  
  4 Saving Threads  
  QC2 Threads  
  Messages  
  
  Test Page  
  Pictures  
    
    
  Links  
  Painters of Words  
  Mar's testpages  
  Backgrounds (Winter)  
  More backgrounds  
  Example for question thread  
  Page Builder for HTML  
  BayRosie Test Page#1  
  BayRosie Test Page #2  
  BayRosie Test page #3  
  BayRosie test page #4  
  BayPage5snagged templates  
  Baypage6snagged templates  
  Welcome  
  Welcome 2  
  Shyly TEST1  
  testing recipe list  
  WhatsNewPageQC1  
  Shyly Jukebox Test Page1  
  ShyHalloweenTest1  
  ShyHalloweenTest2  
  testlist to keep track of threads  
  Test NY page  
  SiteSearchCatagories  
  New Test List  
  testing new page  
  test  
  2 Remember  
  archives  
  Storage  
  storage  
  
  
  Tools  
 
All Message Boards : How To Use Custom Backgrounds
Choose another message board
 
     
Reply
 Message 1 of 11 in Discussion 
From: MSN NicknameShylyQ  (Original Message)Sent: 9/18/2004 2:54 PM
This is from BTB by Skyangel


To Use Custom Backgrounds.

1.Click the Tables Icon

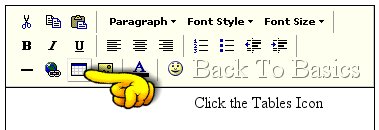
2. A new window will pop up. Click Rows and Columns. In the rows and Colums  box you will see #2. Change this to  #1 so you have one row and one column.

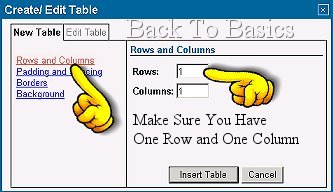
3. Next click Padding and Spacing. In the Padding  box Type any number you want. Small numbers make thin frames in your table. Large numbers make wider frames. See the Frames on the sides. The wider ones are 15 the smaller ones are 5. Variations in  sizes make more interesting frames. Set your Cell Spacing to 0. You do not need cell spacing to make Frames.

4. Click Borders. Set your border width to 0, unless you particularly want a  plain coloured border around the table. If you do want a plain border, then chose your border colour and set  the border number according to how thick you want it. Small numbers make thin borders. Large numbers make  wide borders. The outside table in this set has a border width of 3. The next one has a border width of 1  the next one has a border width of 0

5. Click Background. We are now going to put an image URL into the box.

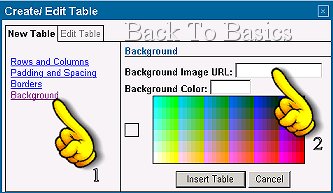
6. First you need to place your images in an Album or someplace on the web where you can see them and  find their URL..See Making a Photo Album 

 Go to where your images are stored

7. Chose which Background you wish to use..Click on the small thumbnail in your album so you get the larger picture

 Right Click on the picture and you will see a drop down menu as in the picture below.

  Click On Properties. A new window will pop up showing you the address ( URL ) of your picture

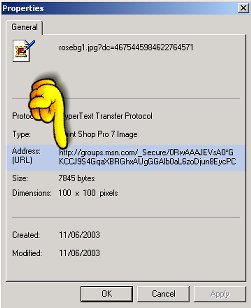
8. Triple click (3 fast clicks in succession) on the address bar so it is all highlighted. Or you can click and drag over the whole lot but make sure you get ALL of it. Copy It. ( Ctrl + C ).. You can then close down that window.

9. Go back to your discussion window and paste the URL into the box. Press Ctrl + V to paste it.

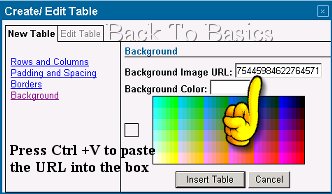
10. Click the Insert Table Button under the colour  chart. and your table should appear in your reply window.as in the sample below.


To add more  tables inside the table. Simply repeat the whole process as many times as you like. Your Tables will expand as you put writing  and pictures inside them.


Also Check Web Page Backgrounds. for a link to many free backgrounds

Have Fun. Please post your work or any questions below.


First  Previous  2-11 of 11  Next  Last 
Reply
 Message 2 of 11 in Discussion 
From: MSN NicknameShylyQSent: 9/18/2004 3:17 PM
I did it.............. EEEEEEEEEHAWWWWWW....


Reply
 Message 3 of 11 in Discussion 
From: MSN NicknameShylyQSent: 9/18/2004 3:19 PM
ooooops I forgot to put the poem in............
 
but that's ok i did it anyway LOLOLOLOLOLOL

Reply
The number of members that recommended this message. 0 recommendations  Message 4 of 11 in Discussion 
Sent: 9/18/2004 5:57 PM
This message has been deleted by the manager or assistant manager.

Reply
 Message 5 of 11 in Discussion 
From: MSN NicknameBayRosie-2Sent: 9/18/2004 5:59 PM
Well I  got half of it right... I need work on how to add the writing though ..... and how to adjust the backgrounds
 

Reply
 Message 6 of 11 in Discussion 
From: MSN NicknameShylyQSent: 9/18/2004 6:06 PM
OK if you add the writing directly from the site you won't get all the <OP> stuff
 
And as for adjusting the layers you click on a specific layer to make it have the dots around it then click the columns button again, then click adjust columns or whatever it is you can go and change numbers for that specific layer
Try it I know it works You may have to do it in a place like a web page so you can go in and edit the page, though. I don't think you can do it in a post.
Q

Reply
 Message 7 of 11 in Discussion 
From: Rainbow MouseSent: 9/18/2004 6:48 PM
test
 

add your  text here 

let's see how this goes


the above is borrowed from another group i'm in
now i try to make one myself:


don't pay attention to the colour 

i'm just trying out some things


        looks  like it is      

doing what i want

well, almost


Reply
 Message 8 of 11 in Discussion 
From: MSN NicknameTheMarEmmSent: 9/20/2004 2:50 AM
looking good!
congrats!
 
Christelijke muziek koop je bij Gospel.nl
www.gospel.nl/?affiliateID=1698

Reply
 Message 9 of 11 in Discussion 
From: MSN NicknameShylyQSent: 9/20/2004 6:25 AM
OK Mar, now build yourself a web page on this site, and see if you can do it . Use the things in the album on the main site, that is named Q poems or something like that.
Goood Job
I deleted the one I did but I wish you'd leave yours there. I will make another later.
Q

Reply
 Message 10 of 11 in Discussion 
From: Rainbow MouseSent: 9/20/2004 9:36 AM
lol, this was an answer to BayRosie's deleted post ...
but the mail delivery took so long that it arrived after my own post
now it looks as though i am complementing myself while i meant to say well done BayRosie!


Reply
 Message 11 of 11 in Discussion 
From: MSN NicknameShylyQSent: 9/20/2004 11:35 AM
To get the right wdth make sure you have everything inside you want inside, then you click your curser  inside at the left edge of the one you want to widen. and hit the spacebar as many times as necessary to widen as it reachs the opposite side. you have to make sure all the writting is in too or it will widen more as you go accross. (unless you backspace to take out a space to compensate)
When you are finished with the entering all you need inside you can put your curser at the left lower to hit enter as many times as needed to lengthen.
Is that making sense?
Q

First  Previous  2-11 of 11  Next  Last 
Return to All Message Boards