|
Getting Ready:
You will need approximately 3-1/2 yards total fabric for each side (top and bottom covers). For the basic body-rectangles, you will need about 2-1/2 yards each—the extra yard is for tabs and seam-binding strips. (You may opt to use a contrasting fabric.)
| 
| ![]()
Project crafted by Kathy Curotto Hammocks Rule!
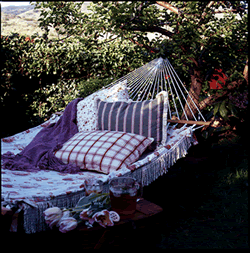
Who can resist that carefree, totally relaxing sway of a hammock under the treetops on a lazy late summer day? Especially when it’s our sumptuously appointed nest, complete with its drift of pillows and charming fringed cover.
To Make Floral Top Cover:
1. Measuring hammock from knots, not from frame, calculate length and width; add 1�?to both, and cut out rectangle that size from chosen fabric. (For instance, our hammock measured 53�?wide, so the width of the rectangle needed was 54�? a convenient size since many fabrics come in this width. Make sure the fabric you choose is wide enough for your hammock.)
2. You will need 4 fabric strips to bind edges of body to fringe and tabs; these strips give the slipcover a crisp tidy border and a neat underside. (Two strips should measure length of hammock plus 1�? the other 2 should measure width of hammock plus 1�?) Making sure to cut widthwise (you have no fabric to spare in the other direction!), cut strips 1-1/2�?wide. (Number of strips you cut depends on your hammock’s measurements.) You will need to piece 2 widthwise strips together to arrive at correct measurement for lengthwise strip.
3. From the remaining fabric, cut 28 tabs 9�?x 2�? (You will have 5 tabs across on each end and 9 on each side.) Fold each piece in half lengthwise, right sides together, for a 9�?x 1�?piece, then stitch close to edge with 1/4�?seam, leaving opening at bottom. Turn inside out, press, and leave bottom edge raw.
4. To mark tab placement, fold body rectangle of fabric lengthwise in half (wrong sides together) and in half again and again, marking folds at edge of fabric with pins. You will have 9 pins on right side of fabric including corners. Unfold rectangle and fold widthwise (wrong sides together again) in half and in half again and mark right side with pins. You will have 5 markings.
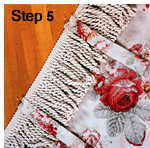 5. Lay top rectangle out flat, right side facing up. On length sides only, pin fringe (edge of fringe will be flush with raw edge of hammock body, with the loose, fringy part pointed in toward rectangle body). Next, pin tabs at marked places. (You’ll have to peek under fringe a bit to see pins. Tabs and body will be sandwiching fringe, with raw edges of tabs flush with raw edges of body—see photo of step 5.) 5. Lay top rectangle out flat, right side facing up. On length sides only, pin fringe (edge of fringe will be flush with raw edge of hammock body, with the loose, fringy part pointed in toward rectangle body). Next, pin tabs at marked places. (You’ll have to peek under fringe a bit to see pins. Tabs and body will be sandwiching fringe, with raw edges of tabs flush with raw edges of body—see photo of step 5.)
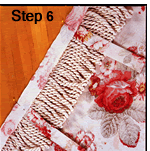 6. Pin unfinished strip, right side down, on top of the other three layers (with tabs immediately under strip, and strip’s outer edge flush with raw edge of body)—see photo of step 6. Pin in place and stitch all together with 1/2�?seam. 6. Pin unfinished strip, right side down, on top of the other three layers (with tabs immediately under strip, and strip’s outer edge flush with raw edge of body)—see photo of step 6. Pin in place and stitch all together with 1/2�?seam.
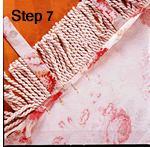 7. After stitching, turn the whole piece over and lay flat so wrong side of hammock body is facing up toward you. (Strip will now be on bottom layer.) Pull strip, fringe, and tabs out from underneath hammock body, pointing to the right—see photo of step 7. Fold strip edge up-and-over to the left (toward body), covering raw edges of seam (trim seam as needed so strip will fit over seam edges). Next, pinch seam (now sandwiched on top and bottom by the strip) and continue to fold over to the left once more, pressing right side of raw strip edge onto wrong side of hammock body; pin into place—see photo of step 7. (You should now have a tidy little ridge with no raw edges showing.) 7. After stitching, turn the whole piece over and lay flat so wrong side of hammock body is facing up toward you. (Strip will now be on bottom layer.) Pull strip, fringe, and tabs out from underneath hammock body, pointing to the right—see photo of step 7. Fold strip edge up-and-over to the left (toward body), covering raw edges of seam (trim seam as needed so strip will fit over seam edges). Next, pinch seam (now sandwiched on top and bottom by the strip) and continue to fold over to the left once more, pressing right side of raw strip edge onto wrong side of hammock body; pin into place—see photo of step 7. (You should now have a tidy little ridge with no raw edges showing.)
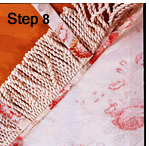 8. Stitch into place, close to edge, being careful to keep fringe out of the way—see photo of step 8. 8. Stitch into place, close to edge, being careful to keep fringe out of the way—see photo of step 8.
9. Repeat steps 6, 7 and 8 on other sides, adjusting directions for non-fringed sides. (For optional bottom cover, repeat entire directions omitting fringe.)
To keep your hammock looking fresh, Scotchgard periodically, and keep it under cover or indoors when not in use. |
 Free Forum Hosting