MSN Home  |  My MSN  |  Hotmail
Sign in to Windows Live ID Web Search:   
go to MSNGroups 
Free Forum Hosting
 
Important Announcement Important Announcement
The MSN Groups service will close in February 2009. You can move your group to Multiply, MSN’s partner for online groups. Learn More
The YapYap Sisterhood[email protected] 
  
What's New
  
  Susie's Stuff  
  General  
  My Scrap Board  
  My Recipe Box  
  Appetizers  
  Beef Recipes  
  Breakfast  
  Cakes  
  Cookies  
  Copy Cat Recipes  
  Crock Pot  
  Eating Healthy  
  Fish Recipes  
  Garden Fresh  
  Holiday Goodies  
  Just Desserts  
  Mmmmm Pie  
  Pasta Dishes  
  Pork Recipes  
  Poultry Recipes  
  Soup  
  Vegetable Dishes  
  .·:*¨¨* ≈☆�?*¨¨*  
  Gardening  
  You're so Crafty  
  .·:*¨¨* ≈☆�?*¨¨*  
  Special Tribute To FTLODS Furbabies At The Rainbow Bridge  
    
  CHAT ROOM  
  Pictures  
  Game Board  
  Naturally Health  
  Furbaby 1st Aid  
  Dog Treats  
  
  
  Tools  
 
General : Silent Night Tut
Choose another message board
 
     
Reply
 Message 1 of 1 in Discussion 
From: MSN NicknameDogma_SuZ1  (Original Message)Sent: 12/8/2006 4:41 PM

Silent Night - TuT

This TuT assumes that you are beyond beginner. 

Please NOTE that you have to join here before you can access the supplies.  Just click the "join now" in the left nav bar...fill out the application. Please be SURE your address is hidden.  Then...you're in!  There is NO WAITING. 

The supplies are zipped up with Winrar which you can get here if you don't already have it.

Make a folder for your supplies and download from HERE. Included in supplies: Image, bow and gradient.  I am not able to supply the font because it's a payfer.

Eyecandy 3.1 available HERE

I use DSBflux for most noise and you can get that filter HERE.

If you need help installing your plugins, go HERE first.

1) Unzip and Install the eyecandy 3.1 and DSBflux in your plugins folder and the gradient into your gradient folder.

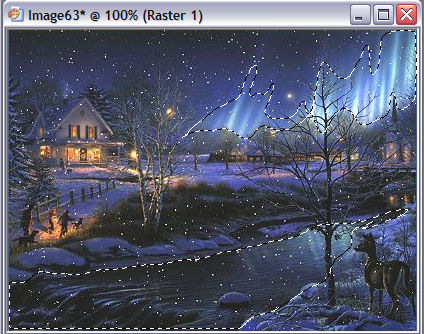
2)  Bring up the image into PsP, duplicate it and close the original.  Next go UP to Image/Canvas Size and make your canvas 500x500.

Now in your layer palett, right click and choose duplicate image twice and x-out the top two layers.  Working on the bottom layer...>

3)  get your Freehand Selection Tool, set to add and Edge Seeker, go around the lights and the river something like this:

 4) Now we'll apply the noise.  Go UP to Effects/Plugins and find DSBflux/Bright Noise.  Use these settings:


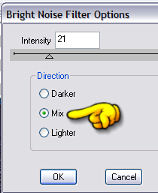
5) Next un-X the next layer up and Highlight it.  Go back UP to Effects/Plugins/DSBflux/Bright noise and just click once on the "Mix" button.

6) Repeat step 5.

You now have 3 layers with different noise on them.  Save these layers as Night Layers and in psp form.

NOTE:  Make your saying, "Silent Night" or whatever you want. I'm not going into detail with this step.  Just use font and size of your choice.  Obviously, I used white. 

You only need one copy of your saying.  Save it in psp form.

7) Now we'll make the frame.  Bring up a 500x500 canvas.  Right click on the top of your Nightlayers and copy.  Then right click on the top of the new canvas and paste as new layer.  You just made a working copy which in the end we will delete.

8)  Go UP and get your Magic Wand and click it on the canvas.  Then Go UP to Selections/Invert.  Go back UP to Selections/Modify/Select Selection Borders use:

Both sides
Border Width - 4
Anti-alias checked

9) In your materials palett, bring up the supplied gradient and use these settings:

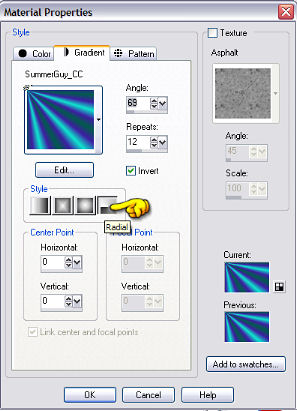
10) Now flood-fill your selection.

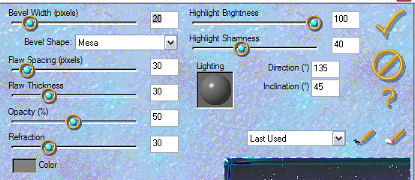
11)  Keep your marching ants going! ...and go Up to Effects/Plugins/EyeCandy 3.1 and use these settings:

12) Now go Up to Effects/3d Effects/Drop Shadow and use these settings:

Vertical = 1
Horizonal = 1
Opacity = 50
Blur = 5.00
Color = Black

13)  Right click on top of canvas and copy.
Right click on workspace and Paste as New Layer.

You now have a frame made.  Save it as "Night frame".

You can delete the working copy of the image and frame you just worked with and...

14) Bring up the RedBow to your workspace.

15)  We're going to colorize it and add a shadow.  Go up to Adjust/Hue and Saturation/Colorize and use these settings:

 16)  Now go up to Effects/3d Effects/Shadow and use the same settings as in step 12:

Vertical = 1
Horizonal = 1
Opacity = 50
Blur = 5.00
Color = Black

17)  Save the bow naming it "Bow" in psp7 compatible form.

Now we're going to bring up all the elements you just made into Animation Shop and put them together.

18)  Working first with the 3 Night layers and the Night frame, click on the Night layers then go UP to Edit/Select All. 

19) Next click on the top of the Night frame and then click on the propogation tool...making sure it looks indented.

20) Now click your cursor on the edge of your Night frame image and hold cursor down and slide it onto the 1st frame of your Night layers.  Position it correctly and let go of your cursor.

21)  Do the same step 20^ on your saying and with the bow you made.

22)  Now with all your frames put together, go UP to Edit/Select All.  Back UP to Edit/Copy and go over to your PsP and right click on the workspace and Paste as New Image.

23)  Put this shadow on each of your layers:

Vertical = -2
Horizonal = 6
Opacity = 14
Blur = 2.5
Color = Black

24)  Save your layers again and bring them up in AS.

25)  Go UP to Edit/Select All.  Then UP to Animations/Frame Properties and set your speed.  I put mine at 19.

26)  All you need to do now is:

Right click on top of the animation and choose Animation Properties/Opaque  color=white

Hint:  I also at this point choose the comments tab and put in the name of the font I used.

25)  Add your watermark and crop to size.

ENJOY!!!


First  Previous  No Replies  Next  Last