Make Ur Own Snow Globe - TuT
Please NOTE that you have to join here before you can access the supplies. Just click the "join now" in the left nav bar...fill out the application. Please be SURE your address is hidden. Then...you're in! There is NO WAITING.
The supplies are zipped up with Winrar which you can get here if you don't already have it.
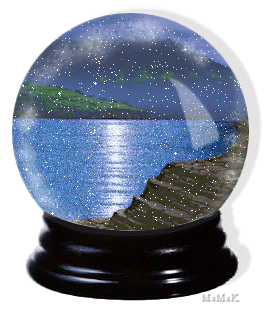
Make a folder for your supplies and download from HERE. I am not including any background w/the supplies. That's the point of this TuT for you to create your own unique globe. What is included: Snow Globe image, base and snow layers.
1) Bring up Snow globe and scenic background of your choice.
NOTE: Many of the backgrounds are in .jpg form and you need to go over to your layer pallet and right click on the bkg layer and "Promote Background Layer" to raster.
2) Copy and paste the globe as a new layer onto the bkg.
3) Making sure you are using the bkg layer, get your Selection Tool (see red arrow below) set to: Type: Circle, Mode: Replace, Feather: 0, with Anti-alias checked.
Now click in the center of the globe, but ON the bkg layer, pull out a circle close to size of the globe.
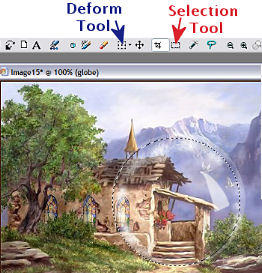
4) To edit this selection and fine tune it to size, go UP (on your menu...not your tool bar) to the Selections/Edit Selections. A red circle will appear.
5) Now get your deform tool (see blue arrow ^ on above Ex.) and a bounding box will appear around the red edit section:
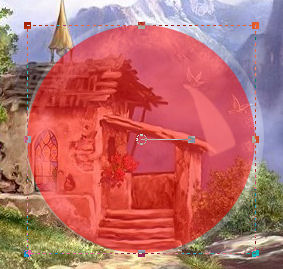
Pull out the little nodes until it's just inside the globe. You can put your cursor right in the middle too and click&hold and move the red edit circle around.
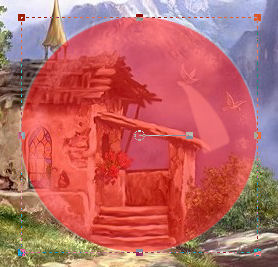
7) Once you have the circle in the right shape, (you don't want it exactly on the globe...more inside it) go back UP to Selections/Edit Selections and the red will disappear and you will still have the marching ants.
8) Make SURE you are on your bkg layer! Go back UP to Selections/Invert and then UP to Edit/Clear. The unnecessary part of the bkg will disappear leaving you with your background globe! Cool...huh? :))
9) Now...go back UP to Selections/Invert and you will have your marching ants just around the circle. Go back Up to Selections/Save Selection to Alpha Channel. Save naming it: SG snow.
10) Go back UP to Selections/None. Click on your bkg globe layer that you just made and save it in psp form. Name it: Globe bkg.
10) Bring up the BigSnowara layers to your workspace and go UP to Selections/Load Selection from Alpha Channel and pick your SG snow.
You can move this selection around on the layers by using the same Selections/Edit Selections technique we just used. Only DON'T USE the deform tool! Just when you get the red outline, you can click in the center of the red circle and it will move around. When you have it where you want it, go UP to Selections/Edit Selections and it will turn back into the marching ants.
11) With your marching ants still going, go back UP to Selections/Invert and you're going to have to clear off the excess snow on each layer.
Go over to your layer pallet and x-off all but your first layer. Hit your delete key. Move up to the next layer un-x it and make sure it's highlighted and Hit your delete key. Keep doing this until you have all 20 layers cleared off.
Up to Selections/None.
Save your snow layers in psp form naming it: Snow Layers and then bring them up in Animation Shop (AS).
12) In AS, bring up the snow globe layer and your bkg globe you made.
13) Now we need a bigger canvas to work on so go UP to the litte paper icon that looks like this:  and make a canvas 450 x 450 transparent. Then using your copy icon:
  make 19 copies of that canvas for a total of 20 frames.
14) With the new canvas frames active, go UP to Edit/Select All. Next click on your bkg globe and then go UP and click on the propogate paste icon:  and then hold your cursor on your bkg globe and slide it onto the middle of the first frame of your new frames. That should put one copy of your bkg globe into each of the 20 frames.
15) Next we'll add the snow. With the bkg globe frames active, go UP to Edit/Select all. Then with the snow frames active, go UP to Edit/Select all, back UP to Edit/copy...and click on the 1st snow frame and hold your cursor on it and slide it over to the first frame. DON'T LET GO! You'll have to position your snow outline so that it is INSIDE of the globe. When you have it positioned correctly...let go of your cursor.
If you screwed up...just hit your Undo icon:  and repeat step 15.
NOTE: If you screwed up, you'll be left with empty snow frames where the snow used to be. Just click on the top of the empty snow frames and click the Undo button. That will bring the snow back into the frames.
16) Now we'll add the globe layer. With your 20 frames of globe & snow active, go UP to Edit/Select all. Then go over to your Snow Globe layer and click on it to make it active and go Up to the propogate paste icon. Make SURE that the little icon looks indented. 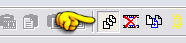
Do the same click, hold and slide onto to the 20 frames holding your cursor until you have it position correctly and let go.
Click on the run animation icon:  and see if everything is right. If not...undo and do over. If OK...let's continue.
17) The next thing we have to do is add the base. So click in the first frame of your animation and then right click on the top of the frame and choose copy.
Go over to PsP and right click on the workspace and paste as new animation.
18) Get your base image and copy paste a new layer of it onto the frame you just brought into PsP. It may or not be of the correct size. If the base needs to be resized for your globe, then get your deform tool and use the nodes to tweek the base into the desired size.
BE SURE TO go Up to Adjust/Sharpeness/Unsharp Mask after tweeking your base and use these settings: Radius: 1.00 Strength: 25 Clipping: 0 Luminance unchecked.
18) In your layer pallet, delete the globe and save the base layer name it: SG base.
19) Bring the SG base up into AS and add it to your globe as described in step 16 using your propogation icon.
20) The only thing left to do is add a shadow. So go UP to Edit/Select all and then back UP to Edit/Copy.
21) Go to PsP and paste as new image on your workspace. You'll have 20 layers staring back at you!
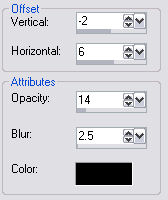
22) I used these settings for my globe:
So add a shadow to each layer.
At this point, if you want to add other elements to the globe, you can. I'm not taking you through all that. I think you can figure that out from what I've already told you here. 
When you're done, save it naming it: SGwShadows
23) Bring SGwShadows up in AS. Go UP to Edit/Select All. Then UP to Animations/Frame Properties and set your speed. I put mine at 19.
24) All you need to do now is:
Right click on top of the animation and choose Animation Properties/Opaque color=white
25) Add your watermark and crop to size.
ENJOY!!!

 Important Announcement

 First
First