| I wrote this tutorial on 25th of August 2007 and any similarity to any other tutorial is purely coincidental. Please feel free to print it out for your own personal use but please do not claim it as your own. All materials and tubes used are copyright to their respective owners and will be credited accordingly. If there is something I have used and it is yours, please let me know so I can give you the credit you deserve. This tutorial assumes you have a Good working knowledge of PSP.
Supplies Needed:
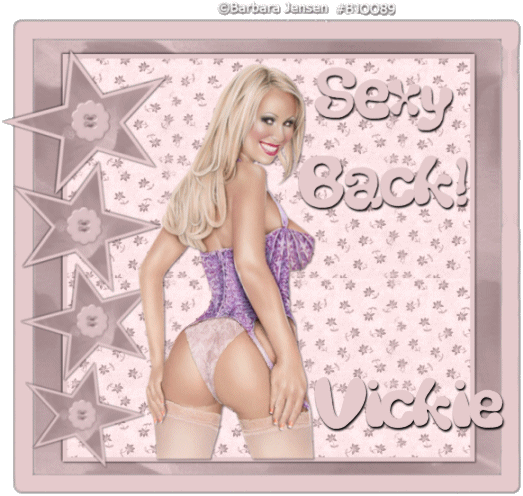
Paint Shop Pro (I used 7 but can be done in any version) Tube of Choice (I used the Gorgeous artwork of ©Barbara Jensen). You can Purchase a Licence to use her Artwork here. Font of Choice (Thickhead). Scrap from clarey called Wisteria which you can download here. I used a filter called Gloop which I used to make her buttocks move. Just unzip the filter and place in your psp filters folder. Open supplies and minimize for later! Open a blank canvas 600x600 you can resize later. Layer new raster layer. Using your preset shapes, draw out a star of choice, using a color from your tube and pattern from one of the papers from Wisteria scrap. I colorized my paper but that is up to you. Draw out your star. When you are happy with the size, go to layer pallet and convert to raster layer. Duplicate this and resize the duplicate 90. Align the resized star below the bigger one. Duplicate the duplicate and resize 90. Align the resized star below the bigger one. Duplicate the duplicate and resize 90. Now merge these stars visable. Add a drop shadow of choice. Copy and paste any elements from the scrap set you want into your star, then merge them visable. Layer new raster layer. Using your preset tool again set to rectangle line width set to 20 and pattern set to paper of choice you want to fill the rectangle. Draw out a rectangle(see my tag for reference). When pleased convert to raster add a drop shadow of choice. Draw out another rectangle a little bit bigger than the previous one, but this time have the patter set to null..convert to raster layer in your layer pallet and click inside of the rectangle with your magic wand..setting 10. Then selection/modify/expand by 2. Copy paper of choice into selection. Now click on the border of the rectangle you just drew and expand by 20 and flood fill with the color you have choosen from your tube. Then selection/select none. Now copy and paste your tube of choice on your tag, add your text of choice using a drop shadow of choice on both. Be sure and add your copyright information..unless you want to animate, then your tag is complete so merge all Animation To animate go to filters and find the gloop filter that you extracted earlier into your psp folder. Set yours to the setting I have below. 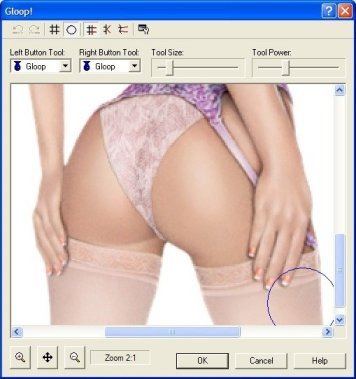
Now just push and pull on her buttocks until you are pleased with your results...You can always undo and go back and redo. Merge this visable go to animation shop and paste as a new animation..go back to psp undo the animation you just did..merge visable and copy and go back to animation shop and paste this after current frame. Now duplicate this two times having a total of 4 frames. Right click on any frame and go to frame properties and set the timing on the frames to 38..check your animation and if pleased then save as you prefer. I hope you enjoyed this tutorial | 
 Important Announcement

 First
First 