MSN Home  |  My MSN  |  Hotmail
Sign in to Windows Live ID Web Search:   
go to MSNGroups 
Free Forum Hosting
 

Important Announcement Important Announcement
The MSN Groups service will close in February 2009. You can move your group to Multiply, MSN’s partner for online groups. Learn More
VenablesArchives[email protected] 
  
What's New
  
  TUTORIALS  
  Tuts and things.  
  Welcome  
  General  
  ♦◊♦◊♦◊♦◊♦◊♦◊♦◊♦  
  Sue's Play...  
  Marina's C/S  
  Completed Backs  
  Mini Backs.  
  ♦◊♦◊♦◊♦◊♦◊♦◊♦◊♦  
  Dawn's Backs...  
  Dawn's C/S's  
  Backs Dividers.  
  Eilleens Backs  
  Eilleens C/S  
  Hileena's BG'S  
  Hileena's Awards  
  Hileena's Play..  
  ♦◊♦◊♦◊♦◊♦◊♦◊♦◊♦  
  Various Poems  
  AwardsReceived.  
  Solomon...  
  Pictures  
  Links  
  ♦◊♦◊♦◊♦◊♦◊♦◊♦◊♦  
  Welcome to Classes  
  Class Folders  
  Lesson 1 Tutoria  
  Lessons 1 - 4  
  Interim Lesson  
  Advanced Classes  
  Background Tips  
  WAMBO Class Stuf  
  ADII Stuff..  
  WAMBO Stuff.  
  1stLessonTut&C/S  
  Photobucket  
  2A large Print  
  ♦◊♦◊♦◊♦◊♦◊♦◊♦◊♦  
  Marina's Play  
  Diva's stuff  


  Tools  
 
Tuts and things. : Tutorials
Choose another message board
 
     
Reply
 Message 1 of 6 in Discussion 
From: MSN NicknameMarina4christ1  (Original Message)Sent: 1/7/2007 11:24 PM
How to Open Three Windows.
 
1. Clic on File, scroll to New Window, then to Window where it is blue, then clic again, you should see another window in your toolbar at the bottom of your screen.
 
2. Repeat the first step, you should now have 3 windows in your toolbar at the bottom of your screen.
 
You will need these 3 windows,
1. for your Folder page where you will be making your background.
1. for your entry into the lesson
and
1. for selecting your Tiles,Glitters, and Ribbons.


Any resemblance to any other tutorial of this kind, is purely coincidental.

Designed &HTML & © to Marina at VenablesArchives.


Reply
Recommend Delete    Message 3 of 4 in Discussion 
From: <NOBR>NineMSN NicknameMarina4christ1</NOBR> Sent: 23/12/2006 3:43 PM


Welcome to Lesson One.

Firstly you will need a folder for you to practice in ..so would you please go HERE, and make yourself one.  You will be doing your lessons 1 - 4  in this folder.

Now you will need to open 3 windows, if you are unsure of how to do this please go HERE.    Then return here.   

Open up a window in your Student Folder
Then Open up a window where you will find your tiles Here
And open up your third window for your Cheat Sheet Here

Now you are ready to copy your Cheat Sheet into your reply box, place your cursor at the top corner of the Cheat Sheet, clic and hold, dragging it all the way to the bottom, you will notice a change in colour, now Right clic/copy, now go over to your reply box, clic inside of it, and hit Ctrl+V, and vwalla your Cheat Sheet should appear.......

image

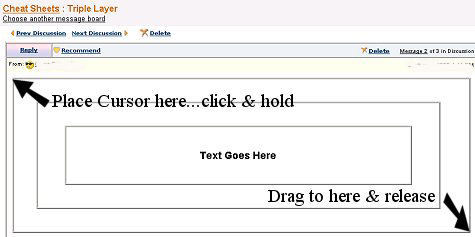
This is your basic 3 Layer, you do not have to colour the inner layer, if you do not wish to do so, as this is where your text or graphic will be going.

Now you will start to put colours into your layers, they are called Tiles,
which you will find Here, chose the colours you want to use, the first one could be for the bottom layer of your sheet.


image

 Open up the folder by clicking on the title i.e. purple, pink etc.,.

image

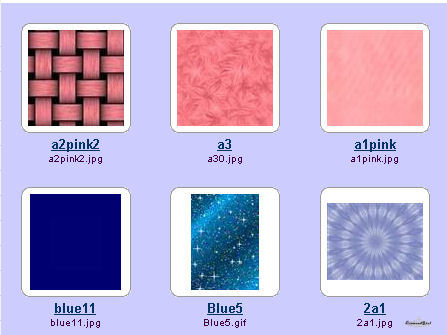
Then click on the Tile you want to use

  
 image
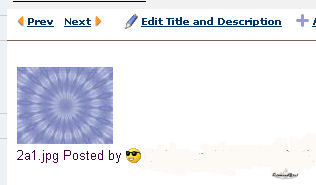
Now right clic on the tile, and a box will come up, scroll down until you come to properties, left clic and a box will appear, see where it says
Address (URL), left clic and holding it down gently scroll across and down, making sure you have all the address highlighted, as sometimes they are longer than is actually shown.

image


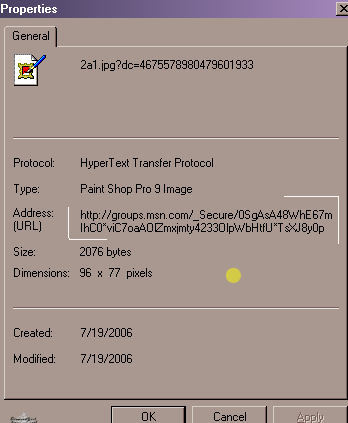
Having copied you know have to get it into your Cheat Sheet, so go back to your Reply box and left clic on the bottom layer of your Sheet.
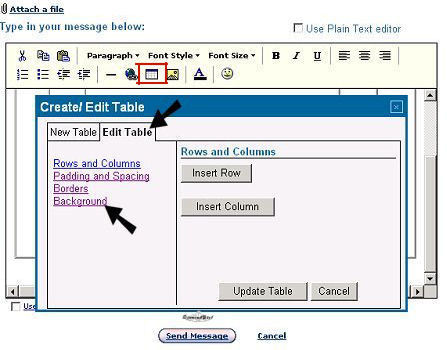
Look up to your icons, the center one, between the world and chain, and the picture of mountains, this is called Table Image, (Looks a little like a callendar) clic on it, now another box should come up,
 Clic on edit table, then clic on Background....  
See Sample below...

image

Another box will appear, this is where you will posting that URL (Address you saved earlier) Left clic inside the space for your URL, then Ctrl+V, if it does not show up, you will have to go back, to the Properties of the tile and gather it again by copying and pasting.

 image

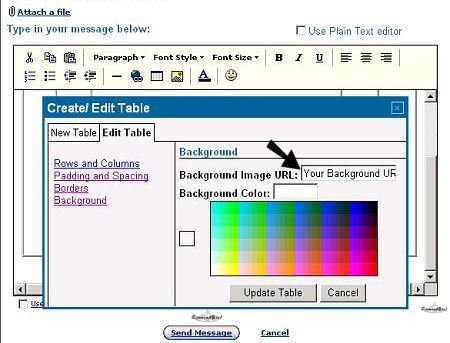
Now clic on Update Table, and your tile should show up in the bottom layer of your Cheat Sheet.
Now all that is left to do is follow the instructions for your other layers .

And now you have completed a Tiled backgroud ......

Well done ..... You will soon get used to it ...

And dont forget if you have any questions please post them on the
Questions for Backs Board, and we will get to them as soon as possible
Have Fun !!!!


First  Previous  2-6 of 6  Next  Last 
Reply
The number of members that recommended this message. 0 recommendations  Message 2 of 6 in Discussion 
Sent: 1/7/2007 11:26 PM
This message has been deleted by the manager or assistant manager.

Reply
The number of members that recommended this message. 0 recommendations  Message 3 of 6 in Discussion 
Sent: 1/16/2007 12:42 AM
This message has been deleted by the manager or assistant manager.

Reply
The number of members that recommended this message. 0 recommendations  Message 4 of 6 in Discussion 
Sent: 1/23/2007 6:55 PM
This message has been deleted by the manager or assistant manager.

Reply
 Message 5 of 6 in Discussion 
From: MSN NicknameMarina4christ1Sent: 2/1/2007 1:43 AM


Making double Verticles in Backgrounds.


1. Make yourself a five layer C/S, do not "Send Message"

2. Place your cursor in the last layer you have made, then
go to the top of the page and clic on Center Justify.....you
will notice that your cursor is now in the centre of your last Layer.

3. Go to Insert Table and do your rows and columns, as usual, as if you were going to make another Layer .. then go to HTML box and tic it...

4. Look carefully at this next part please, for this is what you will have to add to obtain the vertical bars .......I will have to type them out ....

5. Copy this layer for layer...

<TD> Align Middle
<TABLE class=NOBORDER borderColor=#cc9933 cellSpacing=0 cellPadding=0 width="97%" bgColor=#3399cc background="" border=0>
<TBODY>
<TR>
<TD>Align Middle
<TABLE class=NOBORDER borderColor=#cc9933 cellSpacing=0 cellPadding=0 width="98%" bgColor=#ffffff background="" border=0>
<TBODY>
<TR>
<TD>AlignMiddle><BR>
<TABLE class=NOBORDER borderColor=#cc9933 cellSpacing=0 cellPadding=0 width="97%" bgColor=#3399cc background="" border=0>
<TBODY>
<TR>
<TD>AlignMiddle
<TABLE class=NOBORDER borderColor=#cc9933 cellSpacing=0 cellPadding=10 width="98%" bgColor=#ffffff background="" border=0>

6. Be mindful of course about your spaces ...and remember to delete them as you go ....

7. Notice I have used widths of  97% and 98% .....these we can play around with, depending on the desired effects you want.....it pays to play around a little .    I have also added a colour so that it will be easier for you to notify what you have done ..

Everything highlighted in the previous notes are what have to be added to your layers ......

Have fun .......and if you got any questions holler ......ok??


Any resemblance to any other tutorial of this kind, is purely coincidental. 

Designed & HTML & © by Marina @ VenablesArchives.


Reply
 Message 6 of 6 in Discussion 
From: MSN NicknameMarina4christ1Sent: 2/12/2007 4:58 AM


How to put Links into Backgrounds.

Highlight the specific area where you want to put your link ......i.e. Link Button, or Word.
Proceed to the icon that looks like a ball and chain, clic on this, which will bring up a little Box ......clic on "Select Page" ( here I usually use the Welcome page of the group I am working in) ..clic on it .....and you will notice that the URL will be in place ...


HTML & Creation by Marina @ VenablesArchives.


First  Previous  2-6 of 6  Next  Last 
Return to Tuts and things.