a craft share - make a life's journey tin Life's Journey Tin 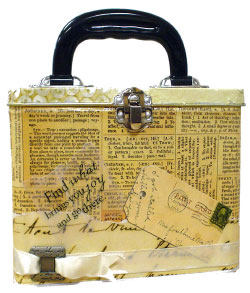 Supplies: Supplies: -
Tin Box -
Mod Podge -
1โ?Foam Brush -
Excel Craft Knife - Fine Pointed -
3-4 โLifeโs Journeyโ?papers, 12โx12โ? -
Your Choice of โLifeโs Journeyโ?stickers or embellishments -
Paper Trimmer Instructions:
-
Choose your โbottomโ?paper for the outside of the tin, front & sides. Trim two 3โ?strips. Using mod podge, adhere the strips starting on the lower back and overlay onto the lower sides. Then adhere the lower front piece, overlapping onto the previous side portions. -
Choose the โtopโ?piece of paper & tear a 2-3โ?strip. Using the paper trimmer, cut off the torn edge of the leftover paper. Tear another 2-3โ?strip. Adhere the strips to the upper back & sides. Adhere the side and half of the front up until the clasp. Using the craft knife, cut around the clasp. Adhere the remaining paper onto the tin. -
Cover the entire front sides & back with the mod podge to protect the surface. -
Choose the paper for the top of the tin. Using the craft knife, cut a slit in the middle of the sheet, wide enough for the handle to fit through. Slide the paper over the handle, and using the craft knife, carefully cut around the metal components of the handle. Adhere the paper onto the to. Wrap the paper onto all sides of the top, and using the craft knife, cut off the excess paper, again cutting around the clasp. Using a โhospital corner,โ?fold the corners around. Cut of any remaining excess. If you do not wish to use the wrapping technique onto the sides of the top, you can cut the paper flush and either use the same wrapping technique as the bottom with a strip of matching/contrasting paper that is the size of the side (around ยฝโ?or so.) You can also use a metal paint or border sticker. Finish off the top with a layer of mod podge. -
If you are using โLifeโs Journeyโ?stickers, apply them now as desired. Add another 2-3 layers of mod podge over the entire box. Allow to dry completely. Add any other embellishments, such as frames, metal words, epoxy stickers, etc. Make sure to use the appropriate adhesive (ex. E-6000 is heavy duty for metal pieces). Use a very light coat to avoid a mess. -
If desired, you can finish the inside of the tin to protect the contents. Use felt, fabric, paper-backed velveteen, or even just another matching/contrasting paper. |

 Important Announcement

 First
First 