HOBBIE & CRAFTS
Holiday Crafts
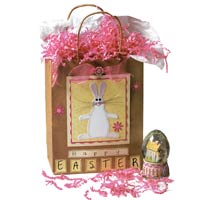
Easter Bunny Bag for the Kiddies/grankids
What You Need:
Use as an Easter basket filled with a
variety of candy, or as a gift bag
for someone special.
8-1/4-x-10-1/2-inch kraft bag
Paper punches as follows: 1/16-inch hole punch, 1/4-inch hole punch, 3/8-inch circle punch
EK Success Paper Shapers
Family Treasures Daisy punch
7-inch length of 1-1/2-inch-wide bright pink sheer wire-edge ribbon
Pink flower button
Fine twine
GoneScrappin.com bunny die cut
Chalk: gray and pink
2 4-3/8-inch lengths of wire
Card stock: black, light pink, and bright pink
Black ZIG Writer
Times to Cherish polka-dot paper in medium yellow and pale yellow
Provo Craft wavy-edge scissors
Mounting tape
Glue
Instructions:
Punch four 1/4-inch holes 1 inch from the top center of the bag, approximately 1/8 inch apart. From the front of the bag, thread ribbon in through the center holes and out through the outer holes. Trim the ends into a V. Tie a button on the ribbon with twine.
Punch two black circles and one light pink circle for bunny eyes and nose and glue them to the die cut. Draw a black mouth. Shade the edges of the bunny with gray chalk. Shade the corners of the mouth and the centers of the ears with pink chalk, blending to soften. Punch two tiny holes on each side of the nose and weave the wire whiskers through the holes.
Cut a 4-7/8-x-5-5/8-inch medium yellow rectangle and layer it on bright pink card stock. Trim the card stock with wavy-edge scissors for a narrow border. Adhere the pink card stock to pale yellow paper. Cut the paper to 5 3/4 x 6 1/2 inches. Adhere the bunny on the layers.
Cut six 1-x-1-1/4-inch medium yellow rectangles and one 5-1/2-x-1/2-inch pale yellow strip. Write the message and draw dashed lines on the papers in black.
Glue the bunny and message on the bag. Punch and layer three bright pink daisies and three light pink circles and adhere them to the bag.

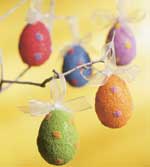
Glittered Easter Egg Ornaments
What You Need:
Decorate a tree or use in
Easter baskets to brighten
someone's day.
Small sponge brush
2-1/2-inch-long plastic Easter eggs (hot pink, orange, green, yellow, purple, and blue)
Mod Podge decoupage medium
Glitter (in colors to match the eggs)
Paintbrush
Waxed paper
Paper plate
10-inch length of 5/8-inch-wide sheer ribbon for each egg
Ruler
Scissors
Hot-glue gun and hotmelt adhesive
Instructions:
1. Using the sponge brush, cover a small area of a plastic Easter egg with decoupage medium. Sprinkle the area with glitter while the medium is still wet. Continue this process until the entire egg is covered. Place the egg on waxed paper to dry.
2. Once the egg is dry, dip the handle end of the paintbrush into the decoupage medium. Dot three or four drops of the medium on the egg surface. Working over a paper plate, sprinkle the wet drops with a contrasting color of glitter. Shake the excess glitter back onto the paper plate. Continue in this manner until you've covered the entire egg with polka dots. Allow the egg to dry completely.
3. Fold a ribbon length in half. Tie a knot in the folded ribbon 2 inches from the fold, and tie the ends into a bow. Trim the ribbon ends. Glue the bow loop to the top of the egg.
One more idea...
Add your decorated eggs to a spring floral bouquet for a bright-colored holiday touch.

 Important Announcement

 First
First 