Recycling Crayons
 | 

Make fun refrigerator magnets out of melted crayons. Instructions below. | | Family fun expert Donna Erickson shares project ideas for recycling old crayons. Crayon Magnets Materials: old crayons
baby food jars
saucepan or electric skillet
water
candy molds
hot glue gun
magnets
note pad Steps:
- Remove the paper wrappers and break up the crayons into small pieces.
- Divide the pieces by color into empty baby food jars.
- Place a small rack inside a saucepan or electric skillet and put the baby food jars on the rack.
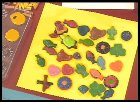
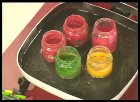
Fill a pan with enough water to reach halfway up the jars (figure A), then heat the water until the crayons melt. Pour the melted wax into various candy molds. If you choose, pour a contrasting color in one of the molds after the first wax layer has hardened. When all of the molded wax has hardened, simply pop the new designer crayons out of their molds. Freeze to harden them quickly.
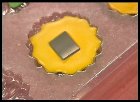
Glue a magnet on each blob (figure B) while the wax is still soft. Store on the refrigerator with a notepad. Melted Crayon Art Project Materials: old crayons
newspaper
electric frying pan
heavy duty aluminum foil or an old beating tray
construction paper
frozen ice-treat stick
ribbon Steps:
- Line a table with newspaper.
- Remove the paper from the crayons and arrange the crayons in piles according to color.
- Cover the bottom of an electric frying pan with heavy-duty aluminum foil or use an old heating tray. Set the pan on low heat.
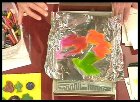
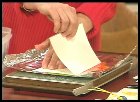
Place various crayons on the foil and wait for them to melt into a puddle (figure C). Fold a piece of construction paper in half. Lay the outside surface of one side of the paper in the melted wax (figure D)for a couple of seconds. Use a frozen ice-treat stick to press the paper into the wax if necessary. Lift the paper out of the wax and lay aside to harden. Repeat. After the cards have hardened, put together packs of them, tie with ribbon, and give as a gift to someone special.
| 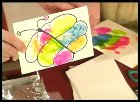
Figure E | | | 
Sandpaper art can either be created dark paper ... | | | 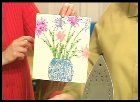
... or light-colored paper. | | Let your child outline the designs if desired (figure E). Sandpaper Art Materials: old crayons
fine-grain sandpaper
white or light-colored construction paper
iron Steps:
- Let your kids draw a picture using crayons on a piece of fine-grain sandpaper. Be sure to tell them to press down hard.
- When complete, place the sandpaper upside down on a sheet of construction paper.
- Apply a warm iron directly to the backside of the sandpaper for 15 to 20 seconds. Remove the iron. Wait 30 seconds and gently remove the sandpaper to reveal the picture on the construction paper in dot form. It should look like a work of art by an Impressionist or Postimpressionist.
Spooky Halloween Treat Cut out small pieces of white paper for ghost notes. Let the kids write messages with a white crayon. Paint black or orange watercolor paint over the paper to reveal the invisible message.
RESOURCES:
Donna Erickson's Fabulous Funstuff for Families
by Donna Erickson
Augusburg Fortress Publishers, 2001
| 
 Important Announcement

 First
First 