This tutorial is my own creation, any similarity is purely coincidental! This tutorial was written September 4th, 2004. Please feel free to LINK to this tutorial and/or print it out for your personal use, but please do not copy it in anyway to put online, pass out or re-write without my permission ©§tud This tutorial was written in PSP7 and will be tested in PSP8 Supplies
PSP
Font, 2 gradient and tube... unzip the tubes to your tube folder, font to your font folder and gradients to your gradient folder or use your own gradients, tube and font and colorize with those colors instead!
Eye Candy 4000 but can be done with 3.1 Zip of tube and font and gradients
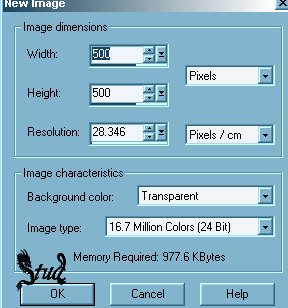
1. Open a new, blank image 500 x 500 pixels transparent image (16 million color depth). File > New > set size & set color depth, then open and copy each of the tubes, closing the originals and minimize the copies for later.
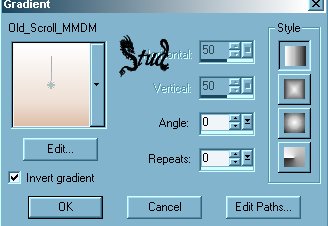
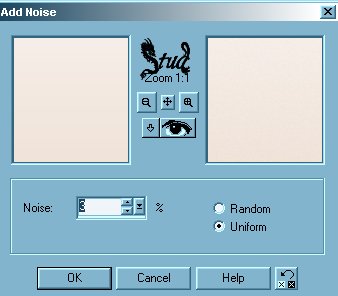
2. Click on the paint pot and then select your gradient, invert the gradient so the darker color as at the bottom then click into your blank image to fill it... a small tip on gradients... if you've used a gradient that looks like there's lines running along it even though it's meant to be smooth... you can go effects > noise > add noise > and select 3% with uniform checked... this will smooth out the lines (if dots appear on the preview, check you've got uniform checked)... the old scroll gradient won't need to be smoothed
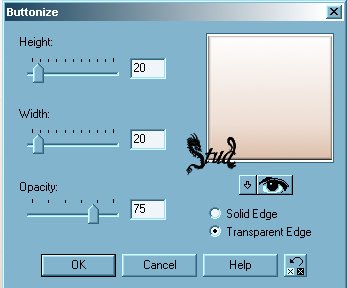
3. Right click on the darker end of the filled image to select that color as a background and then click effects > 3D effects > buttonize and use the settings height and width ~ 20 and opacity ~ 75 with transparent edge checked. Then reduce the opacity by 41 on the layer palette
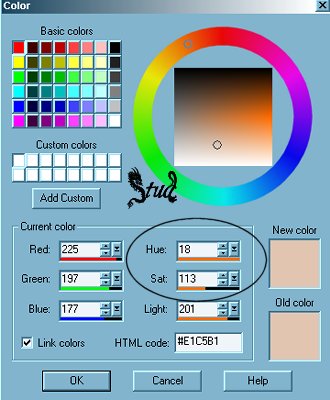
4. Maximize your tube of the woman, copy and paste as new layer onto your colored background. Move it up a little and then click on your background color at the top of your colors palette and make a note of the hue and Saturation numbers
5. Click on Colors > Colorize and then insert the hue and saturation numbers you noted down and watch your tube change color! Reduce the opacity on your layer palette to 70
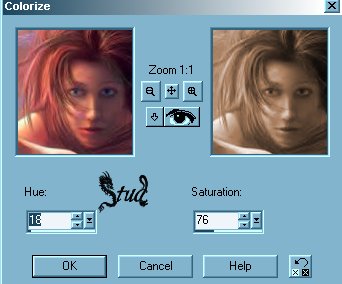
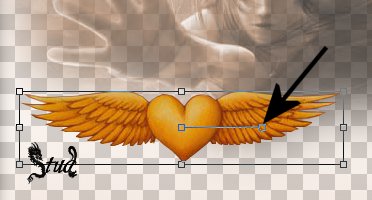
6. Now maximize the other tube, copy and paste as new layer with your faded lady, use the mover tool to mover it to below her hand, now click on the deformation tool at the top of the tool bar so that node squares appear around the edge and 2 in the center. Left click and hold down the mouse button on the right hand square in the center of the tube and rotate the heart so the right wing moves up towards her thumb. When you're happy with the position, click apply on the box by your layer palette or double left click on the center node square to get rid of them
7. Again, click on colors > colorize and use the same settings, then reduce the opacity to 70.
Page 2
 Important Announcement