| A Glossary of of PSP Terms for Beginners
The world of PSP is fun and exciting, but can also be a little bit intimidating when you first start out. In an effort to make it seem a little less intimidating and a lot more familiar, we have come up with a list of commonly used terms when discussing and using PSP. When applicable, pictures will be added in an effort to make it even a little bit easier to understand.
The Basics Filter (aka Plug in): Filters, or plug ins, are basically programs within your PSP program. They take the image you have and twist it, recolor it, reshape it, do pretty much anything you can imagine and more to that image. PSP has some default plug ins, found under the "Effects" tab. They can be used to achieve many drastically different effects from one basic image. When adding filters to your PSP program, save them into your Plug Ins folder, and restart PSP so that you can use them.
jpg (jpeg) or gif: These two terms simply refer to the format you have saved your finished sig in. GIF (graphic interchange format) files are the type of file that Animation shop makes. GIF files can have transparent or colored backgrounds, whichever you choose. JPG files, while a little smaller in size, do not allow for animation, and always have a background. If you save an image with a transparent background as a .jpg file, the background will save as white.
Layer and Layer Palette: Layers are a basic unit of PSP. Think of layers as sheets of glass. If the top layer is light enough, you will be able to see through to what lies in the layers below it. Using the Layer Palette, you can change the order of the layers and the layer opacity. (If your layer palette is not visible, not to worry, simply hit L in PSP 7, or F8 in PSP 8.
Layer Opacity: Basically this is how you select how much you want your layer to show. If the opacity is at 100%, the image will show through with the colors at their full strength. At 0%, the layer is invisible.
Mask: When you look at a mask, you see a pretty screwed up shape that you'd probably never want to use by itself in a signature. A lot of people ignore masks for that very reason. Knowing how to interpret mask samples goes a long way in figuring out their usefulness. When you apply a mask over a layer in your image, the dark portions of the mask make that part of the layer transparent, so the layer underneath shows through. The image below is a good example of a mask. I took a layer and flood filled it with black, then used a mask on it. I added a bottom layer of white, simply to show the contrast. When looking at the mask, the design you see in black here was shown in white.

Pixel: A pixel is the basic unit of any graphic, no matter what format it is saved in. If you zoom in on an image, way in, you will see that it is made up of a series of what look like squares. These are the pixels.
Tube: A tube is simply a graphic or image on a transparent background, saved in PSP format. They are much easier to use than other types of images because there is no background image to try to work around.
Tut: Simply the shortened version of the word tutorial. A 'how to' written on the way to achieve a certain effect or look to a sig. They often are written to show the reader how to use a certain filter, or combination of filters. Tuts are generally written assuming you have a good working knowledge of PSP.
Getting to Know Your Tool Palette
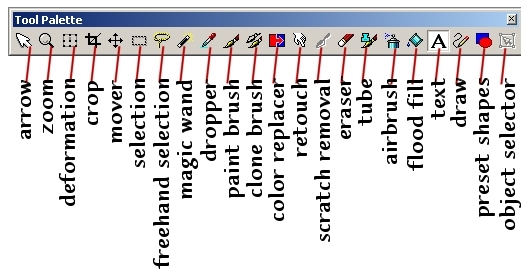
The toolbar on PSP contains a lot of different buttons, which can be a bit confusing. Here is an explanation of what each button on the tool palette does. Below is an example of the tool palette in PSP, with the names of each tool listed.

Arrow tool: Your basic everyday mouse cursor. I tend to keep mine on this when I don't want to change the image at that exact moment.
Zoom tool: Allows you to click the area of the image you want to zoom in on.
Deformation tool: This tool allows you to stretch or shrink your image to the left, to the right, up or down.
Crop tool: By using the crop tool, you can cut out just one area of the image that you want to keep. Always selects areas in a rectangular or square shape.
Mover tool: With the mover tool, you can grab an image and move it's position within the layer.
Selection tool: The selection tool allows you to select a certain area of the image in a set shape (I.e. circle, square etc.). Once an area is selected, you can delete or modify the image that is within that area without affecting the rest of the image.
Freehand Selection tool: Very similar to the selection tool, however, instead of using preset shapes you draw the selection as whatever shape you would like.
Magic Wand: Used to select areas of a graphic based on their similarity to the area you click. Usually, it is done by the color, you can use the options palette to change the settings.
Dropper: The dropper can be used to highlight a certain color in an image and get the information about that color (it's red, green and blue color values) so that you can then use that color in another part of the sig or in your text if you so desire.
Paint Brush: Just what it sounds like. Use this tool to paint colors onto your image. You can select the width, shape and opacity of the brush you use.
Clone Brush: This tool can be used to select certain parts of the image and copy them to another part of the same image or to a different image entirely.
Color Replacer: The color replacement tool can be used to replace one color with another, either in a selected part of the image, or the entire image.
Retouch: Just as if you were retouching a photograph, you can use this tool to lighten or darken certain areas of the image, or to soften the edges of the image.
Scratch Remover: This tool is mainly for use with photographs to remove scratches from the images.
Eraser: As we are all human, we all need an eraser at some point in time. Use this tool to remove mistakes, stray pixels or imperfections. You can alter the size as well as shape of the eraser brush.
Picture Tube: The picture tube tool allows you to basically paint with the tubes you have stored. A single click places the image as part of a layer, while holding the mouse button down and moving the mouse will produce a trail of the image you have selected. A very useful tool when watermarking your sigs.
Airbrush: Something like the paint brush tool, with the airbrush tool you can simulate the effects of a spray paint can. The size, shape and opacity of the airbrush can be altered.
Flood Fill: The paint can, or flood fill tool, is used to fill large areas easily. With a single click, you can flood a selected area with a single color, gradient or pattern.
Text: Used to place text onto the graphic. For the font junkies like myself, this is where a lot of the fun comes in.
Draw: Used to draw solid lines, shapes or curves onto your image.
Preset shapes: Used to draw shapes onto you image. PSP has a decent selection of shapes, from simple squares to more complex three-dimensional shapes.
Object Selector: Similar to the deformation tool, the object selector is used to alter vector images.
| | ©cjcreations2005 |
|
 Free Forum Hosting