Rated: Intermediate.
*Supplies Needed*
PSP7 or PSP8
*EyeCandy3
(*Use Google search.)
*I added a new folder inside of the PSP>PlugIns Folder,
named it Toadies, and extracted all the files from the Toadies zip, to that folder.*
(Adding the contents to another filter folder may cause the effects to be different.)
C:\Program Files\Jasc Software Inc\Paint Shop Pro 7\Plugins\Toadies *I used the font ~ Marnie Regular
*This is a pay font.*
*You may substitute with a fancy font of you choice.*
*Zip File*
*Open the tubes in PSP.
~~~~
Ready? Let's get started!
While on the Large White Heart layer, hold down the Shift Key, and hit the letter D (key)
(to duplicate.)
Close out the original.
Leave the heart exactly where it is on the layer.
Go to Effects>PlugIns>EyeCandy3.1>Chrome.
Apply the following settings:
Select>Puffy Blue*
*Softness: 14
*Variation: 100
*Contrast: 1
*Bands: 1
*Light Direction: 248
*Base Color: #800000
*Highlight Color: #EF3131
Ok.
*Using PSP7*
Go to Effects>PlugIns>Toadies>
Picasso's Another Word and
Apply these settings.
*If using PSP8*
Apply the same settings, and go to Effects>Sharpness>Sharpen.
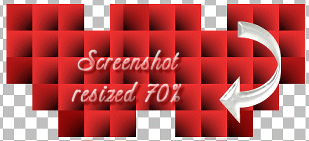
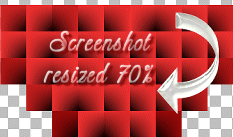
Duplicate and mirror.
Move the duplicated image over so that the two
images are now together and overlapping, as shown below.
Go to Layers>Merge>Merge Visible.
Now move the image to the center of the layer.
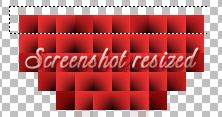
*I used the rectangle selection tool, to surround and
delete a selected portion of the merged image, (as shown
below.) *Any stray pixels can be removed by using the eraser.
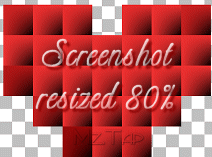
Duplicate, and go to Image>Flip.
Move the duplicated image so that it is on top
and slightly overlapping, as shown below:
Go to Layers>Merge>Merge Visible.
(PSP7) Now, go to Colors>Adjust>Brightness/Contrast:
Brightness: 6
Contrast: 8
Ok.
(PSP8) Adjust>Brightness and contrast>Brightness and Contrast.
Tutorials© by Mz. Tap

 Important Announcement