| Image Mapping in PSP for MSN groups. So, you want to learn the other side of PSP and learn how to "Image Map"!!! The very first thing you want to do is get an HTML editor. I use First Page 2000 , I say get an editor because you will want to check and see that there are no mistakes and all the links work correctly BEFORE you upload it to your community. This is a free program although Eversoft no longer provides support for it. And it also allows you to put some really nice effects to your page! Ok now on to the good stuff!! Create your image that you want to map in PSP and merge visible, Then save and set aside for a few moments. Now comes the hardest part.. ready??? You need to have all the pictures or documents already upload and have the link addy's already stored on your computer so you wont be flipping back and forth and searching for the addresses. Ok that being done.. now open up your image in PSP again and make sure it is the size that you want it... I have found that 600x600 is a good size now go to File...Export....Image Map.... Here is the first thing you will see...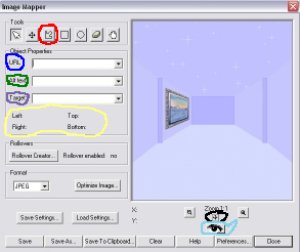 and here is what the colors mean... Red = point to point which is the best for precise lines around your links. Blue = where you will place your link addresses. Green = Alternate Text which is what you will enter if you want a mouseover ie: when they pass thier mouse over the link, it will tell them what the link is. Purple = Target.. I always use Blank which means the link will open in a new window. Yellow = the coordinates that will that tells the map where the link is. Black = crosshairs which you will get you to where you want to map. Aqua = an eye which will allow you to see your map in a browser at any time. Ok now you know what most of the stuff means so lets do a map! Click on the crosshairs and a box will pop up, put that box on the first image you want to map. dont worry that it is not precise.. it just gets you in the general area.Now pick your polygon (circled in red) and use the point to point to go all the way around the first image, the lines around your image will be green which means it is active. Now after doing that copy the first address corrasponding with that outlined image and paste it in the URL box (Control + V) now enter your alt text, and your target. Do this same sequence for each item you want to map. You will notice that as you map different items that the box around them will turn red, that just means it has already been mapped. Now you will want to save your settings so that if you need to, you can come back and fix whatever is wrong, just name the file and it will save as a JMD file and you wont have to remap, but remember that to reload your settings you must open up the origonal picture in PSP and export back to the image mapper and reload the settings from there. Now you can optimise and save, and lets go to page 2! and here is what the colors mean... Red = point to point which is the best for precise lines around your links. Blue = where you will place your link addresses. Green = Alternate Text which is what you will enter if you want a mouseover ie: when they pass thier mouse over the link, it will tell them what the link is. Purple = Target.. I always use Blank which means the link will open in a new window. Yellow = the coordinates that will that tells the map where the link is. Black = crosshairs which you will get you to where you want to map. Aqua = an eye which will allow you to see your map in a browser at any time. Ok now you know what most of the stuff means so lets do a map! Click on the crosshairs and a box will pop up, put that box on the first image you want to map. dont worry that it is not precise.. it just gets you in the general area.Now pick your polygon (circled in red) and use the point to point to go all the way around the first image, the lines around your image will be green which means it is active. Now after doing that copy the first address corrasponding with that outlined image and paste it in the URL box (Control + V) now enter your alt text, and your target. Do this same sequence for each item you want to map. You will notice that as you map different items that the box around them will turn red, that just means it has already been mapped. Now you will want to save your settings so that if you need to, you can come back and fix whatever is wrong, just name the file and it will save as a JMD file and you wont have to remap, but remember that to reload your settings you must open up the origonal picture in PSP and export back to the image mapper and reload the settings from there. Now you can optimise and save, and lets go to page 2! NEXT |

 Important Announcement
