MSN Home  |  My MSN  |  Hotmail
Sign in to Windows Live ID Web Search:   
go to MSNGroups 
Free Forum Hosting
 
Important Announcement Important Announcement
The MSN Groups service will close in February 2009. You can move your group to Multiply, MSN’s partner for online groups. Learn More
Dreams and Visions[email protected] 
  
What's New
  
  â™¥MOVE 2 AIMOO�?/A>  
  How 2's n Aimoo Grp  
  Aimoo Insert Images  
  General  
  â™¥INDEX 2 BOARDS  
  â™¥DnV Founder  
  â™¥Managment  
  â™¥~~♥~~♥~~♥~~�?/A>  
  ï¿½?Bless You All! �?/A>  
  â™¥Code of Ethics  
  â™¥Site Properties  
  â™¥~~♥~~♥~~♥~~�?/A>  
  â™¥Member Quilt  
  Past Pages  
  â™¥Honoring Fathers�?/A>  
  â™¥March Greetings!�?/A>  
  â™¥WELCOME 2007!�?/A>  
  March's Secrets!  
  ï¿½?Fall Welcome  
  Fall Welcome  
  â™¥~~~~~~~�?/A>  
  3RD PLACE WINNERS  
  PSP Class Rm  
  â™¥Class Protocol  
  Joining ClassChatRm  
  â™¥UR MAIL  
  Bkgrnd sets 1  
  Bkgrnd sets 2  
  â™¥SIS♥BRO. Sites  
  â™¥~~Moods~~�?/A>  
  â™¥MSN How 2's  
  â™¥~~~~~~~�?/A>  
  â™¥Sharing Photos  
  Sharing Photos  
  â™¥DnV Birthdays  
  â—‹â™ Gamesâ™ â—‹  
  â™¥Gamezzzz�?/A>  
  Â±Poems We Write  
  â™¥~~~~~~~�?/A>  
  Beginners Lessons  
  â™¥PSP GUIDANCE 1  
  â™¥PSP GUIDANCE 2  
  â™¥More Guidance  
  ï¿½? Tutorial Libraries�?/A>  
  â™¥MoonRunners Tuts  
  â™¥MOONS GET STARTED TUTS  
  â™¥Moon's PSP 7 Tips  
  â™¥MOONS TUTS 3  
  â™¥~~~~~~~�?/A>  
  SnaggableWebSets  
  â™¥DnV Gift Box  
  DnV GiftBox post  
  â™¥Tag Request  
  â™¥Tag Bio Info.  
  Tag Questionaire  
  â™¥~~~~~~~�?/A>  
  â™¥CHALLENGES  
  Â©Tube Resource Infor�?/A>  
  â™¥COPYRIGHT INFO�?/A>  
  â™¥Links 2 Share�?/A>  
  â™¥Contest pg 1  
  â™¥Contest pg 2  
  ï¿½?�?Music Hall  
  Our Music Place  
  â™¥Memories  
  Our Memories  
  â™¥~~~~~~~�?/A>  
  ~~Past Pages Below:  
  â™¥Valentine Welcome�?/A>  
  â™£St. Pattys Month! �?/A>  
  â™¥June Welcome�?/A>  
  â™¥July Welcome�?/A>  
  Patriotic Info  
  â™¥~~~~~~~�?/A>  
  â™¥Ãƒba's PSP Misc.  
  â™¥FriendsAreBlessings  
  â™¥~~~~~~~�?/A>  
  â™¥World Map R U Listed?  
  â™¥~~~~~~~�?/A>  
  â™¥AlbumsBelow�?/A>  
  Snags & Albums  
  Snags Xmas by Members  
  SnagsPSP Art content  
  Snags by Members  
  Snags by SnowFires  
  SnagTubes by Di  
  Snags Welcomes by U  
  Snags Fall By U  
  Snags by DC  
  Snagged Snags fr DC  
  Snags Politeness 4 All  
  Snags of Prayers, ETC  
  Snags Spiritual 4 U  
  Snags by everyone  
  SnagAnimations 4 everyone to use  
  Snag Guy stuff  
  SnagsExpressions & Emotions  
  snags Any County  
  Pictures  
  New Begining  
  Dianes tags  
  Snowfire's stuff  
  Barbs Album  
  Mayflowers tags and such  
  MoonRunner 2005 Photos  
  Contest tags  
  Dianes Tags 4 others  
  Awards by the Members 4 the Mem  
  AwardsDnV 4 Mbrs  
  Computers  
  Christmas page  
  Computer Tip Screen Shots  
  Challenge stuff for fun  
  Easter door stuff  
  Holiday Snags by Members 4 use  
  DaBoss  
  DreamAngelDianes  
  Diane'sCreations4DnV  
  Dianes personal tags  
  Diane's tags by Others  
  Di's Art n Poems  
  DuckyJazz  
  Dan Projects NEVER delete  
  Fall door member art tags  
  Graphics by Teacher  
  Gift Box Etc  
  Glory Sigs  
  Kittykat7983  
  Managment tags  
  MemberProud Tags  
  michelle's album  
  Moon newAlbum 1  
  Moon's Family  
  Moon's Private Sigs  
  MR Temp Sig Drop  
  My Play Area  
  Pic of the Year  
  Permissions Banner  
  PSP Tools ETC  
  Albums Below:  
  QuiltBlocks  
  Sharon Sigs - Dolls  
  Stuff  
  TizzylishArtWorks  
  Tutorial Pics  
  Valentines pg  
  Welcome page storage Album  
  â™¥~~~~~~~�?/A>  
    
  DNV Promote Banners  
  Fall Snags  
  â™¥Welcome New Member!�?/A>  
  Save Plz  
  Tut by DianeHefley  
  D TagGifts  
  D Tags  
  2  
  D early psp  
  D's Pg Builders1  
  D beg tut SS  
  Sharons Stuff  
  Graphics ETC  
  D's 1st Siggies 2003  
  D's Tut SS tools Etc  
  Snags Etc #1  
  Snags ETC #2  
  Award tags n tut  
  Emotions  
  WelcomeSnags  
  EtcSnagsBySnowF  
  SnagsETCbyMembers  
  SnagPSPcontent  
  ChristmasSnagsByMembers  
  ETC 1  
  ETC 2  
  ETC 3  
  ETC 4  
  ETCSnags  
  Tags  
  Tags  
  
  
  Tools  
 
For some reason MSN will not let me finish this tut in tut site 3 so I am putting it here for now.


Animation1x.gif picture by Dream_Angel_Diane

Supplies you will need the shapes below but if you have done many of my tuts you probably

already have them.

My gradient mirror by di.PspGradient

You will need this font if you want what I used.CHAMPGNE.TTF

You will need this gradient but you might have it already also so check first. Objecten 02.jsl

You will need this flower if you want what I used. RedFlower.pspimage  

I used this steam picture tube to animate my tag. smoke stem.PspTube

Make sure your auto save is set for saving every 1 minute.

1. Open your flower tube and minimize.

2. Open a new transparent image of 500 by 500 to work on.

You can downsize later on but while working try not to make your tubes to large.

3. Get back in the top color box and the gradient in the bottom box.

Click your preset shape tool and find the cylinder shape and settings as shown below

and drag out the pot shape as seen here.

shape.jpg picture by Dream_Angel_Diane 

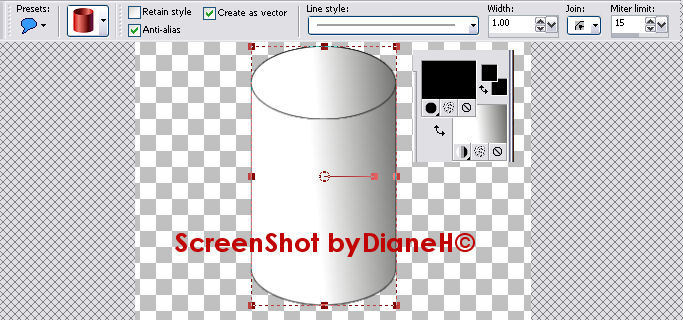
4. Change the vector to a raster layer.

5. Add this inner bevel to the shape. Note do not pay attention to my shape in preview window, just use the inner bevel settings shown.

ib.jpg picture by Dream_Angel_Diane

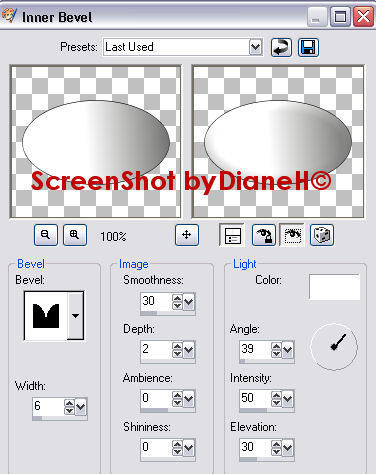
6. Change vector to a raster if it did not do so automatically.

7. Now same steps as before but we will just drag out an oval shape for the pot lid.

So click your preset shape tool again and this time get your ellipse shape.
eclipse.jpg picture by Dream_Angel_Diane

Drag out the oval shape that fits over the coffee pot for a lid. Use your deform tool to adjust the size

and shape just right.

8. Then use the same inner bevel as before.

ib.jpg picture by Dream_Angel_Diane

9. Now we will make the knob for the top of the lid using the same methods as the lid.

Use your same preset oval ellipse and drag out the bottom part of the knob and then inner bevel it same way.

Then drag out the top knob and inner bevel it same way, as shown here.

lid.jpg picture by Dream_Angel_Diane

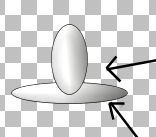
10. Now you can get your eraser and with the top oval shape on the top of layers erase with a small

eraser the bottom as shown below:

erase.jpg picture by Dream_Angel_Diane 

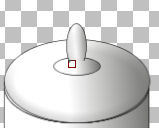
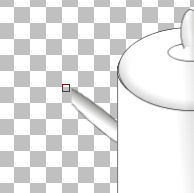
11.Now merge the knob parts to be one layer and then merge the entire knob down to the lid if

all is positioned OK. Then merge the lid to the pot so that is all one layer.

12. Now we will make the spout then the handle. For the spout same method as shown here with inner bevel

added After you are done with the shape.

spout.jpg picture by Dream_Angel_Diane

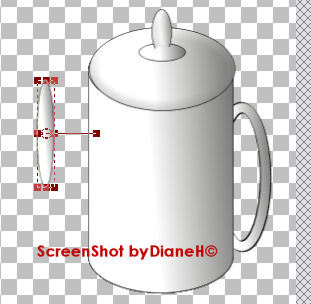
Then turn the spout as shown here

spout2.jpg picture by Dream_Angel_Diane

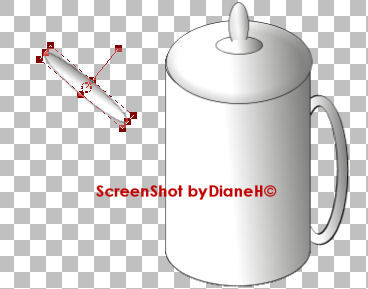
and move it under the pot layer so that it looks real.

Then use your eraser to erase the tip as shown here. I did this at a slant.

erase2.jpg picture by Dream_Angel_Diane

13. Now the handle is made the same way BUT you need to have your pot color in the top box only

and have the bottom box NULLED and set your width for how wide you want your handle to be.

null.jpg null picture by Dream_Angel_Diane
Nulled bottom box.

Drag out the handle as shown here.

handle.jpg picture by Dream_Angel_Diane

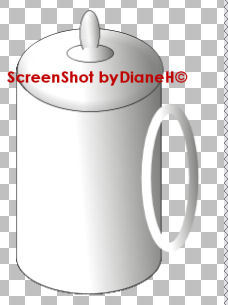
Then give the handle the same inner bevel as we used before and drag this layer under the pot layer

and position as you like. Then give the drop shadows as shown below:

First this drop shadow

closeds2.jpg picture by Dream_Angel_Diane

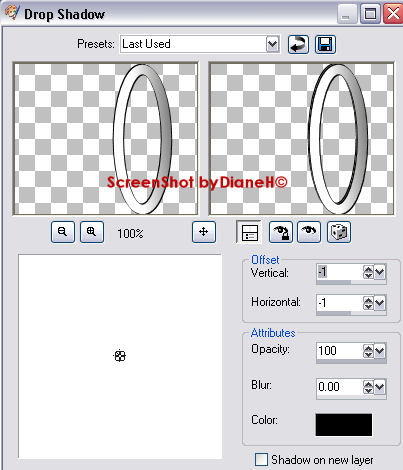
Then this drop shadow:

closeds1.jpg picture by Dream_Angel_Diane

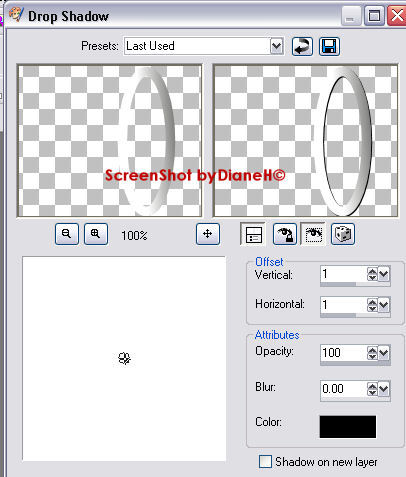
14. Now when your handle is as you want it then merge it down to the pot so that the pot is all one layer now.

15. Now bring your flower tube up and copy paste it as a new layer with your pot and move it and adjust

as you like it to the front of the pot and then merge it down to the pot.

potshadow.jpg picture by Dream_Angel_Diane

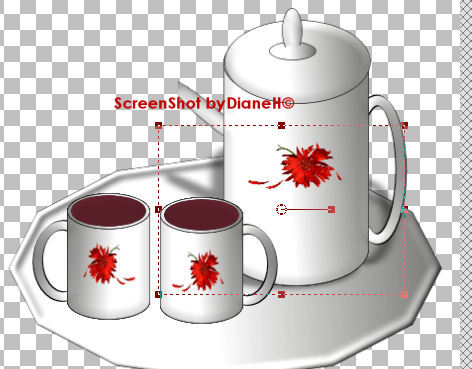
16. Now you can make a coffee cup same method as making the pot but you do not need a LID!!

cup.jpg image by Dream_Angel_Diane coffeefill.jpg image by Dream_Angel_Dianecup1shadow.jpg image by Dream_Angel_Diane

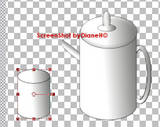
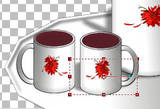
17. Then add an oval shape of brown to the top of the coffee cup and arrange it just right then merge it down

to the coffee cup. Add a flower also.

18. Duplicate the coffee cup x 1 and move it over or mirror it which every you like.

Arrange pot and 2 cups as you like them.

19. Now we are making a tray for them to sit on.

Make a blank layer and drag to the bottom of the layers and get the colors you want the tray to be in both color

boxes and drag out the tray shape as shown here.

d.jpg picture by Dream_Angel_Diane

20. Now you can use the inner bevel:

traybevel.jpg picture by Dream_Angel_Diane

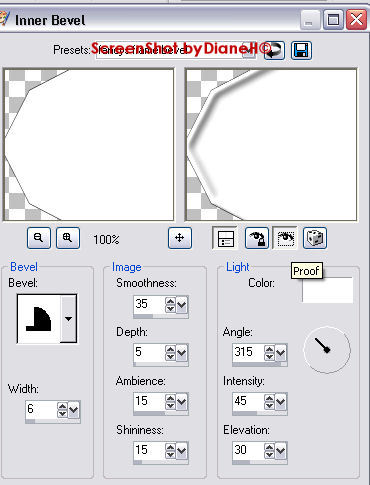
21. Now arrange your pot and cups on the tray as you like them.

You can now use save as and save in a folder of your own made tubes if you wish to save them for

another time to use.

Now to make a tag with them.

Use any background you desire but some of the steps I used are below:

I used this same drop shadow shown here on all my layers of cups and pot and also my font.

fontshadow.jpg picture by Dream_Angel_Diane

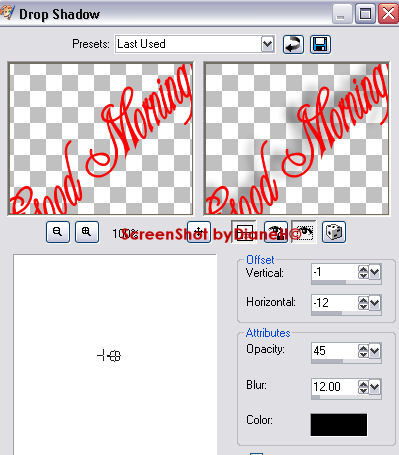
But I did use the deform tool on the pot and cups and put my shadow on a separate layer so that I could

use the deform tool to move the shadow by squeezing it down to look more real.

cup2shadow.jpg picture by Dream_Angel_Diane

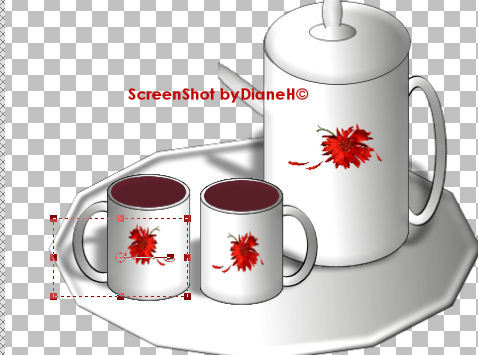
When I had my entire tag done I merged it flat and then added on layer for my smoke stem tube.

I placed it over the pot spout and cups all on one layer the size I liked best.

Then I took my copy merged tag to Animation shop and pasted as a new animation frame 1.

I went back to psp and used my warp tool to just pull up a bit on each of the 3 smoke stem images.

Then used copy merge and took to AS as frame 2.

I set my display time slow to 96.

Here are a few pot and cup examples to let you see how many shapes and colors you can

make by just trying some different things and using different shapes and your warp tool for reshaping

another shape.

xxxxxxxx.jpg picture by Dream_Angel_Diane 

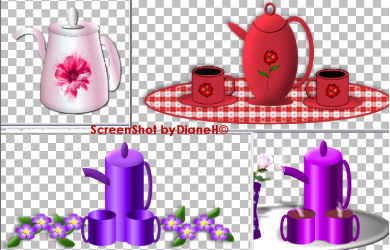
I hope you have enjoyed this simple tut on making your own cup, pot & tray tubes.

Thanks for trying my tut!

If you have any questions or comments please email me at [email protected]