| PSP BASIC GUIDE TUTORIAL 2004 LEARN PRESET SHAPES TUTORIAL INTRODUCTION TO PRESET SHAPES AND EXPLANATION OF HOW TO USE THEM THIS TUTORIAL IS THE ORIGINAL GRAPHICS AND CONFIGURATIONS OF ANDREA P. K. ANY SIMILARITY TO ANOTHER TUT IS COINCIDENTAL AS THIS TOPIC IS SO BASIC AND THEREFORE COVERED BY EVERYONE WHO TEACHES GRAPHIC ARTS USING JASC PAINTSHOP PRO VERSION 8.1 OR 8.10 OR 7 VERSIONS 
^ My Terms of Use ^ 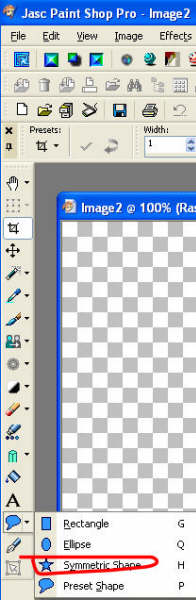

10:58 AM 7/17/2004
© 2004 How to Use Preset Shapes
The Preset Shapes tool has several options that can be used for quick drawing.
The first step is to select the properties for the shape to be drawn and then
to draw the shape. If it doesn't come out right for u and the shape was drawn as
a vector object then the properties can be modified. 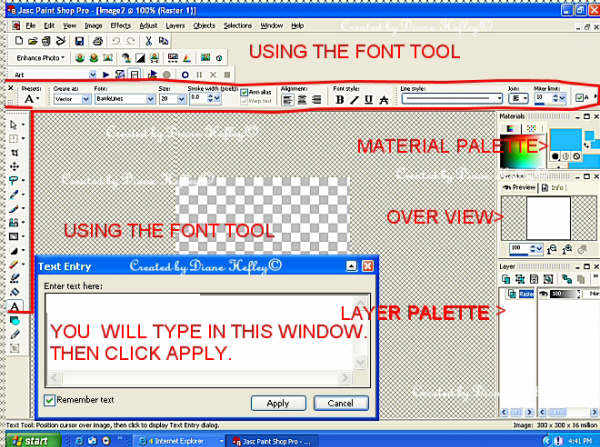
Basic shapes that will be drawn options include:
circle, ellipse, square, rectangle, rounded square and rectangle, triangle,
stars and arrows. Style indicates the coloring of the shape:
Stroke, Fill or Stroke and Fill. Line Width This will set the width of the stroke if u choose that option.
Width can be from 1 to 100. Anti-alias is a standard option - this gives a smoother edge to curves and slanted
lines. Antialias only works for greyscale and 24 bit images. 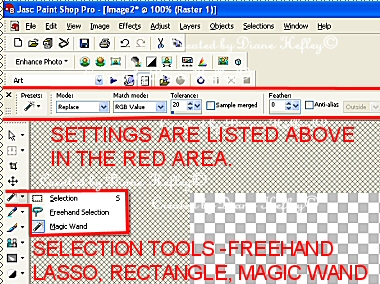
Uncheck Retain Shape so ur shape is filled with ur color, pattern or gradient of choice 
Create as Vector must be selected in order to create vector shapes. 
The vector box looks like this. 
See the tiny nodes at the corners and center of each side of ur shape.
The nodes make it possible to stretch ur shape out.

Use ur mouse to tug and pull on them and make it the height and width or slant
that u want. Tip From Apk: Remember U do not need to delete to start over or repair an effect u dont like. Just go to Edit > UNDO -  until u get back to where u like it and then rebuild it. until u get back to where u like it and then rebuild it. In the center there is another node with a circular arrow - hover to see it
clearer. Use that center node to turn and make it interesting. If u press down the control key on ur keyboard at the same time u click on one
of the corner nodes... 
Then u can make angled shapes. See how I altered my X shape?
This is how to make slanted 3d perspective text and shapes.
Looking at the Layer Palette 
See that this preset layer is a Vector Layer
While it remains that way - u can still reshape it as u like When ur shape or
text is angled like u want. Tip From Apk: Click the white arrow tool  on top of ur tool bar on the left. on top of ur tool bar on the left.
This will disengage ur preset shapes tool for u.
Highlight the layer on the layer palette itself
Right click on the vector layer and a new menu of options open 
Choose Convert Raster to Vector Now U can work on that Preset Shape Layer. Add text. Add a Tube 
Add effects like Inner Bevel or Drop Shadow. Delete any blank layer and Merge Layers Visible before u save ur graphic. 
 Export it as a .gif file as it has a transparent background Export it as a .gif file as it has a transparent background

PSP BeginnerTips TUT 104 Eyedropper Tool Tutorial TUT 1 FROM START 2 TUBES TUT 2 DL NEW FONTS TUT 6 Ez CROP In Ani Shop TUT 3 DL ZIP FILES in psp7 TUT 12 TEXT TIPS PSP7 TUT 11 Ez 3D Background TUT 13 Ez Stuffed Chair Frame TUT 18 Ez Bird House TUT 19 Ez Blond Angel TUT 15 Ez No-Filter Mosaic TUT 27 EZ Rose Glasses p1 TUT 53 Ez Hearts Girl Begin TUT 63 Ez BoyRabbit TUT 65 Ez St Pat's Babe TUT 64 Ez Rabbit Ears TUT 69 EZ Hawaiian Eternity TUT 87 Introducing Masks DNV DOOR 2 All Tuts List | 
 Important Announcement

 First
First 