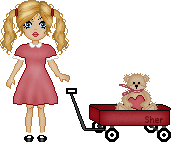
| Valentine Doll with her Wagon 
This tutorial will basically tell you how I shaded everything. I'm hoping to eventually write a tutorial and explain how I made my doll, the wagon and the bear but if you want to use this, this Valentine's, then we'll just go with the shading, lol.
I wrote this using PSPX2 but it should work with earlier versions.
I assume you know how to pixel and have a good working knowledge of psp. Let's start with a new transparent 300x300. I like to have room to work. We'll resize it when we're all done. Next you'll need to open the base.
To do this, save the base to your computer and open it in The Animation Shop, then export it to PSP.  Copy and paste your base to a new layer on your transparent canvass.
I always flood fill the first layer with white so I can see what I'm doing. We'll delete that when we're all done. Do the same thing with the dress outline.
I'm going to give you the dress outline, the dress filled showing how I shaded it, and then my finished dress.
You can skip the shading if you like my dress and just copy and paste it to her body, or you can change the colors or do your own shading.
I'm really not good at shading so I won't feel offended if you want to do it yourself. However, I will explain how I did my shading.
So save which ever dress you want to use to your computer and open like you did for the base.   
You can either paste the outline on your base as a new layer or we can do all the shading first, then paste it on the base.
If you're using my already shaded dress then just paste that as a new layer on top of the base. Ready? For the dress outline, I used #81020b and filled it with #c56068.
I used #c1bab7 for the collar and sleeve ruffle outline and #ededed for the fill.
If you're using my outline, select the inside of the dress and fill it with #c56068.
Select inside the collar and the sleeve ruffles and fill them with #ededed.
Select none.
Add a new layer for the dark shading.
Using the same color as your outline, draw some dark lines all around the edges of your outline and then some dark lines running up the dress and across the chest.
Add a new layer and do the same thing using the color white.
Go back to your dark shaded layer and add a Gaussian blur of 2.
In pspX2 you get to Gaussian blur by clicking Adjust>>Blur>>Gaussian blur.
You may get there going a different route in different versions of PSP.
Click the white highlighted layer and apply the same Gaussian blur.
Now stand on the filled dress layer and select the dress.
Invert the layer then click on the dark shaded layer and hit the delete key. Do the same for the white shaded layer, then deselect.
Now your dress should be shaded.
Turn off all layers except the dress and shaded layers and merge visible.
If you decided to use a different color or do your own shading, use my outline as a guide for your own outline or just make your own clothes, lol.
If you worked on your dress separately, copy and paste it as a new layer and place it on top of the base. Now for the shoes and socks. 
I'm not going to explain how I made these. Just open them in the Animation Shop and export them to PSP.
Then copy and paste them on the base.

Our doll should be done except for her hair. If you didn't feel like doing the first few steps, you can save the doll without her hair and use that instead, or keep scrolling and use my finished doll, hair and all. I figured I'd give you a doll without hair in case you wanted to give her a different look.
I'm not going to explain how I did the hair because that's a whole other tutorial but here's my hair without any ties, my hair with some ties, and my finished doll.
Use which ever you like.
Just save them to your computer and open them as you did for the base, dress, etc.
  
On to the wagon >>
|  Free Forum Hosting