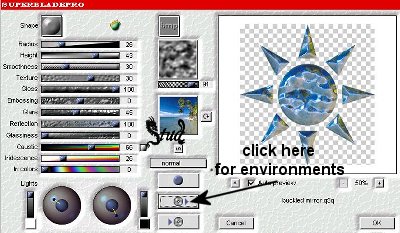
9. Make sure layer 2 is highlighted... click on Effects > Plugins > Toadies and select Blur 'em! with the following settings x ~ 20 and y ~ 11 and click ok
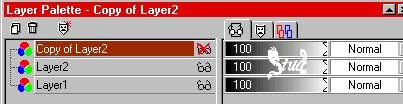
10. Unhide the copy and with that laye highlighted reduce the opacity to 50... then click on layers > layers merge > merge visible
11. Maximize your tube, edit > copy, then go back to your sun and edit > paste as new layer. Click on Image > resize and resize by 80% using bicubic resample (from the drop down menu if you do not already have this selected), make sure the resize all layers box is unchecked and the maintain aspect ratio IS checked
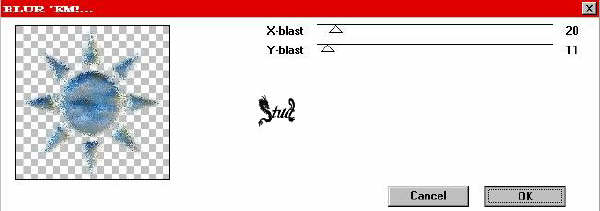
12. Move the tube so they're are standing on the bottom spike (or where ever suits your tag if you are using your own tube)... then click on effects > Plugins > Eye Candy 4000 > shadowlab and use the following settings: CMYK Black drop shadow (from the settings menu), Directions ~ 344, Center offset distance ~ 14.26, Overall opacity ~ 55, Over Blur ~ 5.04, Perspective Blur ~ 15, draw only outside selection checked and color set to #000000
13. Add a new raster layer, open your font and minimize it... use a font size that suits your tag and choose a fill that also suits... i kept a black stroke and white fill to use Super Blade Pro as a fill , with floating and antialias both checked ... if you use Medusa, don't be put off if the squares show up instead of letters because the lettering will show up on the actual tag as you can see on the image ... 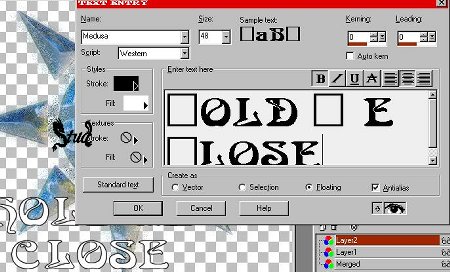
move your text to suit your tag... if you aren't using Super Blade Pro to fill then go to step 15
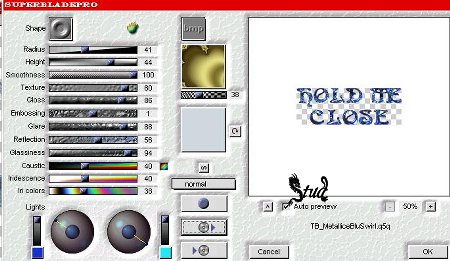
14. If you're using Super Blade Pro, select a preset that you like... I used TB_Metallic BluSwirl with the glare changed to 88
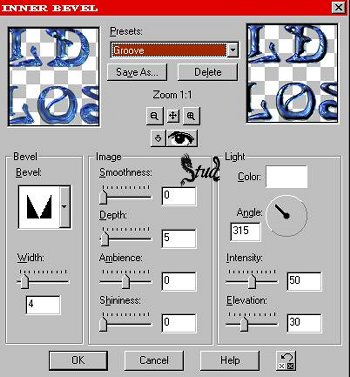
15. Now whether you're using SBP or a normal color/gradiant click on effects > 3D effects > Inner Bevel, select groove from the drop down list and use the default settings making sure the color is set to #FFFFFF , click ok
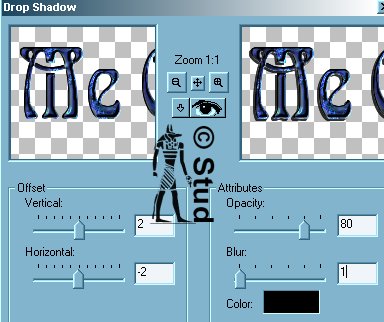
16. Add a drop shadow clicking effects > 3D effects > drop shadow and use the following settings: Vertical ~ 2, horizontal ~ -2, opacity ~80, blur ~ 1 with color set to #000000
click ok... click on selections > select none. Click on your top layer on the layer palette and drag it down so it is beneath layer 1 so your tube is at the top
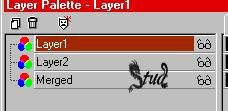
17. Add one new raster layer to put on your watermark and one new raster layer to put the copyright details on (add a new raster layer for each set of writing you add), then click on layers > layers merge > merge visible
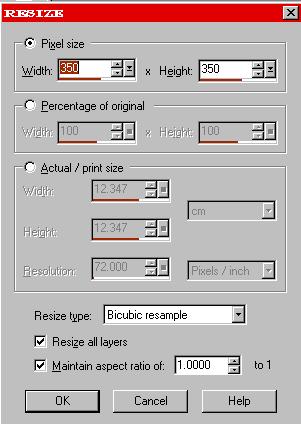
18. Either crop your image if there is space around your tag or resize the whole tag like I have by clicking image > resize... with the following settings: resized by pixel size to 350 at its longest edge, bicubic resample, resize all layers and maintain aspect ratio to 1.0000 both checked
19. Save as a jpeg and you're done!
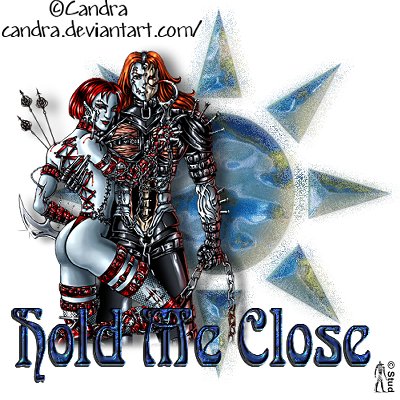
This tag was created in PSP 8 by Gothika 
Hope you enjoyed this tut 
 Important Announcement

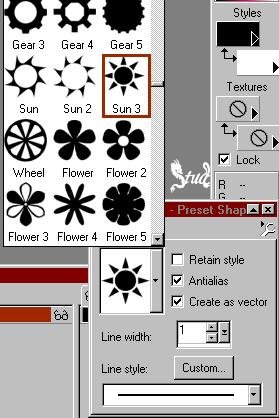
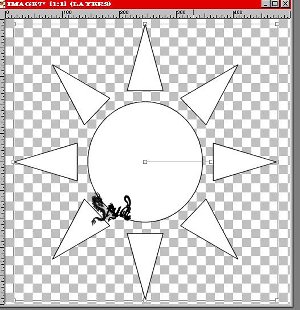
 and select sun3 from you list, with antialias and vector both checked, draw a shape to fill your blank image