This tutorial is my own creation, any similarity is purely coincidental! This tutorial was written August 8th, 2004. Please feel free to LINK to this tutorial and/or print it out for your personal use, but please do not copy it in anyway to put online, pass out or re-write without my permission ©§tud This tutorial was written in PSP7 Supplies a background picture of your own choice or use mine in the zip file a tube of your own choice or mine (I've put in the zip a choice of 2 tubes and backgrounds) a font of your own choice or use mine Eye Candy 4000 (although you can use Eye Candy 3.1, it will look slightly different) Filter Factory D ZIP 1. Open your background picture and make a copy (Ctrl+D) then close your original. Right click on the layer palette and promote to layer
2. Effects > Plugins > Filter Factory D > Shoutin'!
settings: Strip width ~ 27, Padding width ~ 57, Top scale ~ 75, bottom scale ~ 65, top rhythm ~ 93, bottom rhythm ~ 156, transparency ~ 0, mode ~ 176
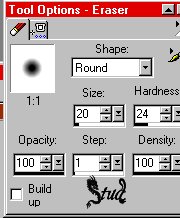
3. If there is an extra piece of stripe at an edge that looks odd, use the eraser tool with the settings below to carefully remove it before continuing.
4. Effects > texture > Fine leather with settings: custom3 on presets, color set to white #FFFFFF, angle 180, blur 30, number of furrows 35, length of furrows 10, transparency ~ 250
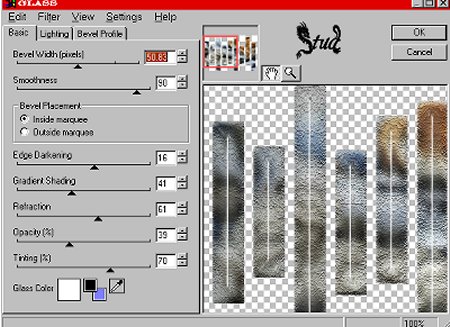
5a. If you're using Eye Candy 3.1 go to step 5b. Effects > Plugins > Eye Candy 4000 > Glass... settings:
Settings list: Rough Cut
Basic: Bevel width ~ 50.83, bevel smoothness ~ 90, bevel placement ~ inside marquee checked, edge darkening ~ 16, gradient shading ~ 41, refraction ~ 61, opacity ~ 39, tinting ~ 70, glass color set to white ~ #FFFFFF
Lighting: Direction 168, inclination 59, hightlight brightness ~ 95, highlight size ~ 98, highlight color white #FFFFFF, ripple thickness ~ 30, ripple width ~ 16.00, random seed ~ 515
Bevel Profile: Grooved with sharp corners UNchecked
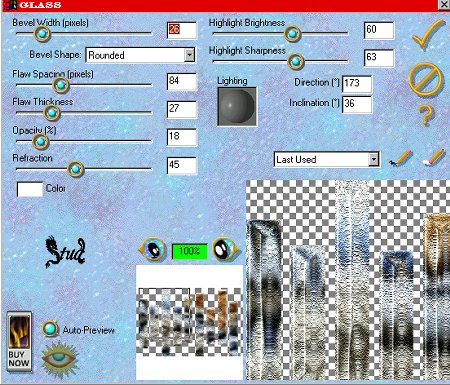
5b. Eye Candy 3.1 settings: bevel width ~ 26, bevel shape ~ round, flaw spacing ~ 84, flaw thickness ~ 27, opacity 18, refraction 45, color set to white #FFFFFF, hightlight brightness ~ 60, hightlight sharpness 63, lighting direction 173, inclination 36
Page 2 Many thanks go to my bevvy of testers ßear, Charlie & Jane 
 Important Announcement