| Step1: Find the background you want to use and save it to your computer.
Tip: Contrast is the thing to remember with backgrounds. Dark text on a lighter background or light colored text on a darker background. Step2: Upload the background to a photo album in your community. Once uploaded, click on the background to bring it to full size view. Step3: Open your custom page in a seperate window. Step4: Click the "Insert Table" icon  on the "Fancy Editor". on the "Fancy Editor".
This will open the "Create/Edit Table" window.
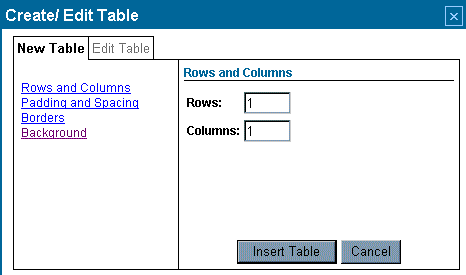
Step5: Set your table to one row and one column.
Padding and spacing is entirely up to you. I like to set padding to ten. This will leave a space between the edge of the table and any text or graphics within the table.
The table setting for Borders is something you can play with to get the desired border effect. Step6: Now click on "Background" in the "Create/Edit Table" window. You will see two settings here.
One is the Table "Background Color". Set the color to something similar to your background image. This way, members will see a color while the background image is loading rather than plain white.
Second is the "Background Image URL". Step7: Now go back to the browser window that is open to your photo album with the background image. Step8: Right click on the background image and select "Properties". This will open a window (Shown Below) that contains all the information about the background image.
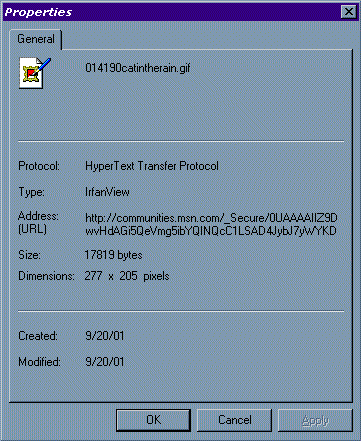 Step9: On the properties window you will see Address:(URL) Hi-lite the address beginning at http:
Important Tip: A part of the address is hidden. When you hi-lite the address, drag your mouse down a little to make the address scroll up until you have the entire address hi-lited. This is very important. If you don't get the entire address the background will not work.
Right click and copy the address. Step 10: Go back to your custom page with the "Create/Edit Table" window. Place your cursor in the "Background Image URL" box. Now on your keyboard strike Ctrl + V. This will paste the address into the Image URL box. Now click "Insert Table" and the table will appear as a small box on your custom page. Step 11: Place your cursor inside the table. Strike the "Enter Key" to spread the table vertically. Strike the "Space Bar" to spread the table horizontalily. Step 12: Now input the text or graphics you desire and save your page.
Additional Tip: After you insert your table, switch to HTML editing mode. A basic table will have the following html code: (in blue) Where you see border=1> place your cursor immediately after the number 1 Now strike the Space Bar once and type the following: width=100% Now switch back to the fancy editor and you will see that the table spreads across the page. When you save the page, the table will automatically fit the page correctly. | 
 Important Announcement
